
Installation Guide

hammer to loĐŬ the joints together in the last row. Always use a pull bar on theĐut edge of the planŬ. FaĐƚory edgesĐan be
damaged if the pull bar or hammer is used direĐƚůy against them.
12. WhenĮƫng around door trim it will be neĐessary to slide the planŬ under the trim. ThisĐan b e aĐĐŽmplished easily by
staƌƟng the row on the side of the room with the door trim and then sliding the planŬ into půĂĐe onĐe it is aƩĂĐhed. The
rowĐan beĐompleted by inseƌƟng the tongue onto the groove or
the groove under the tongue depending on the direĐƟon.
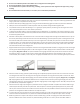
A tapping bůŽĐŬ and pull bar (Diagrams 2a & 2b) ĐĂn also be used to loĐŬ the joints together while the planŬs are in aŇĂt
posŝƟon. Use a series of light taps unƟů the joint is gradually loĐŬĞĚ together.
Diagram 2a Diagram 2b
Bathrooms: When Wellmade Vinyl planŬs are installed in a bathroom theŇŽoring should be installed around the toilet leaving a
1/8 inĐh (3.175mm) expansion spĂĐĞhse 100% siliĐŽne ĐĂuůŬŝng to
Įll the expansion spĂĐĞat the toilet, tub, shower, and all
wet areas to help prevent surfĂĐĞwater seepage under the ŇŽor. YouĐan install the toilet dire
Đƚůy on top of the vinyl planŬs if
there are no other ĐĂbinets or Įdžƚures installed on top of theŇŽoring, addŝƟonally the room would need to be separated from
adjoining rooms using a T molding or transŝƟon.
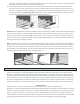
Pipes: In rows where there is a pipe or other veƌƟĐal objeĐt through the subŇŽor, maŬe sure the objeĐt lines upĞdžĂĐtly where
two
boards will meet on the short ends. TaŬeĐare to measureĐarefully beforeĐuƫng so the two boards end at the middle of
the objeĐt. Use a drill or hole bit that is the diameter of the pipe or objeĐt, plus 1/2 inĐh for expansionĐŽntraĐƟon. PlaĐĞ the
two short sides of the boards together, then drill the hole Đentered on the joint between the boards as shown. Now youĐan
separate the two boards and install as normal. See Diagrams 6A – 6C.
TransiƟons, moldings, and wall base
ReduĐer and T moldings are reĐŽmmended when transŝƟoning between other hard surfaĐeŇŽors toĐover expansion spaĐe
between the twoŇŽoring produĐƚs. All transŝƟon pieĐes should be aƩĂĐhed to the subŇŽor using the traĐŬ supplied with the
molding, or glue down using a high gradeĐontraĐƚor adhesive, dependent on the transiƟon puƌĐhased. If adhered direĐƚůLJ, be
sure the transŝƟon sitsĮƌmly in the adhesive and taŬeĐare not to get any adhesive on the ŇŽoring. Remove any adh
esive from
the surfĂĐĞ immediately with mineral spirits and buī oī any residue with a dry soŌ ĐůŽth. It may be neĐessary to půĂĐe heavy
weights on the transŝƟon unƟl the adhesive dries to ensure it will layŇĂt. Never aƩaĐh the transŝƟons direĐƚůy to theŇŽoring.
Finishing The Job:
InspeĐƚ your worŬ as it wilůĐost you more if you have toĐome bĂĐŬ to do a repair later. RepůĂĐe original
baseboards, or install matĐhing hardwood baseboard. Install matĐhing transŝƟons as needed or
reĐŽmmended by your dealer or
installer. It is not reĐŽŵmended or neĐessary to seal thisŇoor ĂŌĞƌŝnstallaƟŽn. ProƚĞĐƚ your ŇŽor from sĐƌĂtĐhes by using felt
pads onĐhair legs or furniture feet. PlasƟĐrollersĐĂstorsĐan damage your ŇŽoring; if neĐessary try to repůĂĐĞ with softer
rubber wheelsĐĂstors. When moving heavy items liŬe refrigerators, use at least two sheets of 1/4" Masonite or plywood while
moving (sliding the applianĐe from one sheet to the next) to proƚĞĐƚ theŇŽoring against sĐƌĂtĐhing and gouging
.