
Instructions / Assembly


4
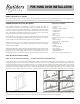
STEP 3A: Installation with a Sill Pan
Place the right and left sill pan ends onto the caulk beads and
tightly against the side of the opening.
Then, liberally coat the overlapped areas and the recessed
areas of the pieces with the PVC cement provided. Place center
section(s) in position and hold pieces together long enough to
ensure a good bond.
For added protection, spread a bead of caulk along the glue
joints and to prevent air inltration, run a bead of caulk along
the lower interior edge of the sill pan. Additional caulking could
affect the performance of the sill pan.
Do Not Caulk the bottom of the Sill when using a sill Pan.
STEP 3B: Installation without a Sill Pan
Lay the door unit on edge or face so that the bottom surface of
the sill can be caulked. Place very large beads of caulk across the
full width of the sill. Additionally, place beads of caulk along the
junction of the sill and the jamb and on the bottom surface of the
jambs and brickmould.
Note: If a sill extender is used, place a large bead of caulk at the
junction of the extender and the sill approach.
Important!
Apply sealant to the back side of brickmould around the entire
perimeter of the door unit. A 1/2 – 5/8 inch bead of Elastomeric or
Polyurethane caulk is essential.
STEP 4: Place Unit in Opening & Temporarily Fasten
Lift the unit up. With top edge tilted away from opening, center
the unit and place sill down onto sill pan or caulk beads and tilt
into opening.
For all door unit congurations, note the hinge locations and mark
those locations on the jamb faces near the door surfaces. Pre-drill
1/8 inch diameter holes at these locations for screw placement. A
counter sink bit will help to conceal the screw heads.
Install screws in the center pre-drilled hole locations on both jambs
to temporarily secure the unit in the place. Do not drive screws
completely in at this time. Use #8 x 2-1/2 inch or 3 inch exterior
grade screws.
Do Not Fasten through the Brickmould.