
Installation Guide


7
WARNING: Drilling, sawing, sanding or machining wood products can expose you to wood dust, a substance know to the state of California to cause cancer.
Avoid inhaling wood dust or use a dust mask or other safeguards for personal protection. For more information, go to www.P65warnings.ca.gov
All 6 sides of the doors must be nished.
For out-swing doors the sides, top and
bottom must be inspected and maintained
as regularly as all other surfaces.
All bare wood surfaces such as the door
frame exposed to weather should be
primed and painted or stained and top
coated within two weeks of exposure for
best performance.
Maintain or replace sealants and nishes as
soon as any deterioration is evident.
For semi-gloss or glossy paint or clear coats,
do this when the surface becomes dull or
rough. More severe climates
and exposures will require more
frequent maintenance.
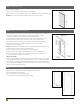
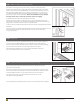
STEP 10: Additional Frame Anchoring
Door with Sidelites
Double Doors
Patio Doors
If sill is prepared for anchoring screws, place appropriate screws
through the sill into the sub oor where needed (primarily on outswing sills).
We recommend that you provide additional frame anchoring as shown here.
Certain states or jurisdictions, notably Florida and the coast of Texas, have specic
installation requirements and may require installation in strict accordance with the
product approval for a specic product. You should always check with the local
authority having jurisdiction for any specic installation requirements that may apply.
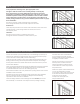
Doors with Sidelites:
Shim above mull post or jambs separating doors and sidelites.
Screw through the frame into the header, adjacent to the shims.
Double Doors:
Place temporary shims above the center of the head frame, where doors meet.
Pre-drill and insert a screw through frame into header, then remove
the temporary shims.
Patio Doors:
Shim above the mull post(s), pre-drill and insert a screw
through the frame into the header, at either side of the post.
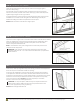
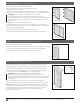
STEP 11: Weatherproof, Finish & Maintain
Provide and maintain a properly installed cap or head ashing to protect top of
surfaces from water intrusion and damage. Tape and properly seal the top ap
of the water resistive barrier (WRB) over the head ashing.
Caulk around entire “weather” side of unit, sealing along the brickmould to the
ashing material or siding and seal all joints between the jambs and moldings.
Seal the joints between the exterior hardware trim and the door face to prevent
air and water inltration.
Place and set galvanized nish nails through the brickmould around the perimeter.
Use exterior grade screws if you are installing a storm door to the brickmould.
Countersink all fasteners and cover with exterior grade putty.
Add insulation material to the cavity between the opening and the unit to reduce
air inltration and heat transfer.
All Builders Choice doors must be nished within several days of the installation
date for continued warranty coverage. For Fiberglass doors the nishing
requirement is within 6-months of installation.
Paint according to Builders Choice Finishing instructions. DO NOT paint or stain
the weatherstrip, it is “friction-t” and easily removed for painting or staining.