
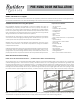
Instructions / Assembly


2
Installation Instructions for Pre-hung Door Systems
These installation instructions are designed to assist door installers who have an
understanding of carpentry principles, and know how to properly and safely use
power tools. The purpose of these instructions is to illustrate how to install a Builders
Choice door system using methods and materials that help eliminate water related
leaks. If the directions are closely followed, the door system will have a long useful life
with good resistance to rain related water intrusion problems.
These methods are “tried and true.” They are used widely by builders and remodelers
who are serious about managing and keeping water outside the home. If you remain
unclear, please seek more professional assistance with the installation.
Different parts of the country have different code requirements, which may not be
covered in these instructions. The installer is responsible for insuring the installation
complies with local codes.
If disturbing existing paint, take proper precautions if lead paint is suspected (commonly
used before 1979). For information regarding lead paint regulations, refer to www.
epa.gov/lead. For products being removed, always ensure that these products are
properly disposed of or recycled in accordance with local jurisdictional requirements.
PRE-HUNG DOOR INSTALLATION
Builder, Subcontractor or Supplier:
Please forward these instructions to the homeowner. The application performance standards for these products may be governed by
the International Residential Code, International Building Code and other state and jurisdictional requirements.
Required Tools & Materials:
• 2 & 6 foot Levels
• Hammer
• Putty Knives (rm & exible)
• Framing Square
• Caulking Gun
• Sturdy Ladder
• Shims
• Tape Measure
• High Quality Elastomeric or Polyurethane
Sealant
• Optional Sill Pan
• Screw Gun/Drill -1/8 inch Drill Bit
• Razor Knife
•#2 & #3 Philips Bit
• Stapler
• Insulating Material
• Eye Protection
• Water Resistive Barrier
• Flashing Material
•#8 x 2-1/2 inch Exterior Grade Screws
Read all instructions before starting.
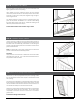
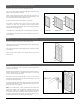
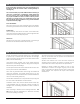
Builders Choice Recommended Best Practices | Use Water Resistive Barrier and Flexible Flashing:
We recommend the use of a Water Resistive Barrier (WRB) applied to the exterior sheathing (OSB or other) and the use of an adhesive
or exible ashing product to seal around the opening. The WRB should be cut in the opening (follow manufacturer’s guidelines) with
the head of the ap taped up, to be sealed later in Step 11. The ashing should be applied in an overlapping manner as shown, always
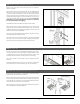
working from the bottom up (follow manufacturer’s guidelines). Use a Sill Pan: We recommend you rst “dry t” the sill pan in the opening,
following the instructions furnished with the sill pan. Place the right and left sill pan ends tight against the sides of the opening. Check
the center section for proper length and if necessary, cut with a hack saw or tin snips. Be sure to allow 2 inches of overlap at the joints.
Note: Use only the PVC cement provided in the sill pan kit to glue the pieces together. The sill pan must be sealed to the sub-oor using
an Elastomeric or Polyurethane sealant, but do not apply sealant to the bottom of the sill when using a sill pan.