
Instructions / Assembly


6
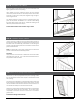
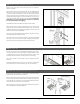
STEP 7: Remove Door Plug & Open Door
Remove the door plug. Open and close door to check for
smooth operation.
With the door open at the top hinge, drill 1/8 inch diameter pilot
holes in the screw hole locations closest to the weatherstrip (if
no screws previously installed). If screws are previously installed,
remove 3/4 inch screws and install #10 x 2-1/2 inch screws. For
middle and bottom hinges, proceed to install one (1) #10 x 2-1/2"
screw in the bottom hole, closest to the weatherstrip. Make sure
all installed screws go through the hinge, into the stud, to anchor
the door frame and prevent sagging.
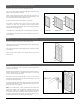
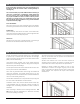
For Sidelite and Patio Units that are hinged at the center:
With the door open, check to determine if the 2-1/2 inch long
hinge screws were pre-installed in the hinges. If not, drill 1/8 inch
diameter pilot holes and install the long hinge screws in the hole
locations closest to the weatherstrip.
Close the door and carefully shim between the jamb and the
opening behind the strike plate area.
Then open the door and drill 1/8 inch dia. pilot holes and install
the #8 X 2-1/2 inch screws (provided) through the strike plate
holes to secure the lock side jamb and provide security.
STEP 8: Adjust Sill
Your door unit may have an adjustable threshold cap. When
properly adjusted, it should be snug and slightly difcult to pull
a dollar bill out from under the door when it is fully closed. The
dollar bill should be able to be removed without tearing.
This check should be performed at each adjustment screw
location.
After adjusting the threshold cap, ensure that the weatherstrip
is ush with the top of the threshold cap. Trim as necessary.
STEP 9: Install Corner Seal Pads (Inswing Units Only)
Apply sealant (Polyurethane or Elastomeric) at the joint where
the threshold cap meets the door jambs.
Remove the self-stick paper from the corner seal pads and apply
to the door jamb, with the bottom lined up evenly with the top of
the threshold cap. When the pad is correctly installed, the tab is
on top and the narrow part is on the bottom.
The bottom of the pad is the same width of the threshold cap to
help with alignment during installation.