
Instructions / Assembly


9
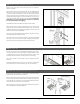
STEP 10: Additional Frame Anchoring
If sill is prepared for anchoring screws, place appropriate screws
through the sill into the sub oor where needed (primarily on
outswing sills).
We recommend that you provide additional frame anchoring as
shown here. Certain states or jurisdictions, notably Florida and
the coast of Texas, have specic installation requirements and
may require installation in strict accordance with the product
approval for a specic product. You should always check with
the local authority having jurisdiction for any specic installation
requirements that may apply.
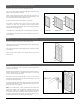
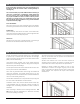
Doors with Sidelites:
Shim above mull post or jambs separating doors and sidelites.
Screw through the frame into the header, adjacent to the shims.
Double Doors:
Place temporary shims above the center of the head frame,
where doors meet. Pre-drill and insert a screw through frame into
header, then remove the temporary shims.
Patio Doors:
Shim above the mull post(s), pre-drill and insert a screw through
the frame into the header, at either side of the post.
STEP 11: Weatherproof, Finish & Maintain
Provide and maintain a properly installed cap or head ashing
to protect top of surfaces from water intrusion and damage.
Tape and properly seal the top ap of the water resistive barrier
(WRB) over the head ashing.
Caulk around entire “weather” side of unit, sealing along the
brickmould to the ashing material or siding and seal all joints
between the jambs and moldings.
Seal the joints between the exterior hardware trim and the door
face to prevent air and water inltration.
Place and set galvanized nish nails through the brickmould
around the perimeter. Use exterior grade screws if you are
installing a storm door to the brickmould. Countersink all fasteners
and cover with exterior grade putty.
Add insulation material to the cavity between the opening and
the unit to reduce air inltration and heat transfer.
Door with Sidelites
Double Doors
Patio Doors