
Instructions / Assembly


10
WARNING: Cancer and
Reproductive Harm
www.P65warnings.ca.gov
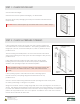
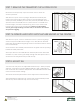
STEP 11: WEATHERPROOFING
Provide and maintain a properly installed cap or head ashing to
protect top of surfaces from water intrusion and damage. Tape and
properly seal the top ap of the water resistive barrier (WRB) over the
head ashing.
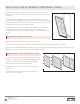
Caulk around entire “weather” side of unit, sealing along the
brickmould to the ashing material or siding and seal all joints between
the jambs and moldings.
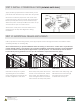
Seal the joints between the exterior hardware trim and the door face
to prevent air and water inltration.
Place and set galvanized nish nails through the brickmould around
the perimeter. Use exterior grade screws if you are installing a storm
door to the brickmould. Countersink all fasteners and cover with exterior grade putty.
Add insulation material to the cavity between the opening and the unit to reduce air inltration and heat
transfer.
All Builders Choice wood doors must be nished within several days of the installation date for continued
warranty coverage. Paint according to Builders Choice Finishing instructions.
DO NOT paint or stain the weatherstrip, it is “friction-t” and easily removed for painting or staining.
All six sides of the door must be properly sealed including all edges of any cut openings (speak easy, mail
slot, pet door, vent, peep site, etc.) for warranty to apply. For out-swing doors the sides, top and bottom
must be inspected and maintained as regularly as all other surfaces.
All bare wood surfaces such as the door frame exposed to weather should be primed and painted, or
stained and top coated within two weeks of exposure for best performance.
Maintain or replace sealants and nishes as soon as any deterioration is evident. For semi-gloss or glossy
paint or clear coats, do this when the surface becomes dull or rough. More severe climates and exposures
will require more frequent maintenance.