
Instructions / Assembly


3
WARNING: Cancer and
Reproductive Harm
www.P65warnings.ca.gov
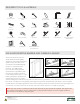
REQUIRED TOOLS & MATERIALS
Insulating MaterialWater Resistive
Barrier
Shims Razor KnifeSill Pan
(Optional)
Stapler
Flashing Material Caulking Gun Sealant (Elastomeric
or Polyurethane)
Tape Measure 1/8" Drill BitScrew Gun/Drill #3 Phillips Bit#2 Phillips Bit #8 x 2-1/2" Exterior
Grade Screws
1/8" #2
#3 #8
2-Foot & 6-Foot
Levels
Hammer Putty Knives
(rm & exible)
Framing Square Sturdy LadderEye Protection
90°
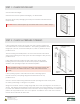
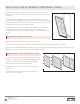
USE WATER RESISTIVE BARRIER AND FLEXIBLE FLASHING:
We recommend the use of a
Water Resistive Barrier (WRB)
applied to the exterior sheathing
(OSB or other) and the use of
an adhesive or exible ashing
product to seal around the
opening. The WRB should
be cut in the opening (follow
manufacturer’s guidelines) with
the head of the ap taped up,
to be sealed later in Step 11. The
ashing should be applied in an
overlapping manner as shown,
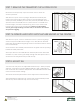
always working from the bottom up (follow manufacturer’s guidelines). Use a sill pan: We recommend you
rst “dry t” the sill pan in the opening, following the instructions furnished with the sill pan. Place the right
and left sill pan ends tight against the sides of the opening. Check the center section for proper length and
if necessary, cut with a hack saw or tin snips. Be sure to allow 2 inches of overlap at the joints.
Note: Use only the PVC cement provided in the sill pan kit to glue the pieces together. The sill pan must
be sealed to the suboor using an elastomeric or polyurethane sealant, but do not apply sealant to
the bottom of the sill when using a sill pan.
1 2
3 4