
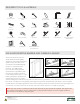
Instructions / Assembly


4
WARNING: Cancer and
Reproductive Harm
www.P65warnings.ca.gov
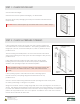
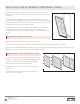
Is the opening square? Check all corners with a framing square.
Double check by comparing diagonal measurements. Fix any
problems now.
Check to be sure the framing walls around the opening are in the same plane.
Do this by performing a “string test” for plumb.
String Test for Plumb: Attach a string diagonally across the opening from the outside, as
shown. The string(s) should gently touch in the center, if not the opening is “out of plumb”
by twice that distance and needs to be corrected. Flip the string over itself to check both
planes. Fix any problems now. An “out of plumb” condition is one of the most common
reasons door units leak air and water.
STEP 1: CHECK DOOR UNIT
Check width and height.
Measure size of frame (width and height), not brickmould.
Remove cleats and packaging, but keep door fastened closed with the
transport clip.
DO NOT remove the transport clip until instructed to do so, later in Step 7.
STEP 2: CHECK & PREPARE OPENING
Is the opening the correct size for the door unit? Check it against the
door frame size now, before installation. The opening should be frame
height plus 1/2 inch, and frame width plus 1/2 inch to 3/4 inch. Fix any
problems now.
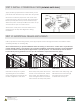
Are the framing and walls plumb? Use a 6-foot level and check both
sides of the opening, both ways (front to back and right to left). Fix any
problems now.
Is the suboor level and solid? Provide a at, level, clean weight
bearing surface so the sill pan or sill can be properly caulked and
sealed to the opening. Scrape sand or ll as required.
Note: If additional oor covering clearance is required, attach the
shim board to the suboor. Be sure to caulk well under the shim
board.