
Instructions / Assembly


6
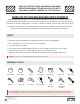
WARNING: Cancer and
Reproductive Harm
www.P65warnings.ca.gov
(Continued)
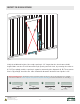
INSTALL THE DOOR
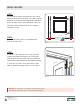
STEP 4:
Square and plumb the latch side of the jamb
and secure using the same method as step 3.
Adjust the jamb so that the spacing is uniform
between the door slab and the jamb (red).
(See Figure 4.)
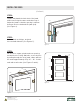
STEP 5:
Shim behind each hinge, and tack
into stud with 4d nails. (See Figures 5.)
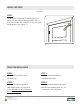
STEP 6:
Re-check for square, plumb and even spacing
around the door. Using 10d nails, secure in place
by nailing through the stop, jamb, shims and into
the studs approximately every 12" – 16". Set the
nails with a nail setter. (See Figures 5 and 6.)
Wall
Shims
Jamb
Door Slab
Frame
Latch
Side
Wall
Figure 4
Figure 6
Shims
Shims
Shims
Shims
Shims
Shims
ShimsDoor
Jamb
Gap
Figure 5