
Installation Guide


4
1. Remove mantel shelf from box and gather materials required to complete the installation. Always practice safety
and use appropriate eye, ear, and respiratory protection when using power tools. If you are planning on installing
the full replace surround, you will need to purchase the Builders Choise Leg and Skirt Kit and use the 4-PIECE
FIREPLACE SURROUND INSTALLATION instructions instead.
2. Decide whether or not you are going to paint or stain the mantel shelf before or after installation. If before,
paint or stain the mantel shelf to the color of your choosing (follow nishing guidelines provided by the coating
manufacturer). If after, proceed to the next step and nish the mantel shelf after the following steps have been
completed.
3. Determine your desired mantel shelf height based on the top edge of the mantel (typically 50"–55" from oor or a
pre-determined height).
4. After your desired height is determined, subtract 1/2" from measurement and mark this height on the wall.
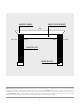
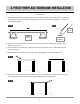
5. Align top of mounting board with mark in step 4. Using the included mounting board and level, draw faint line on
the wall along the top mounting board.
6. Using a stud nder, locate the studs behind the drywall and mark the location on the wall.
NOTE:
• If studs are present, use drywall screws driven directly into studs (preferred method).
• If studs are not present, you may use drywall anchors driven directly into the drywall surface
(per hardware manufacturer's instructions) but this is not the preferred method.
7. Place the mounting board against the wall and transfer the locations of the studs from the wall to the mounting
board using a pencil.
8. Using a 3/32" drill bit, pre-drill holes on the mounting board 3/4" from the edge at the stud locations marked on
the mounting board.
Attach mounting board to wall with fasteners and construction adhesive. Ensure the mounting board is level
and centered prior to permanent mounting. Drive a minimum of three fasteners (*see below) into the surface.
* Brick= 2-1/2" masonry screws
* Drywall= 2-1/2" drywall screws or appropriate drywall anchors (installed per the manufacturer’s instructions)
IMPORTANT: Do not omit the use of construction adhesive between the mounting board and drywall as it helps
distribute the weight of the mantel and anything displayed on top of the mantel.
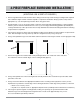
9. Apply construction adhesive to the top of the mounting board. Place mantel shelf over the mounting board and
ensure that it ts snug against wall surface.
10. Pre-drill holes with 3/32" bit for nish nails 3/4" from the back of the mantel shelf every 12-18" across the length
of the mantel.
11. Insert nish nails into the pre-drilled holes on the top of the mantel. With a hammer, sink the nail heads below the
mantel surface.
12. Fill nail holes with matching wood ller. Allow glue and wood ller to dry overnight before placing any objects on
your new mantel.
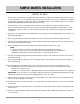
SIMPLE MANTEL INSTALLATION
( MANTEL KIT ONLY )