
Installation Guide


5
1. Remove leg/skirt kit and mantel shelf from boxes being careful to keep mantel and leg mounting boards separate
due to different lengths. Gather materials required to complete the installation. Always practice safety and use
appropriate eye, ear, and respiratory protection when using power tools.
2. Decide whether or not you are going to paint or stain the mantel shelf and leg/skirt kit before or after installation.
If before, paint or stain the mantel shelf to the color of your choosing (follow nishing guidelines provided by the
coating manufacturer). If after, proceed to the next step and nish the mantel shelf and leg/skirt after the following
steps have been completed.
3. Place legs into position on either side of the replace making sure the distance from the replace is equal on both
sides. Note the height of the legs at the top and cut to length if necessary using a chop saw.
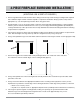
4. Using a level, plumb the legs to the wall. Draw a faint line down the wall along the outside of each leg (gure A & B).
5. Remove the legs from the wall and draw a few parallel pencil lines 1/2" inside each of the scibe lines.
The inside lines mark the outside edges of the mounting boards (gure C).
6. Using a level, plumb each of the mounting boards vertically inside the lines created in step 5 and scribe a faint
pencil line on the wall.
7. Using construction adhesive and appropriate hardware for the mounting surface (drywall or masonry screws,
drywall anchors), attach the outside edge of the mounting board to the inside edge of the pencil lines on the wall.
* Brick= 2-1/2" masonry screws
* Drywall= 2-1/2" drywall screws or appropriate drywall anchors (installed per the manufacturer’s instructions)
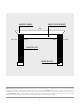
8. Place legs into position against mounting boards, making sure openings are up and towards the inside.
Attach the legs to the mounting boards using nish nails or wood screws approximately every 12-18".
Use a 3/32" drill bit to pre-drill any nail holes.
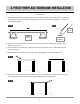
4-PIECE FIREPLACE SURROUND INSTALLATION
( ADDITIONAL LEG & SKIRT KIT REQUIRED )
Fig A
Fig C
Fig B