
Installation Guide


7
14. Using a stud nder, locate the studs behind the drywall and mark the location on the wall.
NOTE:
• If studs are present, use drywall screws driven directly into studs (preferred method).
• If studs are not present, you may use drywall anchors driven directly into the drywall surface
(per hardware manufacturer's instructions) but this is not the preferred method.
15. Place the mounting board against the wall and transfer the locations of the studs from the wall to the
mounting board using a pencil.
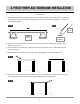
16. Using a 5/32" drill bit, pre-drill holes on the mounting board 3/4" from the edge at the stud locations marked
on the mounting board.
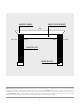
Attach mounting board to wall with fasteners and construction adhesive. Ensure the mounting board is level
and centered prior to permanent mounting. Drive a minimum of three fasteners (*see below) into the surface.
* Brick= 2-1/2" masonry screws
* Drywall= 2-1/2" drywall screws or appropriate drywall anchors (installed per the manufacturer’s instructions)
IMPORTANT: Do not omit the use of construction adhesive between the mounting board and drywall
as it helps distribute the weight of the mantel and anything displayed on top of the mantel.
17. Apply construction adhesive to the top of the mounting board. Place mantel shelf over the mounting board
resting it on top of the legs. Ensure that it ts snug against wall surface.
18. Pre-drill holes for nish nails 3/4" from the back of the mantel shelf every 12-18" across the length of the mantel.
19. Insert nish nails into pre-drilled holes through the mantel. With a hammer and nailset sink the nail heads
below the mantel surface.
20. Attach pre-assembled base corner blocks to bottom of each leg using construction adhesive and nish
nails being sure to pre-drill any nail holes.
21. Fill nail holes with matching wood ller. Allow glue and wood ller to dry overnight before placing any
objects on your new mantel.
( Continued )
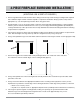
4-PIECE FIREPLACE SURROUND INSTALLATION