
Installation Guide
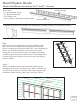


Window Header and Base
assembly right from box.
Fig. 2C
C
L
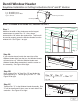
Dentil Window Header
Keystone Installation & Cutting Instructions for 6" and 9" Version
Kit Contains:
1 pc. Dentil Keystone
1 pc. Dentil Keystone Base
4 pcs. Screws
Dentil Keystone
Dentil Keystone Base
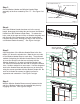
Step 1
Measure the width of the window across the largest
measurement to create Dim. "A". Also, draw a
horizontal line 1/8" above the window trim. This line will
be used to properly space the Window Header from the
window trim. See Figure 1 at right.
Fig. 1
Dim "A"
C
L
Draw horizontal line 1/8"
above window trim
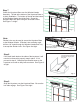
Step 2A
If your window doesn't match the exact size of the
Window Header right from the box, the Window Header
will need to be cut. With the Window Header and
Window Header Base assembled, mark the center on
the assembly. See Figure 2A at right.
Dim "B"
Window Header and Base
assembly right from box.
Fig. 2A
01-16-03
PAPC9928
I-0087
C
L
Step 2B
Next, subtract Dim. "A" from Dim. "B" and divide the
measurement by 2. This will give you Dim. "C". See
Figure 2B at right.
Dim. "A"
Dim. "B"
-
2
=
Dim. "C"
Step 2C
Transfer Dim. "C" to the Window Header Assembly. Dim.
"C" will be transferred 2 times; once on each side of the
centerline. See Figure 2C at right.
Dim "C"
Dim "C"
Fig. 2B
NOTE: IF HEADER IS NOT BEING CUT, PROCEED TO STEP 7