
Installation Guide


Step 4
With the Window Header Base securely fastened to the wall, attach the
Window Header by snapping it into place. See Figure 5 below.
Note:
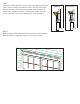
Figures 4A & 4B at right show cross sections of the Window Header in
place. In some instances the Window Header may rock on the high
point of the siding. To overcome this problem, insert the screws or
Shutter Loks into the wall evenly. See Figure 4A at right. Insert the
screws or Shutter Loks evenly, working between top and bottom.
CORRECT
INCORRECT
Fig. 4A
Fig. 4B
Fig 5