
Installation Guide
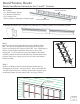
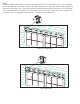
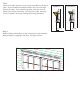
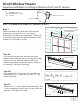
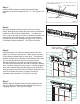


Fig. 7
Fig. 10
Fig. 9
Step 7
Center the Keystone Base over the Window Header
Assembly. The tab at the bottom of the Keystone Base is
to aid in installation. The bottom of the tab and the bottom
of the Window Header should be flush. Screw the
Keystone Base into place using the enclosed screws.
See Figure 7 at right.
Step 9
Snap the Keystone over the Keystone Base. Be sure the
lock tabs engage. See Figure 10 at right.
Note:
Shutter Loks may be used to secure the Keystone Base
to the Window Header. If Shutter Loks are being used,
drill two 1/4" holes through the Window Header and Tray
to accept the Shutter Loks. See Figure 8 at right.
Fig. 8
Drill and place Shutter
Loks in these locations
Cut out both thinned window
areas shown using the wall
as a guide.
Step 8
If the dentil teeth land on the sides of the keystone, it will
need to be trimmed to properly snap in place. If not
proceed to step 9. Otherwise trim thinned areas on the
keystone cover with a utility knife as shown. See Figure 9
at right.