
Installation Guide


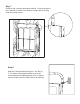


Step 4
Draw a horizontal level line 1/8" above the window trim for
locating the bottom of the mount. Also create a vertical
line at the center of the window for alignment.
Centerline of
window
Horizontal line
1/8" above window
Step 3
Flip the Siding mount over, exposing the back
side of the mount. Apply the 12" length of foil
backed butyl-tape provided with the header
base. Start at the top of the mount and work
your way to the bottom, keeping the tape tight to
the inside of the part. This will ensure a water
tight installation of the siding mount.
Note: If the ribs of the siding mount are too
close to allow the width of tape to be applied,
trim the necessary ribs off with a utility knife.
Start Taping Here.
Keep Tape Tight in Corners
Fig. 4
Fig.5
Step 5
Afix the header mount to the sheathing. Align the cut
in the mount with the center-line of the window found
in step 4 and the bottom with the horizontal line.
Using the screws provided, place them approximately
in the center of the nailing slots to allow proper
expansion and contraction.