
Installation Guide


Step 6
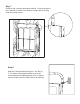
Afix the header mount to the sheathing. Align the cut
in the mount with the center-line of the window found
in step 4 and the bottom with the horizontal line.
Using the screws provided, place them approximately
in the center of the nailing slots to allow proper
expansion and contraction.
Fig.5
Step 5
If the header you are installing extends the width of the window flange or J-channel, you will
want to remove the tab on the end of the mount as shown. Knife slots have been provided on
the inside of the tab to be used as a guide. Trimming the tab will make siding around the
window opening easier. If the header is inboard the flange or J-channel, the tab should be left
in place to divert water.
TAB REMOVED