Model № 913 920 926 PRO I-SERIES FOR FLOORING, SIDING & MORE! INSTRUCTION MANUAL READ BEFORE USE! www.bullettools.com • USA (800) 406-8998 • Int’l (208) 772-0175 Made in the USA by / Fabriqué aux É.-U. par / Hecho en los EE.UU. por Gunntech Mfg., Inc., 3390 W.
SAFETY RULES FOR THE MAGNUM SHEAR™ 1. ......READ AND UNDERSTAND THIS INSTRUCTION MANUAL BEFORE OPERATING THE MAGNUM SHEAR™. 2. ......If you are not thoroughly familiar with the operation of the Magnum Shear™, obtain advice from a qualified instructor or call 800-406-8998 (International: 208-772-0175). 3. ......Stay alert. Do not operate while under the influence of drugs, alcohol, or medication. 4. ......Always wear safety approved eye protection with side shields (ANSI Z87.1). 5. ......
SET UP Welcome! Your Magnum Shear™ comes ready to easily assemble*. *Note: You will need #2 & #3 Phillips head screwdrivers Please Review Parts Included in Box: 1. Power Assembly 2. Handle Assembly 3. Fence 4. Table 5. Tail 6. Rails (2) 7. Instruction Manual 8. Hone Stone 9. 10mm Hex Wrench 10. Hardware Kit containing part A. (4) 8mm x 60mm PH Phillips machine screws part B. (4) M8 star washers part C. (4) 8mm x 25mm PH Phillips machine screws part D. (6) 6mm x 16mm PH Phillips machine screws part E.
SET UP 3 3A 3B 3B ATTACH TABLE to power assembly, starting with front, use 4 (for the I-13), 5 (for the I-20), or 6 (for the I-26) 6mm x 16mm PH Phillips machine screws (Hardware Kit part D. ). Next, attach back of table to tail using 3 (for the I-13), 4 (for the I-20), or 5 (for the I-26) #12 x 1” PH Phillips tapping screws (Hardware Kit part E. ). 4 Tip: begin threading screws by hand, then tighten with screwdriver NOTE: TO ATTACH HANDLE, • Insert handle into cam shaft.
MAKING CUTS Your Magnum Shear™ is OPERATED MANUALLY. The two-part handle is grasped by the operator and pushed down to make a cut. USE EXTREME CAUTION! Blade is very sharp! 1 Unlock Safety Lock by pulling knob IN (see p. 4). 2 Insert material. It is recommended that you HOLD MATERIAL IN PLACE until the cut is complete. ALWAYS KEEP HANDS AWAY FROM BLADE while operating or carrying! 3 PUSH HANDLE DOWN to cut. Some effort may be required, depending on hardness of material.
CUSTOM SETTINGS 1 THICKNESS TO CUT APPROVED PRODUCTS (see p. 9), loosen and remove Phillips head screw on the “back stroke stop”; turn the “back stroke stop” 180° and replace and tighten Phillips head screw. For more convenience when cutting thinner products, restore factory setting. 2 Factory Setting Set to cut over 3/4” OVER 3/4” THICK SUPPORT THE ANVIL has 2 edges: a 1/32” (0.75mm) narrow edge and a 3/16” (4.5mm) wide edge.
MAINTENANCE THE BLADE 1 2 The blade must be PLACED WITH FLAT SIDE toward the table side in power assembly pocket. USE ONLY I-SERIES (PREMIUM) BLADES IN I-SERIES MAGNUM SHEARS™. Any other blade will not perform properly and may damage your machine.
MAINTENANCE CHANGING THE BLADE 4 A-B WARNING! BLADE IS EXTREMELY SHARP! USE HAND PROTECTION WHEN REMOVING, HONING, OR SHARPENING BLADE! A TURN THE MAGNUM SHEAR™ UPSIDE DOWN Tip: Set the Magnum Shear™ on the edge of a sturdy bench or table B LOOSEN THE BLADE: Using a Phillips screwdriver, remove the M6 X 16 PHP screws. C TO REMOVE BLADE: hold blade by each end and carefully lift out of blade pocket.
CUTTING INFORMATION ACCEPTABLE MATERIALS & SIZE LIMITATIONS FOR THE PRO MAGNUM SHE AR™ I SE R IES WITH THE PREMIUM BL ADE Material Max.
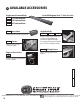
AVAILABLE ACCESSORIES for the PRO Magnum Shear™ I-Series & L-Series Replacement Premium Blades #913B 13” Premium Blade #920B 20” Premium Blade #926B 26” Premium Blade #701S Hone Stone Keep your blade honed for longer use! #848-I Castors Add castors for smoothrolling portability. Angle Guide Kit #856AG-13 #856AG-20 #856AG-26 Provides a fixed “stop” point for more accurate repeat/multiple cuts. Includes 45° Angle Guide with Fence upgrade. Sized specifically for the 13”, 20”, & 26” Magnum Shears.