
INSTALLATION & OPERATING GUIDE


15
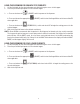
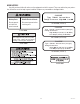
1. Install the seal(s) over the flange at
the rear of the cooling drum(s) and
press the seal(s) firmly into place
as shown.
2. Align the auger shaft(s) with the
auger(s). Push the auger(s) as far as
they will go and rotate so the flat face
of the auger shaft is aligned with the
flat face of the auger nose.
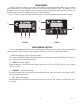
4.
Thoroughly rinse the hopper(s)
and install over the auger(s) and
cooling drum(s).
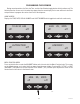
6.
Set the lids on the hopper(s)
and plug in the hopper lid lamp
cord(s).
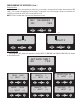
10. Assemble the drip tray.
8. Slide the faucet valve assembly into
place on the hopper.
9. Press down on the valve to com-
press the spring. Position the faucet
handle over the faucet valve one
side at a time and snap into place
on the hopper.
7. Position the faucet seal and return
spring in the faucet valve.
5. Slide into place and push down until
the hopper lock plunger(s) snap
into place. On models with autofill,
reconnect fill hoses and level probe
to hopper.
ASSEMBLY FOLLOWING CLEANING
3. Install auger nose bushing into
inside front of hopper.
40563 042910
11. Turn ON augers and cooling function
to desired settings.