
Service and Repair Manual


52
SERVICE (CONT.)
LED Lamps
If voltage is present as described, the LED board is
faulty.
If voltage is not present as described, retrace the wiring
circuit to find the fault.
5. Check for continuity across the terminals on the
leads and the LED harness.
If continuity is present as described, the lamp is op-
erating properly.
If continuity is not present as described, replace the
lamp.
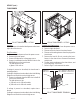
Removal and Replacement:
1. Disconnect power from the dispenser.
2. Disconnect the lamp cord assembly from the lamp
cord connector assembly in the top of the auger
motor cover.
3. Remove the hopper cover with the lamp cord as-
sembly from the hopper.
4. Remove hopper cover liner from the hopper cover.
5. Remove the two #2-28 screws securing the LED
circuit board assembly to the cover liner.
6. Replace the LED circuit board assembly.
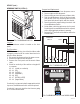
FIG. 45 LED HOPPER LIGHTS
P4110
Location:
The LED hopper lights are located inside the hop-
per lid.
Test Procedures:
1. Disconnect power from the dispenser.
2. Disconnect the black and red leads from the LEDs.
3. Check the voltage across the two leads with a
voltmeter. Reconnect power to the dispenser. The
indication must be approximately 12 volts ac.
4. Disconnect power from the dispenser.