
INSTALLATION & OPERATING GUIDE


6
INITIAL SETUP
CAUTION – The dispenser is very heavy! Use care when lifting or moving it. Use at least two people to lift or
move the dispenser.
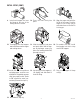
3.
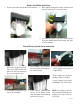
Remove the rear plastic plug
from the trim strip between the
auger motor covers.
2. Remove all shipping material, including the compressor support eyebolt, the cooling drum supports, the
“Do Not Lift Here” signs from the cooling drums, and the “Rinse Before Using” signs from the hopper(s).
For models without PAF (Powder Auto-Fill), proceed to step #9.
4.
Remove the rear most plas-
tic plug from the trim strip
between cooling drums and
remove screw.
6.0”
MIN.
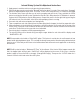
1. Set the dispenser on a sturdy counter top. The dispenser requires a minimum of 6.0” air clearance at the
rear of the dispenser. For optimum performance, do not let warm air from surrounding machines blow on
the ULTRA dispenser.
NOTE – The dispenser should be level or slightly lower in front for proper operation.
6.
Install the platform mounting
bracket using the screws pro-
vided in kit.
7. Place the platform assembly on
top of the auger motor covers
and install screws.
8. Plug RCA cord into ULTRA base
unit. Replace access cover and
screws. Proceed with steps 9
thru 13.
5.
Remove the RCA plug access
cover.
45246 072611
RELEASED FOR PRODUCTION
DIR Num: 45246.0000 12, June 2015