
User's Manual


5
Daily Cleaning:
1. Turn handle on rear of dispenser to shut off the water supply.
2. Open the faucet to relieve pressure in the system.
3. Since the bag connector(s) have an internal shut off valve, it will be necessary to prop the valve open during clean-
ing.
NOTE: Cutting off the mating connector of an empty concentrate bag works well for this. Keep this mating end for future
cleanings of the system.
4. Turn on water supply to the dispenser.
5. Place the open bag connector into a 1/2 gallon container of dish soap and warm to hot water (130° F/54° C).
6. Place a large container under dispenser faucet.
7. Open faucet until the soap/water mixture in the container is empty.
8. After the soap mixture has been flushed through the system, fill the container with warm to hot tap water only (no
soap) and repeat steps 5 thru 7 until all soap has been flushed from the system.
9. Remove the mating end of connector and attach dispenser’s connector to a Bag In a Box and dispense several cups
to prime the concentrate line or until consistency of the product is correct.
10. Wash the entire outside surface of dispenser with a clean, damp cloth.
NOTE: When the system is not in use for extended periods of time (nights, weekends, etc.), turn the water supply valve
off.
Weekly Cleaning:
1. Turn handle on rear of dispenser to shut off the water supply.
2. Open the faucet to relieve pressure in the system.
On models with chrome nut (Complete Step 3, then skip to Step 6):
On models with wing nut (Skip Step 3 - Start at Step 4):
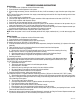
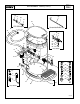
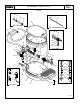
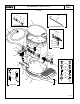
3. Unscrew the faucet bonnet (a) and remove all faucet components, leaving the faucet body (b) in place on the venturi
assembly.
4. Twist the faucet wing nut in a clockwise direction and remove faucet from the dispenser.
5. Remove and clean the O-ring (Optional).
a. Remove the o-ring from the venturi assembly nozzle. Be very careful when removing this o-ring.
Do Not scratch or nick the o-rings sealing surface when removing.
b. Clean the groove and o-ring with the same solutions as used to clean the faucet, Step 6.
c. When finished, slide the o-ring back into the groove on the venturi nozzle.
6. Sanitizing the faucet:
This procedure requires three cleaning solutions of approximately ½ gal each, a mild detergent and warm
water solution, clean hot water only and a warm chlorine solution (at least 50 ppm of chlorine at 75° F [24°
C]). NOTE: DO NOT use full strength bleach.
a. Disassemble the faucet.
b. Thoroughly wash all faucet parts in the mild detergent solution.
c. Rinse the parts in hot water.
d. Sanitize the parts by soaking for one minute in the warm chlorine solution.
e. Re-rinse the parts in hot water to remove all the chlorine solution.
f. Reassemble the faucet and attach it to the dispenser.
7. Sanitizing the BIB connector, tubing and metering valve:
This procedure requires a 1/2 gallon container of sanitizing solution, (100 ppm of chlorine at 100° F (38° C) water).
a. Since the bag connector(s) have an internal shut off valve, it will be necessary to prop the valve open during clean-
ing. NOTE: Cutting off the mating connector of an empty concentrate bag works well for this. Keep this mating end for
future cleanings of the system.
b. Turn on water supply to the dispenser.
c. Place open bag connector into the 1/2 gallon container of sanitizing solution.
d. Place a large container under dispenser faucet.
e. Open faucet until the chlorine mixture in the container is empty.
f. Allow dispenser to sit overnight before flushing sanitizer out of the system.
g. Flush system by filling a container with warm to hot tap water only (no chlorine) and opening the faucet - until all
chlorine has been flushed from the system.
8. Remove the mating end of connector and attach dispenser’s connector to a Bag In a Box and dispense several cups
to prime the concentrate line or until consistency of the product is correct.
DISPENSER CLEANING AND SANITIZING
a
b
47629 121012