
Repair manual


Page 19
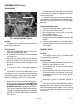
Location:
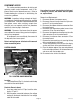
The Membrane Switch (Fig 2) is located on the front
of the hood with a ribbon cable extending through the
hood and connected to the control board.
Test Procedures:
There are two methods for testing the membrane
switch. The easiest method is to use the built in test
mode. Refer to the Trouble Shooting Section for Service
Tools/Test Switches. If for some reason you can't get
into the program modes, or brewer won't power up,
you can test it with an ohmmeter or continuity tester.
Refer to the schematic to trace the appropriate pins.
NOTE: Pin 1 is the static shield & will not provide a
reading to the other pins. There are three commons
in this circuit, pins #9, 10 & 21.
Disconnect brewer from power source before discon-
necting ribbon cable from control board.
Removal and Replacement:
1. Disconnect the ribbon cable from 22-pin connector
on the control board.
2. Gently peel the membrane switch from the
hood.
3. Remove any adhesive that remains on the hood.
4. Remove the adhesive backing from the new mem-
brane switch. Insert the ribbon cable through the
slot in the hood and apply the membrane switch
to the front of the hood.
5. Reconnect the ribbon cable to the 22-pin connec-
tor on the control board making sure every pin on
the control board is inserted into the ribbon cable
connector.
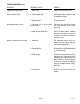
FIG 2 MEMBRANE SWITCH
CONPONENT ACCESS (cont)
MEMBRANE SWITCH
Membrane Switch
41747 112608