
user manual

Page 6
COFFEE GRINDING
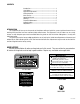
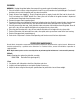
STEP 1 STEP 2 STEP 3 STEP 4 STEPS 5 & 6
1. Visually inspect the hopper for an ample supply of whole bean coffee.
2. Place a paper filter into the brew funnel. The filter must not be folded-over or tilted to one side.
3. Insert the funnel into the funnel rails and push until it stops.
4. Momentarily place the switch in the “START” (right) position. The grinding action will stop automatically
after the preset amount of ground coffee is dispensed into the funnel.
5. Remove the funnel from the grinder and level the bed of grounds by gently shaking.
6. The loaded funnel is now ready for use in any commercial drip coffee brewer according to the manufacturer’s
instructions.
ADJUSTMENTS
The grind can be set from very fine to very coarse. The amount may be adjusted for use in most commercial
coffee brewers. The following procedures should be used to make adjustments. A change in the burr adjustment
will also change the amount dispensed. Any adjustment of the burrs should be followed by an adjustment of
the timer.
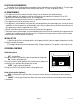
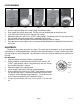
P1301 P1302 P1303 P1304 P1305
10171 113007
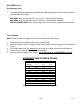
Burr Adjustment
1. Unplug the grinder and empty all beans from the hopper.
2. Plug-in the grinder, momentarily place the Off/On/Start switch in the
“START” (right) position, and run a few grind cycles until all of the cof-
fee in the grind chamber is used-up.
3. Remove the upper front inspection panel.
4. Loosen the burr adjustment screw from its locked position.
5. Place the Off/On/Start switch in the “START” (right) position and slowly
turn the adjusting screw in a clockwise direction until a metallic whine
is heard due to the rubbing of the grinding burrs. (It may be necessary
to start more than one grind cycle to obtain this sound.)
6. Turn plastic grind indicator until screw slot lines up with “O” on the indica-
tor.
1
0
2
3
4
5
6
7
8
9
10
11
12
13
14
15
Adjusting
screw
Hash
Marks
P2820