BUNN® TECHNICAL TRAINING ThermoFresh BrewWISE ® DBC
Index Unit 1: Installation Site Requirements............................................................................................................... 4 Location of the Serial Number........................................................................................... 4 Water Supply Install............................................................................................................ 4 Electrical Install..................................................................................
Unit 1 Installation Unit Objectives Given a realistic scenario depicting a new site install, the learner will be able to install and setup the brewer for customer turnover without error. Given a new machine, all the necessary tools and safety equipment, the learner will be able to install the brewer without error. The learner will be able to verify that the site requirements have been met. The learner will be able to locate and document the serial number.
Installation Site Requirements Space • Single TF BrewWISE - Counter able to support the weight of the machine, approximately 120 pounds (water tank full) - Counter area able to support machine placement 35.8”H x 12.5”W x 20.2”D • Dual TF BrewWISE - Counter able to support the weight of the machine, approximately 185 pounds (water tanks full) - Counter area able to support machine placement 35.8”H x 21.8”W x 21.
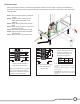
Electrical Install Refer to the electrical section of the machine’s data plate to select the proper power cord, plug and receptacle for the brewer. An electrician must provide electrical service as specified in conformance with all local, state, and federal electrical codes. Step 1: Remove the front panel (11 flat head screws). Step 2: Feed the power cord through the strain relief in the bottom of the machine. Step 3: Attach the wire ends to the terminal block.
Units without a Neutral The field-switchable Duals will have an internal step-down transformer and a 2-pole contactor in addition to a 3rd heating element. The step-down transformer is a 208/240-120VAC transformer. The transformer is installed for locations that do not have a neutral on site.
Unit 2 Setup Unit Objectives Given a realistic scenario depicting a new site install, the learner will be able to install and setup the brewer for customer turnover without error. Given an installed machine, all the necessary tools and safety equipment, the learner will be able to set the machine up for initial operation. The learner will be able to power on the machine. The learner will be able to perform the calibrations.
Setup and Programming The BrewWISE® software is the latest evolution of BUNN’s digital brewer control (DBC®) system. The software allows precise brewing control and multiple extraction recipes to be stored on the brewer and onboard troubleshooting capabilities for the technician. The software also allows the brewer to communicate with a DBC® grinder, to reduce operator errors when selecting products and batch sizes.
Level 1 Programming Press and hold the right hidden switch until the display screen reads “Brew Lockout?” and release. BREW LOCKOUT ? ON DONE OFF This function will lockout an operator if a predetermined temperature has not been achieved message will read “Brew temp to low please wait heating”. Level 2 Programming Press and hold the right hidden switch until the display screen reads “Units” and release. UNITS METRIC DONE ENG This function allows the operator to choose between English or Metric.
L BYPASS Oz/M: 24.1 (-) DONE (+) Enter new number for each bypass valve, after doing CALIBRATE FLOW and measuring output. R BYPASS Oz/M: 24.1 (-) DONE (+) Enter new number for each bypass valve, after doing CALIBRATE FLOW and measuring output. Technician can measure actual flow rate through all 4 valves with 60 second flow test.
Step 4: To activate the flow rate check, press the Brew button of the side of the machine you wish to check. Step 5: The valve will open for 60 seconds. Once all of the water has dripped out, input the volume into the brewer. LEFT OZ QUIT 36.0 YES Check and Adjust the Bypass Valve Flow Rate Step 1: Scroll to Calibrate Flow select Yes. CALIBRATE FLOW ? NO YES Step 2: Select No at the next screen to dispense from the brew valves. SPRAY HEAD CAL ? NO YES Step 3: Select Yes at the next screen.
Calibrating the Temperature Sensing Probe Note: Calibrating the temperature sensing probe (thermistor) should be done when replacing the CBA or thermistor. Allow the tank to heat the water to the ready temperature. No tests should be taken while the tank is heating as the tank temperature must be stable before any readings are recorded. Step 1: Remove the top panel of the machine.
Unit 3 Machine Composition Unit Objectives Given a realistic scenario in which the learner has access to the machine’s internal components the learner will understand the composition and functions of the brewer. Given a realistic scenario requiring the learner to access the internal components of the machine the learner will be able to remove the front panel and top cover. The learner will disconnect the electrical and water supply. The learner will remove the front panel and top cover.
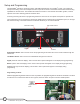
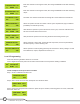
1 Machine Composition 2 4 Exterior Overview 5 Product Outlets and Removable Parts • • • • • • • User interface (1) Display (mounted to the control board) (2) Hot water outlet (3) Funnel sensing coil (4) Funnel (5) Server (6) Data plate (7) 7 6 3 User Interface The user interface is a membrane switch adhered to the front of the brewer. The membrane is connected to the control board by a ribbon cable. The user interface allows the user to select product size and begin a brew cycle.
Machine Function and Operations Main Control Board Main Control Board The main control board is the brain of the brewer. In the Digital Brewer Control (DBC®) system, the control board is the single component that contains all of the programming software, it interprets all the data it receives from the level and temperature sensors and activates components to fulfill those demands. The main control board responds to the users input through the membrane switch and activates and controls the brew cycle.
Heating System The heating system consists of: • Water tank • Heating elements • Triacs • Contactor (3 phase only) • High-limit thermostats • Temperature sensor Tank Heater Triac The heating circuit maintains the water in the tank at a preset temperature. This ensures that the water is always ready for brewing. Water for brewing is contained in a stainless steel tank.
Bypass Valve Dispensing System The dispensing system consists of: • Brew valve • Bypass valve • Sprayhead • Funnel • Funnel lock solenoids Dispense Valve The dispensing system is what makes the brewer a coffee brewer. It dispenses the water onto the ground coffee to create the product. The BrewWISE® brewer is a gravity dump brewing system. During the brew cycle the brew and bypass valves open allowing water to flow from the tank and out the product outlets.
Unit 4 Preventive Maintenance Unit Objectives Given a realistic scenario depicting a machine requiring a preventive maintenance, the learner will be able to identify which elements of a component need to be serviced without error. Given a machine, all the necessary tools and safety equipment, the learner will be able to identify the components that need to be serviced for the PM.
Preventive Maintenance In order to maintain proper operation and long service life BUNN recommends performing the preventive maintenance every 6 months. Individual customers will vary with some customers choosing not to receive preventive maintenance. Tools Required: • 2 Flat blade screwdrivers (#1 - #2) • Phillips screwdriver • 2 adjustable wrenches • Channel lock pliers • Needle nose pliers • Deliming tool BUNN PN: 38227.
□□ Clean any mineral build-up from the valve □□ Reassembly is the opposite of disassembly Step 6: Clean the tank fittings that supply water to the solenoid valves (Note depending on the age of the brewer this will be either a single “T” connector or individual connectors for the dispense and bypass tubes.
Unit 5 Troubleshooting Unit Objectives Given a realistic scenario depicting a broken machine, the learner will be able to effectively troubleshoot, diagnose, and repair the problem returning the machine to normal operation. Given a machine displaying an error message, all the necessary tools and safety equipment, the learner will be able to access the software and diagnose the problem. The learner will be able to access the programming menu.
Troubleshooting and Repair Service Tools The BrewWISE® brewer features on-board troubleshooting. Since all of the machine’s components are controlled or activated by the control board, you can activate and test components individually from the user interface. This allows you to listen to solenoid valves opening, observing the flow of water or test to see if a component is receiving voltage using a meter. The Service Tools option is located in Level 1 of the programming.
Test Switches TEST SWITCHES? NO NOTHING PRESSED YES Press any of the input buttons on the membrane switch, the display will show which button is being pressed. ENABLE ENABLE ON / OFF ON / OFF BREW BREW Test Frequency TEST FREQUENCY? NO YES SERVER124.7 REMOVED Khz .5 5. 124.7 Khz IN PLACE The funnel sensing circuit is tuned to 125 kHz. If the circuit is not tuned correctly, then the funnel information will not be transferred to the brewer.
Operator Fault Messages The following fault messages will appear on the display if the operator needs to take corrective action. The brewer does not sense a funnel in place. The brewer will only display this message if Yes has been selected in the Funnel Detect programming menu. Otherwise the unit will brew. Wait for the brewer to heat up to proper temperature. The brewer will only display this message if the Brew Lockout feature is set to NO.
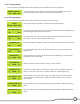
Problem Equipment will not operate. Probable Cause Remedy 1. No power or incorrect voltMeasure the voltage at the terminal age. block and confirm that it matches the voltage specified on the brewer data plate within +/- 10%. Brew cycle will not start. 1. No water Check plumbing and shut-off valves “ “ 2. ON/OFF switch Test the ON/OFF switch. Refer to the Test Switches in SERVICE TOOLS section. “ “ 3. Brew switch Test the BREW switch.
Problem Water will not heat or display shows HEATING TIME TOO LONG, (Cont.) Probable Cause Remedy 2. Tank Heaters Remove power from the brewer. Check for continuity through the tank heaters. “ “ 3. Triac Remove power from the brewer. Connect a voltmeter across one of the tank heaters. Reapply power to the brewer. If the full supply voltage is measured when the tank heater is turned on, and zero voltage is measured with the triac off, then the triac is good.
Problem Inconsistent beverage level in server. (Cont.) Probable Cause Remedy 3. Brew Valve Test the Brew Valve. Turn the valve on for 30 seconds and collect the water dispensed from the sprayhead. Repeat the test several times to confirm a consistent volume of dispensed water. If not consistent, check the valve, tubing and sprayhead for lime buildup. “ “ 4. Bypass Valve If bypass is being used on the inconsistent brewing recipe, test the Bypass Valve.
Problem Weak beverage. (Cont.) “ “ Probable Cause Remedy 5. Water temperature Empty the server, remove its cover, and place the server beneath the sprayhead. Place empty funnel over the server entrance, with ON/ OFF switch in the “ON” position press the start switch and release it. Check the water temperature immediately below the sprayhead with a thermometer. The reading should not be less than 195˚F (91˚C). 6. Incorrect Recipe Consider adjusting bypass percentage, preinfusion, or pulse brew.
Triac Map 1 2 3 4 5 6 7 8 9 10 1. Left Funnel Lock 2. Right Funnel Lock 3. Left Transformer 4. Left Dispense Valve 5. Right Dispense Valve 6. Left Bypass Valve 7. Right Bypass Valve 8. Right Transformer 9. Spare 10.
Additional Resources Visit the BUNN Online Learning Center for technical information on BUNN equipment. Unit Objectives • • • • • Go to URL: http://training.bunnserve.com/ Go to the menu bar and place your cursor over Courses, then choose “Commercial”. Browse the list of available courses. From the course introduction, use the menu on the left to find instruction sheets, manuals, key learnings, checklists and updates on equipment.