G9WD-RH INSTALLATION & OPERATING GUIDE BUNN-O-MATIC CORPORATION POST OFFICE BOX 3227 SPRINGFIELD, ILLINOIS 62708-3227 PHONE: (217) 529-6601 FAX: (217) 529-6644 To ensure you have the latest revision of the Operating Manual, or to view the Illustrated Parts Catalog, Programming Manual, or Service Manual, please visit the Bunn-O-Matic website, at www.bunn.com. This is absolutely FREE, and the quickest way to obtain the latest catalog and manual updates.
BUNN-O-MATIC COMMERCIAL PRODUCT WARRANTY Bunn-O-Matic Corp. (“BUNN”) warrants equipment manufactured by it as follows: 1) All equipment other than as specified below: 2 years parts and 1 year labor. 2) Electronic circuit and/or control boards: parts and labor for 3 years. 3) Compressors on refrigeration equipment: 5 years parts and 1 year labor.
CONTENTS Introduction.........................................................................................................................................3 User Notices........................................................................................................................................3 Electrical Requirements.......................................................................................................................4 Operating Controls.......................................
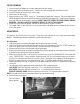
ELECTRICAL REQUIREMENTS This grinder has an attached cord set and requires 2-wire, grounded service rated 120 volts ac, 15 amp, single phase, 60 Hz. OPERATING CONTROLS d c b e a Grind Pad (a) Pressing initiates a grind cycle. Stop Pad (b) Pressing ends the operation of the grinder. ® Pad (c) Pressing the copyright pad allows programming access. Pads (d) “Hidden” buttons used to navigate setup and programming menus. Pads (e) Press button to select small, medium or large batch size. 4 41451.
COFFEE GRINDING 1. 2. 3. 4. 5. Visually inspect the hopper for an ample supply of whole bean coffee. Place a paper filter into the brew funnel. The filter must not be folded-over or tilted to one side. Insert the funnel into the funnel rails until it stops. Select batch size desired (e). Momentarily press the “START” switch (a). The grinding will begin after a moment. The actual weight of the coffee being ground into the funnel will be shown on the display during grinding.
CLEANING WARNING – Unplug grinder before the removal of any panel or grind chamber-housing parts. 1. Clean all exterior surfaces using a damp cloth rinsed in any mild, nonabrasive, liquid detergent. Care should be taken not to scratch the grinder with any abrasive material. 2. Remove the hopper by sliding all the way forward. 3. Remove the lid from the hopper, and empty of beans. 4. Clean and sanitize the hopper and lid. Care should be taken not to scratch the hoppers with any abrasive material. 5.
GLOSSARY GRIND OZ: ##.## (-) DONE (+) Adjust current weight setting using (-) and (+) buttons CENTER SW TARE Allows present weight on scale to be tared SET GRIND TIME? NO YES Allows adjustment of current time setting OUNCES = #.## EXIT TARE Shows current weight on scale GRIND SEC: #.
GROUND COFFEE COUNTER The grinder will keep a running total of the pounds of coffee the grinder has ground. This running total is shown in the “PmBurrsLbs #” menu, under the “SERVICE TOOLS” menu. This running total can be used to determine when the grinding burrs need cleaning or replacement. Pressing the button under “RESET” will reset this total to zero. GRINDER SCALE CALIBRATION 1. Place empty funnel into funnel rails. 2.
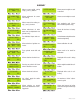
COMMUNICATING WITH THE GRINDER Press the hidden (copyright) button for 1 second “COFFEE NAME” PREV DONE NEXT SELECT COFFEE NO YES ENTER PASSWORD 0 0 0 Press right hidden (copyright) button to scroll to next screen Pressing “PREV” scrolls to the previous coffee name Pressing “NEXT” scrolls to the next coffee name “COFFEE NAME” MODIFY SHOW NEXT SET PASSWORD 0 0 0 Press right hidden (copyright) button to scroll to next screen Press right hidden (copyright) button to scroll to next screen SMALL BATCH GRI
COMMUNICATING WITH THE GRINDER (Continued) from (A) From previous page GRIND oz (-) DONE #.## (+) FACTORY DEFAULT NO YES The small batch size will flash, press (-) or (+) to adjust grind weight. After first batch size is set, additional batch sizes can be set by pressing appropriate batch size button. Press “DONE” after all three batch sizes have been set.
COMMUNICATING WITH THE GRINDER (Continued) from (B) TEST OUTPUTS NO YES GRIND MOTOR ON NEXT OFF TEST GRIND MOTOR NO YES TEST SWITCHES ? NO YES PRESS RIGHT HIDDEN TO EXIT TEST FREQUENCY ? NO YES CENTER SW TARE TEST SCALE ? NO YES PLEASE WAIT TARE SWITCHES ENABL DISABLE PmBurrLBS RESET Pressing any switch in this mode will display the switch name in the grinder display. # SENSOR BITS #### Weight ##oz After the funnel is “tared” add a calibrated weight to check scale.
COMMUNICATING WITH THE GRINDER (Continued) LEVEL 2 FUNCTIONS: Press the hidden (copyright) button for 3 seconds in “ENTER PASSWORD” menu. MACHINE TYPE WEIGHT TIMED CALIBRATE SCALE ? NO YES CALIBRATION OZ (-) 8.00 (+) MODIFY MAXBIT NO SPREAD? YES CALIBRATE SCALES EXIT TARE SHUToff Bits ## (-) DONE (+) PLEASE WAIT TARE MaxBits read # (-) DONE (+) PLACE 8.00 oz EXIT DONE Finished, returns to main screen PLEASE WAIT CAL 12 41451.
TROUBLESHOOTING A troubleshooting guide is provided to suggest probable causes and remedies for the most likely problems encountered. If the problem remains after exhausting the troubleshooting steps, contact the Bunn-O-Matic Technical Service Department. • • • • Inspection, testing and repair of electrical equipment should be performed only by qualified service personnel. All electronic components have 120 volts ac and low voltage dc potential on their terminals.
TROUBLESHOOTING (Continued) Problem Grinder will not start (continued) Grinder will not shut off Incorrect weight of coffee dispensed Probable Cause 5. Relay Remedy Check that relay contacts close when start switch is pressed. 6. Motor With a voltmeter, check that 120 volts AC is present across L1 and L2 on the rear of the motor when the Start switch is pressed. If voltage is present, and motor does not start, replace motor. 1.
SCHEMATIC WIRING DIAGRAM G9WD-RH L1 N BLK BLK BLK L1 WHT BLK BLK GRN M WHT L2 K1 N.O.