LCA-2 LP REF REA ILL DY AT WER PO SE RIN ! 1. ´ ´ FE rafe Ca uct for rod ss e p Pre oos ch RA CA OP ST ER W or T de HO mo de ualn mo AFE DEC man io in ort en in p wh hen ld ho e w d as an le ss d re Pre an 2.
BUNN-O-MATIC COMMERCIAL PRODUCT WARRANTY Bunn-O-Matic Corp. (“BUNN”) warrants equipment manufactured by it as follows: 1) All equipment other than as specified below: 2 years parts and 1 year labor. 2) Electronic circuit and/or control boards: parts and labor for 3 years. 3) Compressors on refrigeration equipment: 5 years parts and 1 year labor.
CONTENTS Warranty..................................................................................................................................................2 User Notices............................................................................................................................................4 Introduction.............................................................................................................................................5 Electrical Requirements...............
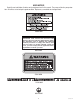
USER NOTICES Carefully read and follow all notices on the equipment and in this manual. They were written for your protection. All notices are to be kept in good condition. Replace any unreadable or damaged labels. 00986.0002 As directed in the International Plumbing Code of the International Code Council and the Food Code Manual of the Food and Drug Administration (FDA), this equipment must be installed with adequate backflow prevention to comply with federal, state and local codes.
INTRODUCTION The Liquid Coffee Ambient Dispenser delivers two types of coffee made from liquid concentrate plus hot water. The dispenser can be set up for continuous draw (by the cup) for self-serve applications, or portioncontrol to fill carafes and decanters for wait staff. Follow the Concentrate Manufacturer’s Storage and Shelf Life recommendations. This dispenser is designed to operate when ambient temperatures are from 32°F (0°C) minimum to 104°F (40°C) maximum.
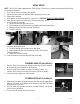
INITIAL SET-UP NOTE: The LCA-2 LP weighs approximately 70 lbs. (32 kg). If necessary, use more than one person when lifting or moving the dispenser. 1. Cut the plastic bands and remove the top box. 2. Locate and remove the parts box from top of packaging and set aside. 3. Remove foam packing. 4. Set dispenser on the counter where it is to be used. CAUTION: DO NOT LIFT ON THE DOOR. 5. Open the parts box remove the drip tray, brackets and splash guard. 6. Install the drip tray assembly. a.
ELECTRICAL HOOK-UP CAUTION: Improper electrical installation will damage electronic components. 1. An electrician must provide electrical service as specified in conformance with all local, state and federal electrical codes. 2. Using a voltmeter, check the voltage and color-coding of each conductor at the electrical source. 3. Connect the dispenser to the power source. 4. If plumbing is to be hooked up later, be sure the dispenser is disconnected from the power source.
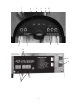
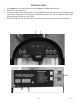
7 8 2 5 6 9 10 1 4 3 14 11 12 13 8
INSTALLING PUMP TUBING INSTALLING THE PUMP TUBING Refer to the Tube Replacement Instruction inside the Cabinet door. 1. Loosen the thumbscrew securing the tubing retainer plate to the pump body and set the retainer plate aside. 2. Depress the tension screw and remove it from the notch in the pump body, releasing the spring tension on the pump band. 3. Apply lubricant (BUNN-O-MATIC part no. M2531.0001) to the middle section of the new pump tubing. 4.
INITIAL FILL & HEAT 1. Select Normal on the Function Selector Switch and Run on the Mode Selector Switch. 2. Confirm the water supply is on. 3. Connect the dispenser to the power source. The Red POWER LED will illuminate and water will begin flowing into the tank. The dispenser will automatically stop filling when the tank is full. The dispenser will not begin heating the water until after the tank is filled. 4.
Rinse Alarm Feature Periodic rinsing of the mix chambers and dispense tips is essential for proper maintenance and optimum performance of the dispenser. The automated Rinse Alarm feature has two levels of operation, Disabled and Warning. Alarm Level Selected Alarm Mode Disabled None Warning Rinse LED will come on 4 hrs prior to the selected time interval and remain on until the Rinse procedure has been performed. The dispenser will continue to serve product.
PROGRAMMING THE DISPENSER Open the dispenser door to access the digital programming module with LED display. Two basic modes are available to the operator: Display Mode and Program Mode. To enter the Display Mode, Set the RUN/NIGHT/PROGRAM Switch to the RUN position. To enter the Program Mode, Set the RUN/NIGHT/PROGRAM Switch to the PROGRAM position. Display Mode: Used to view the current set-up values. Use the MENU switch to scroll to the next display.
PROGRAMMING THE DISPENSER (Cont.) Display Mode (Continued) LCD DISPLAY DISPLAY MODE DESCRIPTION 0 6 0 0. 0 MENU (-) (-) (-) (-) LC MENU Displays Total Decaf Coffee Dispensed (XX.X Gal) Empty Product Threshold Displays Empty Product Threshold (Default = 600) Rinse Alarm (Hrs) Displays The Hours Between Required Rinses. (Default = 0 > OFF, Alarm Disabled) (+) 0 9 OF F MENU Decaf Dispense Total (+) 08 600 MENU Displays Total Regular Coffee Dispensed (XX.X Gal) (+) 0 7 0 0.
PROGRAMMING THE DISPENSER (Cont.) Program Mode: Used to change or enter new set-up values. To enter the Program Mode, Set the RUN/NIGHT/PROGRAM Switch to the PROGRAM position, the unit will display “__PPP” to indicate it is in the Program Mode. Use the MENU switch to scroll to the next display. Use the Increase (+) and Decrease (-) switch to adjust the values.
PROGRAMMING THE DISPENSER (Cont.) Program Mode (Continued) LCD DISPLAY PROGRAM MODE DESCRIPTION P7 MENU 0. 0 (-) (-) (-) Empty Product Threshold Set Conductance Threshold Default = 600 Range = 100 Min / 900 Max To check Conductance of Hot Water, view the display while rinsing. Set value to 100 above reading. Rinse Alarm Timer Default = OFF > Rinse Alarm Disabled Range = 1 - 24 hrs Reminder Only. No Lock Out. To clear alarm, set to RINSE Mode.
PRIMING THE CONCENTRATE LINES 1. 2. 3. 4. 5. Open the dispenser door. Select Prime on the Function Selector Switch and Run on the Mode Selector Switch. Close the dispenser door. Place a container under the dispense tip. Activate the appropriate dispenser until concentrate flows from the dispense nozzle. Priming may take 5 to 10 seconds. 6. Open the dispenser door, select Normal on the Function Selector Switch. Note: Concentrate may continue to drip out of dispense tip.
OPERATING THE DISPENSER Set the Function Selector Switch to “Normal” and the Mode Selector Switch to “Run.” 1A. Push and Hold Dispense Mode (Cup at a time). See Programming Functions to set this amount. a. Place cup on the tray beneath the dispensing tip. b. Push and hold the corresponding dispense switch until the container is full. c. Remove cup or container. 1B. Portion Dispense Mode. (Cup dispense volume preset to a desired amount) Refer to Programming Functions to set this amount. a.
CLEANING & PREVENTATIVE MAINTENANCE General Cleaning and Sanitizing Procedures Note: The BUNN® LCA-2 LP dispenser incorporates a “user selectable” rinse reminder feature, which lights the Rinse LED on the front panel when it is time to rinse. See Programming Functions to activate this feature. Daily: RINSING 1. Open the dispenser door and set the Function Switch to Rinse and the Mode Selector Switch to RUN. 2. Close the dispenser door and place a 1/2 gal (2 liter) container under the dispense nozzle area.
PREVENTIVE MAINTENANCE Bunn-O-Matic Corporation recommends that preventive maintenance be performed at regular intervals. Maintenance should be performed by a qualified service technician. For Technical Service, contact Bunn-O-Matic® Corporation at 1-800-286-6070. NOTE: Replacement parts or service caused by failure to perform required maintenance is not covered by warranty. Replace pump hoses every 6-Months or as needed.
CALIBRATING THE DISPENSER NOTE: The LCA-2 LP is calibrated at the factory and does not normally need to be re-calibrated. To enter the Calibration Mode, Set the RUN/NIGHT/PROGRAM Switch to the PROGRAM position and then hold the “MENU” switch down for 10 seconds. LCD DISPLAY CALIBRATION MODE DESCRIPTION C1 r u n MENU (-) C1 MENU (-) C2 MENU (-) (-) Set PRIME-NORMAL-RINSE switch to PRIME position. Press and hold Decaf Dispense Switch until pump stops (20 sec.
CALIBRATING THE DISPENSER (Cont.) LCD DISPLAY CALIBRATION MODE DESCRIPTION C4 r u n MENU (-) (-) (-) (-) (-) (-) LC MENU Delays the Pump turn off after a dispense. Default = 200 Range = 1 - 999 mSec. English or Metric Mode Eng for English S.I. for Metric Error Code History Displays last known Error Code Depress the Decrease (-) to view the last 3 Errors. Hold the Decrease (-) & Increase (+) switches for 10 sec. to Erase.
TROUBLESHOOTING GUIDE Error Codes When an error has occurred, all Door LED’s will be flashing. Open the Door to access the LED Display and record the Error Code. Refer to the list of Error Codes below to identify the problem. A troubleshooting guide is provided to suggest probable causes and remedies for the most likely problems encountered. If the problem remains after exhausting the troubleshooting steps, contact the Bunn-O-Matic Technical Service Department.
TROUBLESHOOTING GUIDE (Cont.) Error Codes (Continued) LED DISPLAY ERROR DESCRIPTION/TROUBLESHOOTING EC 0 0 7 MENU (-) (-) (-) Switch Board Failure Unable To Communicate With The Switch Board In The Door. Faulty wiring between the Door and the Main Control Board. Power Supply Voltage Out of Range Too High (>26 Vdc) or Too Low (<23 Vdc) Display alternates between EC-011 and the actual power supply voltage, (XX Vdc). Check line voltage. Check 115/230 Vac switch on the power supply.
Field Calibration of the Concentrate Pumps & Dispenser Flow Rates The factory set default values for the Pump & Dispenser Flow Rates are very accurate and typically do not need to be field calibrated. However, if the mix ratio accuracy is ever in question, this procedure can be used to recalibrate the unit in the field. Equipment Required: 50 to 100 ml graduated cylinder, with 1 ml graduations. 1500 to 2000 ml graduated container.
Field Calibration of the Concentrate Pumps & Dispenser Flow Rates (Continued) 4. Stop dispensing and allow the tip to stop dripping. Discard the water collected 5. Place a 1500 to 2000 ml graduated container under Left Dispense Tip. 6. Press & Hold the Regular dispense switch. The dispenser will display a 20 second count down timer and then stop dispensing automatically. Release the dispense switch. 7. Keep the graduated container under dispense tip until all the water stops dripping. 8.
SCHEMATIC WIRING DIAGRAM LCA-2 LP GRN N L1 LIMIT THERM. BLK-16 BLU/BLK-16 COM N.O.