ULTRA-1 ULTRA-2 INSTALLATION & OPERATING GUIDE BUNN-O-MATIC CORPORATION POST OFFICE BOX 3227 SPRINGFIELD, ILLINOIS 62708-3227 PHONE: (217) 529-6601 FAX: (217) 529-6644 To ensure you have the latest revision of the Operating Manual, or to view the Illustrated Parts Catalog, Programming Manual, or Service Manual, please visit the Bunn-O-Matic website, at www.bunn.com. This is absolutely FREE, and the quickest way to obtain the latest catalog and manual updates.
BUNN-O-MATIC COMMERCIAL PRODUCT WARRANTY Bunn-O-Matic Corp. (“BUNN”) warrants equipment manufactured by it as follows: 1) All equipment other than as specified below: 2 years parts and 1 year labor. 2) Electronic circuit and/or control boards: parts and labor for 3 years. 3) Compressors on refrigeration equipment: 5 years parts and 1 year labor.
INTRODUCTION This equipment dispenses granita-type and cold liquid drinks on demand from separate hoppers. Operating controls are accessible only through password protection. CONTENTS Introduction & Warranty................................................................................................. 3 Site Preparation, Electrical Requirements....................................................................... 3 Initial Setup...........................................................................
Initial setup CAUTION – The dispenser is very heavy! Use care when lifting or moving it. Use at least two people to lift or move the dispenser. 6.0” MIN. 1. Set the dispenser on a sturdy counter top. The dispenser requires a minimum of 6.0” air clearance at the rear of the dispenser. For optimum performance, do not let warm air from surrounding machines blow on the ULTRA dispenser. NOTE – The dispenser should be level or slightly lower in front for proper operation. 2.
Initial setup (cont.) 9. Align the auger shaft with the 10. Install auger nose bushing into flat fin of the auger. Push the inside front of hopper. augers as far as they will go and rotate them so the flat fin is facing up. 11. Thoroughly rinse the hoppers and install them over the augers and cooling drums. 12. Slide the hopper(s) into place 13. For models with PAF, install 14.
Initial setup (cont.) Set Consistency This function allows the operator to adjust the ice consistency, or torque of each auger when answered YES (“ICE”). Two screens will appear for left and right. The operator can scroll through a range of a minimum of 1 (ULTRA) to a maximum of 16 (ICE). Factory default is 10. NOTE: ULTRA-1 models will only have one adjustment screen.
Initial setup (cont.) Set Time and Date Selecting YES (ICE) allows the operator to set the DATE (YY MM DD) and TIME (HR MIN SEC) for display on the Home Screen. SET DATE TIME ? NO YES YEAR 2005 (-) NEXT (+) MONTH 1 (-) NEXT (+) MONTH DAY 25 (-) NEXT (+) HOUR 10 AM (-) NEXT (+) MINUTE 45 (-) NEXT (+) SECOND 30 (-) NEXT (+) Install Date The following three screens will scroll after advancing past the function “Restore Defaults”.
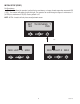
OPERATING CONTROLS ULTRA-1 There are three of these switches that will be used for the operation of the dispenser. 1 2 3 4 P3932 1. switch (upper left corner of the control pad) This switch is the ON/OFF toggle switch which powers up the dispenser and the LCD display. When ON the Date and Time toggle back and forth continously except during programming. 2. (upper right corner) This is used to turn the auger motor to AUGER ON, AUGER OFF or AUGER REFILL ON.
OPERATING CONTROLS ULTRA-2 There are five of these switches that will be used for the operation of the dispenser. 1 P3677 2 3 6 4 5 1. switch (upper left corner of the control pad) This switch is the ON/OFF toggle switch which powers up the dispenser and the LCD display. When ON the Date and Time toggle back and forth continously except during programming. 2. (bottom left corner) This is used to turn the left side auger motor to AUGER ON, AUGER OFF or AUGER REFILL ON.
USING THE DISPENSER FOR GRANITA-TYPE PRODUCTS 1. Lift the lid slightly for the selected hopper and slide back to gain access to the hopper. 2. Place the pre-mixed liquid product in the selected hopper. 3. a. Press and release the (ON/OFF) switch to power on the dispenser. b. Press and release the appropriate when applicable. (ON/OFF) switch to start the Auger Motor and to turn on AutoFill c.
OTHER RECOMMENDATIONS FOR YOUR DISPENSER • Whether liquid concentrate or granulated powder, all product must be thoroughly mixed BEFORE adding it to the hoppers. • For best results with granita-type products, use only products with an apparent brix of 12 or higher. Some products may work with an apparent brix as low as 9. Your experimentation with other products will be the best guide in this area. Keep the pre-mixed liquid product refrigerated. This reduces cooling/freezing time in the dispenser.
RECOMMENDED DAILY CLEANING (ULTRA-2 shown) NOTE – Turn the power OFF to the dispenser before proceeding. 1. Empty all product from the hopper(s). Disconnect the hopper lid lamp cord(s) and remove the lids. 2. Depress the hopper lock plung- 3. Pull forward to remove. er. Lift the hopper up slightly. 4. Pull the auger from the cooling drum. 5. Remove the cooling drum seal 6. Caution: The faucet valve is 7. Carefully slide the faucet valve under spring tension.
ASSEMBLY FOLLOWING CLEANING 1. Install the seal(s) over the 2. Align the auger shaft(s) with the 3. Install auger nose bushing into flange at the rear of the cooling auger(s). Push the auger(s) as inside front of hopper. drum(s) and press the seal(s) far as they will go and rotate so firmly into place as shown. the flat face of the auger shaft is aligned with the flat face of the auger nose. 4. Thoroughly rinse the hopper(s) 5. Slide into place and push down 6.
USER NOTICES Carefully read and follow all notices on the equipment and in this manual. They were written for your protection. All notices are to be kept in good condition. Replace any unreadable or damaged labels. Moving Parts. Risk Of Electrical Shock. Do not operate unit with this panel removed. Disconnect power before servicing unit. CHARGE Type R404A, Amount 10 oz Design Pressures: High 430 Low 80 32162.0000 (ULTRA-2) CHARGE Type R404A, Amount 9.