VPR TC VPR APS OPERATING & SERVICE MANUAL BUNN-O-MATIC CORPORATION POST OFFICE BOX 3227 SPRINGFIELD, ILLINOIS 62708-3227 PHONE: (217) 529-6601 FAX: (217) 529-6644 39064.0000A 04/06 ©2006 Bunn-O-Matic Corporation www.bunn.
INTRODUCTION This equipment will brew a half-gallon batch of coffee into an awaiting dispenser. It is only for indoor use on a sturdy counter or shelf. WARRANTY Bunn-O-Matic Corp. (“Bunn”) warrants the equipment manufactured by it to be commercially free from defects in material and workmanship existing at the time of manufacture and appearing within one year from the date of installation. In addition: 1.
USER NOTICES Carefully read and follow all notices in this manual and on the equipment. All labels on the equipment should be kept in good condition. Replace any unreadable or damaged labels. #00658.0000 #00831.0000 #00833.
ELECTRICAL REQUIREMENTS CAUTION - The brewer must be disconnected from the power source until specified in Initial Set-Up. The brewer has an attached cordset and requires 2-wire grounded service rated 120 volts ac, 15 amp, single phase, 60 Hz. INITIAL SET-UP CAUTION - The brewer must be disconnected from the power source throughout the initial set-up, except when specified in the instructions. 1. 2. 3. Insert an empty funnel into the funnel rails. Place an empty dispenser under the funnel.
TROUBLESHOOTING A troubleshooting guide is provided to suggest probable causes and remedies for the most likely problems encountered. If the problem remains after exhausting the troubleshooting steps, contact the Bunn-O-Matic Technical Service Department. • • Inspection, testing, and repair of electrical equipment should be performed only by qualified service personnel. This brewer is heated at all times. Keep away from combustibles.
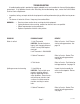
TROUBLESHOOTING (cont.) PROBLEM PROBABLE CAUSE REMEDY Dripping from sprayhead 1. Lime Build-up CAUTION - Tank and tank components should be delimed regularly depending on local water conditions. Excessive mineral build-up on stainless steel surfaces can initiate corrosive reactions resulting in serious leaks. Inspect the tank assembly for excessive lime deposits. Delime as required. Beverage overflows dispenser 1. Dispenser The dispenser must be completely empty before starting a brew cycle.
TROUBLESHOOTING (cont.) PROBLEM PROBABLE CAUSE REMEDY Dry coffee grounds remain in the funnel 1. Funnel Loading The BUNN® paper filter must be centered in the funnel and the bed of grounds leveled by gently shaking. Brewer is making unusal noises 1. Tank Heater Remove and clean lime off the tank heater.
SERVICE This section provides procedures for testing and replacing various major components used in this brewer should service become necessary. Refer to Troubleshooting for assistance in determining the cause of any problem. The tank inlet fitting secures the fill basin to the tank lid. WARNING - Inspection, testing, and repair of electrical equipment should be performed only by qualified service personnel.
SERVICE (cont.) Location: The control thermostat is located inside the hood on the left end of the mounting bracket. Removal and Replacement: 1. Remove wires from control thermostat leads or terminals. 2. Remove the thermostat capillary bulb by firmly pulling-up on the capillary at the tank lid. This will disengage the grommet from the tank lid. Test Procedures: 1. Disconnect the brewer from the power source. 2. Locate the black wire on the control thermostat. 3.
Removal and Replacement: 1. Remove all wires from limit thermostat terminals. 2. Carefully slide the limit thermostat out from under the retaining clip and remove limit thermostat. 3. Carefully slide the new limit thermostat into the retaining clip. 4. Refer to Fig. 6 when reconnecting the wires. SERVICE (cont.) LIMIT THERMOSTAT TANK HEATER P2414 FIG. 5 LIMIT THERMOSTAT Location: The limit thermostat is located inside the hood on the right side of the tank lid. Test Procedures: 1.
SERVICE (cont.) If continuity is present as described, reconnect the wires, the tank heater is operating properly. If continuity is not present as described, replace the tank heater. NOTE- If the tank heater remains unable to heat, remove and inspect heater for cracks in the sheath. Removal and Replacement: 1. Remove the tank inlet fitting securing the fill basin to the tank lid, remove fill basin and tank inlet gasket. Set all three parts aside for reassembly. 2.
SCHEMATIC WIRING DIAGRAM VPR, VPR TC & VPR APS L1 N GREEN LIMIT THERMOSTAT SW. & THERMOSTAT BLK BLU/BLK WHI BLK TANK HEATER WHI "KEEP WARM" HEATER MODEL VPR ONLY ON/OFF SWITCH WHI LOWER WARMER WHI/RED BLK ON/OFF SWITCH BLK 120 VOLTS A C 2 WIRE SINGLE PHASE 60 HZ WHI WHI WHI UPPER WARMER VIO WHI 33769.