
assembly Instructions
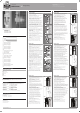


Important notes
Field of application
Packaging content
Assembly tools
Assembly
Contents
A
B
C
D
E
A. Important notes
Please read the instructions carefully before the assembly and store them!
For any possible damage caused during assembly or injury, the manufacturer
does not assume liability.
B. Field of application
The BURG-WÄCHTER mounting anchor MA 99 DUO offers maximum pullout resistance in hollow profiles
and in softwood frame. For assembly of window and door security...
• BlockSafe B1 + BS2 (1-2 mounting anchors required)
• WinSafe WD3 (2 mounting anchors required)
...on frames of windows made of aluminium, wood or plastic.
• WinSafe WS 11 (1 mounting anchor required)
• WinSafe WS 22 (2 mounting anchors required)
...on frames of windows made of aluminium or wood.
• WinSafe WS 33 (2 mounting anchors required)
• WinSafe WS 44 (2 mounting anchors required)
...on frames of windows made of aluminium, wood or plastic with metal insert.
C. Packaging content
• 2 mounting anchors Ø 9 x 120 mm
• 2 screw-in bolt Ø 13 x 28 mm
• 1 drilling template
• 2 screws each M5 x 16/20/25/30/35 mm
• 2 screws each M8 x 16/20/25/30/35 mm
D. Assembly tools
• HSS drill Ø 10 mm
• HSS drill Ø 13 mm
• Masonry drill Ø 10 mm
• Phillips screwdriver
• Screwdriver
Installation Manual MA 99 DUO
BlockSafe B1/BS2
1. Use the Blocksafe assembly instructions to install the
lock case and set the drill holes for the locking part.
• Assembly with fastening rail:
Use the central hole for MA 99 Duo (see Fig.1).
• Assembly without fastening rail:
Reinforce both drill holes with MA 99 Duo.
2. Drill the hole(s) approx. 40 mm deep with a Ø 13 mm drill.
Caution: Do not drill through the frame.
TIP: Note the distance at which the drill hits the alu/steel
prole embedded in the frame (see Fig.1).
3. Place the drilling template onto the frame alongside the
groove as indicated in Fig. 2 and mark the dill hole centre on
the rebate side. Now choose the depth, at which the anchor
can be set most conveniently. Optimal is the noted distance
from Fig.1 + 8 mm (see Fig.2 + point 2), so that the drill does
not cut through along the steel prole.
Caution: The Ø 10 mm drill hole must be made within
the range of the template slot.
4. Drill a hole Ø 10 mm in the indicated point through the frame
and then use a Ø 10 mm masonry drill to reach a depth of
120 mm. This allows, the mounting anchor to be xed rmly
into the frame and in the masonry.
5. Choose the screw with the optimal length from the 5
attached M5 screws (16, 20, 25, 30 and 35 mm).
TIP: The screw should be inserted into the bolt to a min.
distance of 5 mm.
Screw length = 5 mm + bolt upper edge to frame upper
edge + optional padding + fastening rail.
6. Turn the M5 screw through the fastening rail and optional
padding into the bolt and insert it into the frame, so that the
anchor can be driven from the side through the bolt bore
(see Fig.3).
TIP: Make sure that the M5 screw does not protrude into the
10 mm bolt bore.
7. Now tighten the screw and proceed with the assembly of
BlockSafe.
TIP: When installing on the bottom frame prole, seal the
remaining openings using e.g. silicone.
The manufacturer assumes no liability for any damage or
injury which may occur during the assembly.
Fig.1
Fig.2
Fig.3
MasonryMasonryMasonry
Frame
Frame
Frame
Steel prole
Central
drill hole
Fastening rail
Note distance
to steel prole
Steel prole
Drill hole
Ø 10 mm
Drilling
Template
Inner thread
bolt
Prole anchor
Fastening rail
Drill hole
Ø 13 mm
WinSafe WD3
1. Use the WinSafe WD3 assembly instructions to mark and
drill the two holes for the base plate.
2. Drill the two holes approx. 40 mm deep with a Ø 13 mm drill.
Caution: Do not drill through the frame.
TIP: Note the distance at which the drill hits the alu steel
prole embedded in the frame (see Fig. 1).
3. Place the drilling template onto the frame alongside the
groove as indicated in Fig. 2 and mark the two dill hole
centres on the rebate side. Now choose the depth, at which
the anchor can be set most conveniently. Optimal is the noted
distance from Fig.1 + 9 mm (see Fig.2 + point 2), so that the
drill does not cut through the steel prole.
Caution: The Ø 10 mm drill holes must be made
within the range of the template slot.
4. Drill the holes Ø 10 mm in the indicated points through the
frame and then use a Ø 10 mm masonry drill to reach a depth
of 120 mm. This allows, the mounting anchors to be xed
rmly in the frame and in the masonry.
5. Choose the screws with the optimal length from the attached
M8 screws (16, 20, 25, 30 and 35 mm).
TIP: The screws should be inserted into the bolt to a min.
distance of 5 mm.
Screw length = 5 mm + bolt upper edge to frame upper
edge + optional padding + base plate.
6. Turn the M8 screws through the base plate and optional
padding into the bolt and insert them into the frame, so that
the anchor can be driven from the side through the bolt bore
(see Fig.2).
TIP: Make sure that the M8 screws do not protrude into the
10 mm bolt bores.
7. Now tighten the screws and proceed with the assembly of
WinSafe.
TIP: When installing on the bottom frame prole, seal the
remaining openings using e.g. silicone.
The manufacturer assumes no liability for any damage or
injury which may occur during the assembly.
Fig.1
Fig.2
Masonry Masonry
Frame
Frame
Prole anchor
Steel prole
Base plate
Protection
WD 3
Inner thread bolt
Drilling
Template
Drill hole
Ø 13 mm
Drill hole
Ø 10 mm
E. Assembly E. Assembly
WinSafe WS 11
1. Based on the mounting and operating for WinSafe WS 11
please drill the 3 holes for the window lock and determine
the required underlays.
2. Drill the upper hole approx. 40 mm deep with a Ø 13 mm drill.
Caution: Do not drill through the frame.
TIP: Measure the distances of the metal prole located inside
the framework toward the inside of the frame. Shape and
location of the metal prole may differ from Fig. 1.
3. Place the drilling template onto the frame alongside the
groove and mark the dill holes on the interior and rebate
sides. The distance between the Ø 13mm drill hole and
Ø 10mm drill hole on the rebate side must be within the
marked areas on the drilling template. When drilling do
not hit the metal bar of the steel prole.
Caution: The drill holes must be made within the
range of the template slot.
4. Drill the Ø 10 mm hole at the marked position through the
frame and then drill with the Ø 10 mm masonry drill 120 mm
deep into the masonry.
5. Insert one of the enclosed M8 screws through the window
latch and any required underlays.
Keep the window latch WS 11 to the inside of the frame with
the screw on the rebate side.
The screw should be as close as possible to the Ø 10 mm hole
(s. Fig.2). If necessary, choose a different screw length.
6. Screw the inner thead bold on the screw, so that the prole
anchor can be guided from the side through the drill hole of
the screw-in bolt.
TIP: The screws should at least be screwed 5 mm into the
inner thread bolt.
7. Now tighten the screw and continue with mounting the
WinSafe WS 11.
TIP: When mounted on the lower frame prole the prole
anchor can be sealed with e.g. silicone.
The manufacturer assumes no liability for any damage or
injury which may occur during the assembly.
Masonry
Interior side
Rebate side
Frame
Steel prole
Drilling
template
Drill hole
Ø 13 mm
Drill hole
Ø 10 mm
Fig.1
Fig.2
Fig.3
Inner thread
bolt
Prole anchor
Masonry
WinSafe WS 22
1. Based on the mounting and operating for WinSafe WS 22
please drill the 4 holes for the window lock and if required,
the underlays.
2. Drill the upper and lower hole approx. 40 mm deep
with a Ø 13 mm drill.
Caution: Do not drill through the frame.
TIP: Measure the distances of the metal prole located inside
the framework toward the inside of the frame. Shape and
location of the metal prole may differ from Fig.1.
3. Place the drilling template onto the frame alongside the
groove and mark the dill holes on the inside and the
rebate side. Use the drill template to determine the distance
from the metal prole to the point for the Ø 10 mm hole.
Ensure the drill doesn‘t hit the metal prole bar.
Caution: The drill holes must be made
within the range of the template slot.
4. Drill the Ø 10 mm hole at the marked position through the
frame and then drill with the Ø 10 mm masonry drill 120 mm
into the masonry.
5. Insert two of the enclosed M8 screws through the window
lock and any required underlays.
Keep the window lock WS 22 to the inside of the frame
with the screw on the rebate side.
The screw should be as close as possible to the Ø 10 mm
hole (s. Fig.2). If necessary, choose a different screw length.
6. Screw the inner thead bolt on the screws, so that the prole
anchor can be guided from the side through the drill holes
of the screw-in bolt.
TIP: The screws should be screwed at least 5 mm into the
inner thread bolt.
7. Now tighten the screw and continue with mounting the
WinSafe WS 22.
TIP: When mounted on the lower frame prole the prole
anchor can be sealed with e.g. silicone.
The manufacturer assumes no liability for any damage or
injury which may occur during the assembly.
Masonry
Interior side
Rebate side
Frame
Steel prole
Drill
template
Fig.1
Fig.2
Fig.3
Prole anchor
Inner thread
bolt
Masonry
Drill hole
Ø 13 mm
Drill hole
Ø 10 mm
WinSafe WS 33
1. Based on the mounting and operating for WinSafe WS 33
please drill the 3 holes for the window lock and any required
underlays.
2. Drill upper and lower holes with a Ø 13 mm drill approximately
40 mm deep.
Caution: Do not drill through the frame.
TIP: Measure the distances of the metal prole located inside
the framework toward the inside of the frame. Shape and
location of the metal prole may differ from Fig.1.
3. Place the drilling template onto the frame alongside the
groove and mark the dill holes from the inside to the rebate
side. The location is determined by the metal prole to the
point of the Ø 10 mm hole. The drill should not hit the metal
prole bar.
Caution: The drill hole must be made
within the range of the template slot.
4. Drill the Ø 10 mm hole at the marked position through the
frame and then drill with the Ø 10 mm masonry drill 120 mm
deep into the masonry.
5. Insert two of the enclosed M8 screws through the window lock
and any required underlays.
Keep the window lock WS 33 to the inside of the frame
with the screw on the rebate side.
The screw should be as close as possible to the Ø 10 mm
hole (s. Fig.2). If necessary, choose a different screw length.
6. Screw the inner thread bolt on the screws, so that the prole
anchor can be guided from the side through the drill holes of
the screw-in bolt.
TIP: The screws should be screwed at least 5 mm into
the inner thread bolt.
7. Now tighten the screws and continue with mounting the
WinSafe WS 33.
TIP: When mounted on the lower frame prole the prole
anchor can be sealed with e.g. silicone.
The manufacturer assumes no liability for any damage or
injury which may occur during the assembly.
Interior side
Rebate side
Frame
Drill
template
Drill hole
Ø 10 mm
Fig.1
Fig.2
Fig.3
prole anchor
Masonry
Steel prole
Drill hole
Ø 13 mm
Inner thread
bolt
Masonry
Mounting anchor MA 99 DUO
English I 2
WinSafe WS 44
1. Based on the mounting and operating for WinSafe WS 44
please drill the 3 holes for the window lock and any required
underlays.
2. Drill upper and lower hole with a Ø 13 mm drill approximately
40 mm deep.
Caution: Do not drill through the frame.
TIP: Measure the distances of the metal prole located inside
the framework toward the inside of the frame. Shape and
location of the metal prole may differ from Fig.1.
3. Place the drilling template onto the frame alongside the
groove and mark the dill hole from the inside to the rebate
side. The location is determined by the point of the Ø 10 mm
hole. The drill should not hit a bar of the metal prole.
Caution: The drill hole must be made
within the range of the template slot.
4. Drill the Ø 10 mm hole at the marked position through the fra-
me and then drill with a Ø 10 mm masonry drill 120 mm deep
into the masonry.
5. Insert two of the enclosed M8 screws through the window lock
and any required underlays.
Keep the window lock WS 44 to the inside of the frame with
the screw on the rebate side.
The screw should be as close as possible to the Ø 10 mm
hole (s. Fig.2). If necessary, choose a different screw length.
6. Screw the inner thread bolt on the screws, so that the prole
anchor can be guided from the side through the drill holes of
the screw-in bolt.
TIP: The screws should at least be screwed 5 mm into the inner
thread bolt.
7. Now tighten the screws and continue with mounting the
WinSafe WS 44.
The manufacturer assumes no liability for any damage or
injury which may occur during the assembly.
Prole anchor
Inner thread
bolt
Frame
Drill
template
Drill hole
Ø 10 mm
Masonry
Steel prole
Drill hole
Ø 13 mm
Fig.2
Fig.3
Fig.1
Masonry
Language
fr
de
en
nl
sv
it
es
pt
el
no
dk
cs
tr
ro
pl
hr
hu
sl
sk
ru
bg
et
Deutsch 1
English 2
Français 3
Nederlands 4
Download: www.burg.biz
Descarga: www.burg.biz
Download: www.burg.biz
Download: www.burg.biz
Download: www.burg.biz
Download: www.burg.biz
Ladattava tiedosto: www.burg.biz
λήψη: www.burg.biz
İndir: www.burg.biz
Descărcare: www.burg.biz
Pobieranie pliku: www.burg.biz
Stáhnout: www.burg.biz
Letölthető: www.burg.biz
Download: www.burg.biz
Download: www.burg.biz
Download: www.burg.biz
загрузка: www.burg.biz
Download (зареди): www.burg.biz
Download: www.burg.biz
Interior side
Rebate side
To assemble the BURG-WÄCHTER
door and window security:
• BlockSafe B1 + BS2
• WinSafe WD3
• WinSafe WS 11 + WS 22
• WinSafe WS 33 + WS 44
en
Assembly Manual
MA 99 DUO
Mounting anchor
BURG-WÄCHTER KG
Altenhofer Weg 15
•
58300 Wetter
•
Germany
info@burg.biz
•
www.burg.biz
MA Mounting anchor MA 99 DUO NM/SDS 04/2016
Errors and changes reserved.