Owner’s Instruction and Safety Manual child trailer Burley Cub™ Push Burley Cub™ model shown Stroll Bike Ski Jog
Contents Owner’s Instruction and Safety Manual 3 Introduction Burley Cub™ 3 Parts Bag Contents 3 Safety Guidelines 3 Tools Required 4 Installing and Using Parking Brake 4 Opening and Closing Your Trailer 5 Attaching the Seat 5 Installing Wheels 6 Installing Tow Bar 6 Installing Handle Bar and Roll Bar 7 Mounting Lights 7 Installing Cover 7 Installing Safety Flag 8 Installing Seat Pads 8 Installing Shoulder Harness Pads & Crotch Strap Pads 8 Using Seat Harness 9 Us
Congratulations! Your Burley ® trailer is the leading choice of refined bicycle trailer owners worldwide. Every effort has been made to ensure your purchase is a top-quality, thoroughly-tested design, ready to provide many years and miles of happy, safe trailering. Please go to www.burley.com or contact us at burley@burley.com to register your warranty information. IMPORTANT ITISVERYIMPORTANTFORYOUTOFAMILIARIZEYOURSELFWITH YOURBURLEYBYREADINGTHISENTIREMANUALBEFOREUSE.
WARNING Screws/Spring Washers/Flat Washers TRAILERS CANTIP OVER, CAUSING DAMAGETOTRAILER AND SERIOUSINJURYTOPASSENGERS.AVOIDCAUSESOFTIPOVER, ESPECIALLY: • CHILDREN LEANING OR BOUNCING • HITTING POTHOLES, CURBS, OTHER ROAD OBSTRUCTIONS • TAKING TURNS TOO FAST • SUDDEN SWERVING • IMPROPER WHEEL INSTALLATION OR TIRE INFLATION Brake Released 1 2 3 4 Brake Engaged 5 Installing and Using Parking Brake 1. Tilt trailer onto its nose and lean it against a wall. 2.
Attaching the Seat 1. Behind seat, fasten buckle sections together on upper and lower straps and adjust as needed. Photo 1 2. Before closing trailer, unfasten buckles behind seat. Photo 1 UpperFrameTube IMPORTANT ALWAYS KEEP SEAT ATTACHMENTS FASTENED WHILE TRAILERING. UpperandLowerStrapBuckles photo 1: Back of Cub seat shown Installing Wheels 1. Push rubber button on outside of wheel hub. 2. Fully insert axle into axle receiver and release button. Photo 2 3.
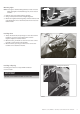
Installing Tow Bar 1. Slide tow bar through both tow bar mounts on LEFT side. Figure 4 2. Match rear tow bar hole with rear mount hole. 3. Slide tow bar lock pin through rear holes and rotate pin toward rear. 4. Insert retaining pin through front tow bar holes, and lock hoop securely. FrontTowBarHole Lock Pin WARNING NEVEROPERATETRAILERWITHOUTRETAININGPINLOCKEDIN PLACE. AN UNLOCKED TOW BAR CAN LOOSEN OR DETACH, CAUSING AN ACCIDENT RESULTING IN SERIOUS INJURY.
Mounting Lights FrontofTrailer Note: Clear light is mounted facing foward, on side closest to traffic. Red light is mounted facing rear, on side closest to traffic. 1. Remove clips and screws from back of lights. 2. Using screws, fasten brackets and lights together. 3. Mount clear light/bracket diagonally on front of roll bar and red light/bracket on rear of roll bar, both on side closest to traffic. Photo 5 RedLight Roll Bar Clear Light PHOTO 5 Installing Cover Front Trailer 1.
Installing Seat Pads Match hook and loop fastening strips on trailer seat to strips on back of seat pads. Installing Shoulder Harness Pads and Crotch Strap Pads Insert shoulder straps through loops on shoulder harness pads, with straps oriented so that FLAT sides of strap buckles face each other. Slide crotch strap through crotch strap pad. Using Seat Harness One Passenger: Note: In two-passenger trailers, use inner shoulder straps and middle crotch strap. 1. Place child in center of seat. 2.
Note: For taller children, the seat harness can be adjusted by moving the buckles on the shoulder strap webbing into the helmet pocket area, above the horizontal elastic. Photo 8 IMPORTANT DO NOT SLIDE SHOULDER STRAP ASSEMBLIES ABOVE WEBBING STOPS. ForTaller Children Helmet PocketArea Using Seat Recliner For added comfort when children are sleeping, make the following adjustments to recline seat: 1. Loosen tension on lower horizontal strap on seat back. 2.
Safety Checklists 2009 Cub Replacement Parts and Diagram Check Before Each Ride: ✓ ✓ ✓ ✓ ✓ ✓ ✓ ✓ ✓ ✓ Wheels tightly and securely attached Tires inflated to recommended pressure on tire side wall Hitch properly secured with safety strap in place Tow bar locked securely in place Maximum load 100 lbs (40 kg by law in Europe) Bicycle safety check, especially brakes and tires Helmet for passengers and cyclist Safety flag in place All seat straps properly attached Children properly secured with harnesses and
BURLEY CUB OWNER’S INSTRUC TION AND SAFE T Y MANUAL 11
Burley Trailer Limited Warranty Burley trailers are warranted from date of purchase against defects in materials and workmanship under normal use and service. Burley will repair or replace parts it determines to be defective as follows: fabric parts for one year, plastic parts for five years and durable frame parts for the lifetime of the trailer. The Burley trailer owner must present the trailer for repair at place of purchase, with an original sales receipt or similar proof of purchase.