Cub Owner’s Instruction & Safety Manual Contents Section Introduction I. Hardware Bag Contents & Tool List II. Attaching the Wheels III. Installing the Tongue & Safety Flag IV. Unfolding & Folding your Burley Cub V. Using the Seat Harness VI. Padded Seat & Shoulder Harness VII. Hitching the Burley Cub to Your Bicycle VIII. Trailer Maintenance and Care IX. Safety Guidelines X. Safety Checklists XI.
Congratulations! You’ve just purchased a Burley® trailer, the leading choice of discriminating bicycle trailer owners worldwide. Every effort has been made to ensure your purchase is of top quality and proven design, ready to provide you with many years and thousands of miles of happy, safe trailering.
I. Hardware Bag Contents and Tool List IMPORTANT: Please verify that you have received all of the contents listed. Do not proceed with assembly if any parts are missing; contact Burley immediately for replacement parts. Hardware Bag Contents (1) Cub Brake Assembly (3) #10 x 5/8 Philips pan bolts (3) #10 x 1” fender washers (1) 6 x 18 plastic bag (1) Brake Hardware Bag (3) #10 split washers (1) 4 x 6 plastic bag Tool List 7/16” wrench Torque wrench Extension 7/16” socket Two no.
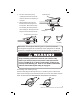
Once the wheels are fully seated in the hollow axle, the quick-relase lever should be positioned so that it is aimed to the rear of the trailer in the “CLOSED” position (the lever is marked for OPEN or CLOSED positions). The wheel quick-release/axle assembly comes preadjusted from Burley. NOTE: All wheels, including optional spoked alloy wheels, must be mounted with the recessed side of the hub facing outward. Make sure wheels are held securely, with wheel shaft fully inserted into the hollow axle.
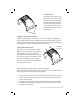
2. Secure it and lock the pin by rotating it toward the rear of the trailer as shown in the drawing on the right. 3. Slip the safety pin though the forward hole in the tongue and lock in place. Refer to the illustra tion showing the locked position of the safety pin. Firmly pull on the tongue to ensure that it is secure. Retaining Pin Safety Pin Forward hole in tongue 2 3 1 OPEN LOCKED Important: The tongue retaining pin is captured between the tongue receptacle and the lip of the poly shell.
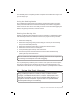
IV. Unfolding & Folding Your Burley Cub Unfolding your Burley Cub Your Burley Cub is designed with a durable polyethelyne bucket, lightweight aluminum frame with roll cage, and bright-colored polyester software. Setting it up or folding it down is accomplished in a few easy steps as follows: Frame Lock To unfold, rotate the front tube upward and the rear tube back until they meet on the two black plastic saddles as shown at right. Then rotate the two frame locks to snap onto the rear tube as shown.
Installing the Cover To install the cover, unfold it and snap the top two snaps first. Next, pull the cover toward the back of the trailer and snap the two rear snaps. Finally, using the B-tabs in front, pull the cover taut by snapping the B-tabs over the edge of the frame rails. B-tabs Folding and Stowing the Front Window Folding and stowing the front window is quick and easy. Begin by unzipping the window. Next, fold the window in half toward the back of the trailer.
3. Use a 1/4” pin punch and a hammer to pop out three dimples - the ones in depressions 1, 3, and 6 (as numbered in the illustration on page 9). If you are lacking a pin punch, use a 1/4” drill bit in a hand drill to drill out those dimples. 4. Clean the slugs and/or burrs from the resulting holes where they enter the inside of the bucket. 5. Put a spring washer on a mounting screw, and put a fender washer on the screw. These parts are found in the hardware bag. 6.
Your assembly of the Cub parking brake is complete. Now reattach the tongue and you are ready to go! Using the Parking Brake Once installed, the parking brake is engaged by pushing the handle to the right, which pushes the brake arms outward so that the tip of each brake engages the inside of each tire. This can be done with your hand or foot. When disengaging the brake, it may spring to the left, so exercise caution.
The straps and sliding buckles sewn to the backrest of the child seat are part of a self-adjusting system that keeps the shoulder straps at the correct height for children of various sizes. When you tighten the shoulder harness, the sliding buckles allow the shoulder belts to come across the top of the child’s shoulders, creating a snug fit. In addition, the sliding buckles keep the straps from falling off of the shoulders.
Two Passengers For two children, use both shoulder harnesses and two outer crotch straps. 1. Ensure that the restraint system is set up for two children so that the male portion of each Y-buckle is facing the center of each seating position. If your trailer was set up for single-child use, reverse the process above in the Single Passenger section. 2. Attach the center support strap. 3. Seat the first child on one side of the trailer. 4. Snap in the shoulder straps at the Y-buckle.
Child and cyclist must wear helmets when trailering. Helmets can prevent or significantly reduce head injury in event of accident. VI. Padded Seat & Shoulder Harness The seat in your Burley Cub is designed to provide the utmost comfort for your children. From a padded seat and shoulder harnesses to room for your children’s helmets to flow-thru mesh to keep your children cool, the Burley Cub is the most comfortable trailer on the market.
Shoulder Harness Pad Insert the shoulder straps into the shoulder harness pad as shown in the drawing at right. The shoulder straps should be oriented so that the FLAT parts of the male buckles are facing toward each other. VII. Hitching the Burley Cub to Your Bicycle The trailer hitch was designed to quickly and safely attach to virtually all types of bicycles. It is inserted in front of the left rear dropout of your bicycle. Hitching the Trailer to Your Bicycle 1. 2. 3. 4.
any racks, bags, or fittings you have on your bicycle. If there is any interference, contact your Burley dealer. IMPORTANT: Remove trailer from your bicycle when it’s not in use to prevent deforming the plastic hitch. Do not operate trailer without hitch safety strap properly installed. A dangling safety strap can contact spokes and damage rear wheel or cause an accident resulting in serious injury. Hitch must seat properly into stays and not interfere with racks, bags, or fittings.
Because of ultraviolet degradation, we recommend that the hitch be replaced every five years under normal use. In sunny or smoggy locations or for trailers that are stored outdoors, the hitch should be replaced every two to three years for safety. Replace your hitch or tongue if there are any signs of damage—i.e., cracks, dents, scratches. When ordering a replacement hitch, you must specify that your Burley trailer is equipped with a square tongue. Trailers with round tongues require a different hitch.
IX. Safety Guidelines Bicycling with a trailer is different from bicycling without one, in ways which aren’t always obvious. It is therefore essential that you read and understand all of the following safety guidelines—in addition to the warnings and instructions in the previous sections—prior to using your trailer. Before loaning your trailer to others, make sure they too understand its proper, safe use. Contact your dealer or Burley if any of these instructions are unclear.
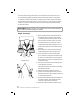
Prevent Trailer Tip Over Just like automobile and motorcycle trailers, bicycle trailers can tip over. To avoid overturning: Do not pull your trailer over curbs or hit holes or other obstructions in the road. Instruct children not to bounce, rock, or lean, which can cause a shift of weight. Do not make high-speed turns or descents when pulling the trailer. Always corner with caution at 5 m.p.h. or less, as the trailer cannot lean into a turn the way a bicycle can.
Avoid Riding in Traffic We recommend against riding in traffic. If you must ride in traffic, do not pull your trailer on highways, busy streets, or on streets unsafe for bicycling with children. Never assume that you will be given the right-of-way, even if it is legally yours. Your child is a precious load; his or her safety should not be entrusted to a car driver whose attention or regard for bike riders is unknown.
not react to it appropriately. If you must ride at night, wear bright, reflective clothing, use a bright headlight and a red blinking taillight on your bike. Similarly, put a red blinking light in the light-holder tab sewn onto the back of your cover so you can be more easily seen. Do not operate without properly attached reflectors; replace cracked or missing reflectors. Always Use Your Cover Affix your Big Screen 2-in-1 Cover to protect your child from flying debris when pulling your trailer.
Use Your Flag Always use the safety flag—it’s an essential safety device. The moving flag will help make you more visible to motorists and other cyclists. Protect Your Child When pulling a child, use the shoulder harness, lap belt, and a child helmet at all times. Always fasten the seat belt so that each child is held securely. For maximum stability and safety, seat a single child in the center of the trailer. Periodically check placement of shoulder straps, especially for a sleeping child.
X. Safety Checklists Before Each Ride, Ensure the Following: √ √ √ √ √ √ √ √ √ Wheels tightly attached Tire pressure 30–35 P.S.I. Hitch properly secured with safety strap in place Locked safety pins for tongue and roll bar Maximum load 100 lbs.
XI. Parts List and Drawing Note: Subassemblies are indented; inquire for additional parts 1. (1) Polyurethane Shell 2. (2) Front Reflector (clear) 3. (2) Rear Reflector (red) 4. (2) Suspension Elastomer 5. (1) Pair Side Panel Hold Down (left and right) 6. (1) Tongue Retaining Pin 7. (1) Pair Tongue Receptacle (front and rear) 8. (1) Safety Pin & Tether 9. (1) Front Roll Bar, 7/8” Aluminum Tube 10. (2) Frame Locks 11. (2) Front Roll-Bar Hinge (plastic) 12. (1) Rear Roll bar, 7/8” Aluminum Tube 13.
37 15 23 17 18 23 Burley Cub Owner’s Instruction and Safety Manual
About Burley Design Cooperative Burley has been supplying products to the bicycle industry since 1975. Burley products are designed and manufactured at our Eugene, Oregon shop. As worker-owners of our cooperatively owned business, we bring an uncommon degree of personal pride and attention to our work. Use our products with confidence and satisfaction! Burley Trailer Limited Warranty Burley will repair or replace any original equipment parts it determines to be defective for the life of the trailer.