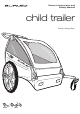
Owner’s Instruction and Safety Manual child trailer Burley Honey Bee™ Stroll Bike Ski Jog
Contents Owner’s Instruction and Safety Manual 3 Introduction 3 Safety Guidelines Burley Honey Bee ™ 3 Parts Bag Contents 3 Tool List 4 Opening and Closing Your Trailer 4 Attaching the Seat 5 Mounting Reflectors 5 Installing Wheel Guards 5 Attaching Wheels 6 Using Parking Brake 6 Installing Tow Bar 6 Installing Handle Bar Receivers 7 Installing Cover 7 Attaching Handle 7 Installing Safety Flag 8 Using Seat Harness 9 Hitching Trailer to Your Bicycle 10 Safety Checklists
Congratulations! Your Burley ® trailer is the leading choice of refined bicycle trailer owners worldwide. Every effort has been made to ensure your purchase is a top-quality, thoroughly-tested design, ready to provide many years and miles of happy, safe trailering. Please go to www.burley.com or contact us at burley@burley.com to register your warranty information. IMPORTANT IT IS VERY IMPORTANT FOR YOU TO FAMILIARIZE YOURSELF WITH YOUR BURLEY BY READING THIS ENTIRE MANUAL BEFORE USE.
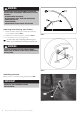
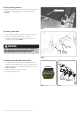
Note: The tow bar mount clamps also function as wheel WARNING guards. They will be referred to as clamps in these assembly instructions. Front TRAILERS CAN TIP OVER, CAUSING DAMAGE TO TRAILER AND SERIOUS INJURY TO PASSENGERS. AVOID CAUSES OF TIP OVER, ESPECIALLY: • CHILDREN LEANING OR BOUNCING • HITTING POTHOLES, CURBS, OTHER ROAD OBSTRUCTIONS • TAKING TURNS TOO FAST • SUDDEN SWERVING • IMPROPER WHEEL INSTALLATION OR TIRE INFLATION Rear Opening and Closing Your Trailer 1.
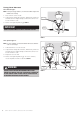
Mounting Reflectors 1. Screw reflectors and brackets together. Bracket 2. Loosen screws on reflector brackets. Mount reflectors/ brackets horizontally on rear corners of side frame tubes, with reflectors extending out past trailer sides. 3. Tighten screws securely. Photo 2 WARNING MAKE SURE REFLECTORS FACE OUTWARD. INCORRECTLY INSTALLED REFLECTORS CAN REDUCE VISIBILITY AND CAUSE AN ACCIDENT OR SERIOUS INJURY. Reflector Left Side Frame Tube PHOTO 2: Trailer left rear corner Installing Wheel Guards 1.
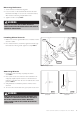
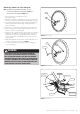
Using Parking Brake Engage parking brake by pushing handle to the right. Exercise caution when disengaging brake, as it may spring to the left. Photo 3 Brake Handle Engaged Brake PHOTO 3 Installing Tow Bar 1. Slide tow bar through both tow bar mounts on left side. 2. Match rear tow bar hole with rear mount hole. 3. Insert the retaining pin through both holes, and lock retaining hoop securely. Figure 6 WARNING Retaining Hoop NEVER OPERATE TRAILER WITHOUT RETAINING PIN LOCKED IN PLACE.
Installing Cover 1. At top of frame, stretch elastic loops around handlebar mounts. 2. Match hook and loop fastener strips on cover to strips on trailer front and rear. 3. Hook O-rings on cover over ends of side frame tubes. Attaching Handle 1. Loosen knobs. Handle Bar 2. Slide handle into lower handlebar receivers and tighten knobs securely. To change height position, flip handle over.
Using Seat Harness One Passenger: Note: In two-passenger trailers, use inner shoulder straps and middle crotch strap. 1. Place child in center of seat. 2. Snap shoulder straps into Y-buckle, with buckle positioned at child’s sternum. Adjust straps so that child cannot move too far forward in seat. Strap Tubes 3. Fasten and adjust lap belt snugly. Figure 8 IMPORTANT Lap Belt SINGLE PASSENGER MUST BE SEATED IN CENTER POSITION.
Hitching Trailer to Your Bicycle Note: The Burley Forged Standard Hitch is used for bicycles with either nutted axles Figure 10 or quick release assemblies Figures 11 & 12 1. Remove axle nut or rear quick release lever assembly from bike. 2. Match hole on flat side of hitch upper arm to left (non-chain ring side) rear dropout hole, and place hitch flat against the dropout. 3. Loosely reassemble axle nut or quick release assembly through hitch, dropout and wheel.
Safety Checklists Check Before Each Ride: ✓ ✓ ✓ ✓ ✓ ✓ ✓ ✓ ✓ ✓ Wheels tightly and securely attached Tires inflated to recommended pressure on tire side wall Hitch properly secured with safety strap in place Tow bar locked securely in place Maximum load 100 lbs (40 kg by law in Europe) Bicycle safety check, especially brakes and tires Helmet for passengers and cyclist Safety flag in place All seat straps properly attached Children properly secured with harnesses and lap belt Monthly Checklist: ✓ Inspect t
BURLEY HONEY BEE OWNER’S INSTRUCTION AND SAFETY MANUAL 11
Burley Trailer Limited Warranty Burley trailers are warranted from date of purchase against defects in materials and workmanship under normal use and service. Burley will repair or replace parts it determines to be defective as follows: fabric parts for one year, plastic parts for three years and durable frame parts for five years. The Burley trailer owner must present the trailer for repair at place of purchase, with an original sales receipt or similar proof of purchase.