Nomad OWNER’S INSTRUCTION & SAFETY MANUAL Contents Introduction I. Hardware Bag Contents & Tool List II. Attaching the Wheels III. Install Rear Reflectors IV. Setting Up & Folding Your Burley Nomad V. Hitching Your Nomad to the Bicycle VI. Trailer Maintenance and Care VII. Safety Guidelines VIII.Safety Checklists IX.
Congratulations! You’ve just purchased a Burley® trailer, the leading choice of discriminating bicycle trailer owners worldwide. Every effort has been made to ensure your purchase is of top quality and proven design, ready to provide you with many years and thousands of miles of happy, safe trailering.
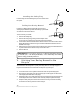
I. Hardware Bag Contents and Tool List IMPORTANT: Please verify that you have received all of the contents listed. Do not proceed with assembly if any parts are missing; contact Burley immediately for replacement parts.
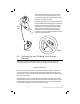
Wheel axle assembly inserts into hollow trailer axle Once the wheels are fully seated in the hollow axle, the quick-release laver should be positioned so that it is aimed to the rear of the trailer in the “CLOSED” position (the lever is marked for OPEN or CLOSED positions). The wheel quick-release/axle assembly comes preadjusted from Burley. Make sure wheels are held securely, with wheel shaft fully inserted into the hollow axle. You should not be able to rock or shift wheels.
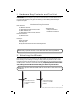
The reflector brackets mount on the outside of each side panel, 2.5” up from the plastic connector on the side panel. The holes for the mounting screws are covered by the fabric. 2.5” First, insert the screw into the reflector bracket and drive the Phillips-head self-tapping screws through the fabric into the holes provided to mount the bracket. (Don’t worry; this won’t harm the fabric.) Then mount the red reflectors onto the brackets with the slotted-head, self-tapping reflector mounting screws.
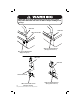
All four side-panel hold-downs must be snapped in place before using trailer. Otherwise side rails can shift or collapse resulting in loss of cargo.
Install Tailgate and Splashguard Snap the tailgate into place as shown in the illustration below. Start by ensuring there is sufficient slack in the 1” webbing to allow you to loop the webbing over the side panel and lock it into place in the corresponding side release buckle sewn to the inside of the side panel. Repeat for the other side of the tailgate. In a similar fashion, attach the front splashguard to the front side panels.
Install Roll Bar and Cover 1. Locate the two roll-bar knobs in the hardware bag, and the tonneau cover. 2. Lay the cover over the side rails so that it is right side out and oriented so the end with “Burley” and “Nomad” is at the front of the trailer. 3. Next, slip one of the roll-bar knobs through one of the grommets on the cover. Slide roll bar through the casing in the top of the mesh divider. 4. Align one end of the roll bar with its corresponding hole on the side rail.
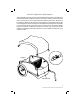
Install Tongue To facilitate tongue installation, tip your Burley Nomad frame onto its back end. If you are working on a rough or dirty surface, lay down a cloth or other protective barrier. Installing your Burley Nomad tongue involves four simple steps (see the following illustrations): 1. 2. 3. 4. Slide the tongue onto the pivot pin at the left front.
Installing the Safety Flag Insert the flag into the webbing strip on the outside of the left panel. Folding Your Burley Nomad Folding your Burley Nomad is basically the reverse of setting it up. Familiarize yourself with setting up the trailer as outlined in this section above. To knock down your trailer: 1. 2. Remove the safety flag. Remove the tongue by pulling out the hairpin cotter and lock pin and reversing the process previously described. Unscrew the roll bar knobs.
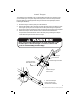
Make sure that the cone is wedged securely into the stays. The knob should be fingertight; do not overtighten. The hitch should not move, but should allow the bicycle complete movement, including lying it down on the ground. It should clear any racks, bags, or fittings you have on your bicycle. If there is any interference, contact your Burley dealer. . IMPORTANT: Remove trailer from your bicycle when it’s not in use to prevent deforming the plastic hitch.
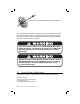
Do not use or store trailer at temperatures below 32˚ Fahrenheit as hitch rubber flex connector can become brittle and possibly break, causing an accident resulting in serious injury. VI. Trailer Maintenance and Care Hitch and Tongue Maintenance Your trailer is designed for low maintenance and easy care. Clean and grease the eyebolt threads on the hitch periodically to ensure that the eyebolt knob can be properly tightened.
VII. Safety Guidelines Bicycling with a trailer is different from bicycling without one, in ways which aren’t always obvious. It is therefore essential that you read and understand all of the following safety guidelines—in addition to the warnings and instructions in the previous sections—prior to using your trailer. Before loaning your trailer to others, make sure they too understand its proper, safe use. Contact your dealer or Burley if any of these instructions are unclear.
Prevent Trailer Tip Over Just like automobile and motorcycle trailers, bicycle trailers can tip over. To avoid overturning: Do not pull your trailer over curbs or hit holes or other obstructions in the road. Do not make high-speed turns or descents when pulling the trailer. Always corner with caution at 5 m.p.h. or less, as the trailer cannot lean into a turn the way a bicycle can. Do not under any circumstances travel faster than 15 m.p.h.
Avoid Riding in Traffic We recommend against riding in traffic. If you must ride in traffic, do not pull your trailer on highways, busy streets, or on streets unsafe for bicycling with children. Never assume that you will be given the right-of-way, even if it is legally yours. Use care when pulling your trailer on bike routes or along bike lanes, especially at intersections. Ride on Clean, Paved Surfaces Your Burley Nomad is not intended for off-road use.
not react to it appropriately. If you must ride at night, wear bright, reflective clothing, use a bright headlight and a red blinking taillight on your bike. Do not operate without properly attached reflectors; replace cracked or missing reflectors. Wear Helmets Numerous studies have shown that: • Head injury is the leading cause of bicycling fatalities; and, • Helmets prevent or reduce bicyclists’ head injuries.
VIII. Safety Checklists Before Each Ride, Ensure the Following: √ Wheels tightly attached √ Tire pressure 30–35 P.S.I. √ Hitch properly secured with safety strap in place √ Roll bar, tongue, and side rails securely attached √ Maximum load 100 lbs.
IX. Parts Lists & Drawings Note: Subassemblies are indented.
23 21 19 17 18 20 16 15 14 4 10 3 13 5 7 12 2 9 1 8 6 11 22 25 24 26 19 Burley Nomad Owner’s Instruction and Safety Manual
About Burley Design Cooperative Burley has been supplying products to the bicycle industry since 1975. Burley products are designed and manufactured at our Eugene, Oregon shop. As worker-owners of our cooperatively owned business, we bring an uncommon degree of personal pride and attention to our work. Use our products with confidence and satisfaction! Burley Trailer Limited Warranty Burley will repair or replace any original equipment parts it determines to be defective for the life of the trailer.