Pre-2004 d’Lite, Lite & Pre-2005 Encore Handlebar & Stroller Wheel Supplement To be used in conjunction with 2003 or previous model year Burley trailer Owner’s Instruction & Safety Manual. Table of Contents I. II. III. IV. V. VI. VII. VIII. IX.
I. Introduction Congratulations! With the Walk’n Roller option you are able to stroll or jog with your kids – using your Burley d’Lite, Burley Lite, or Burley Encore trailer!. You can enjoy years of maintenance-free cycling and strolling together, all in one neat package. Every effort has been made to ensure that your purchase is of top quality and proven design, ready to provide you with many years and thousands of miles of happy, safe trailering.
II. Preparation for Installation The Walk’n Roller requires the assembly and attachment of 3 components: handlebar, parking brake, and stroller wheel. These are covered in sections III, V, and VII. Each section has its associated part list so that you may confirm that you have received all the parts needed. If any parts are missing contact Burley, do not proceed with installation. Tools Required: 7/16 inch wrench Torque wrench Extension 7/16 inch socket No. 2 Phillips screwdriver No.
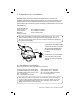
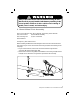
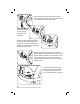
NOTE: if you have a 2004 Encore, this step is not necessary. Locate the replacement parts for the roll bar catch and hinge, and their counterparts on the trailer (see the figure, top of next page). The “catch” is located on the trailer’s right, the “hinge” is on the left. First remove the old hinge from the left side of the trailer by removing the hex head bolt that attaches the roll bar. Then remove the Phillips head screw that holds the hinge to the frame.
Replace the roll bar into the new hinge. Use the pre-existing 1.5 inch hex bolt from the old hinge and the new jam locking nut provided. Tighten until the end of the bolt is flush or slightly protrudes beyond the nut. On the right side, remove the old catch from the frame saving the Phillips head bolt. Install the new catch using the existing Phillips head bolt and new standard nut provided. Tighten securely.
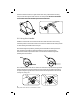
Insert the Handle receivers, on right and left side using 1-1/8” bolts and locking nuts provided. The right and left receivers are side specific. Be sure to mount the receiver that directs the handle upward toward the back. IV. Using the Handle Install the handle from the rear of the trailer. The trailer must be in the running, unfolded position. The handle needs to be removed to fold the trailer. It may remain on while towing the trailer behind a bicycle.
Always check the handle attachment before using. Be sure that handle is properly installed with buttons protruding in the locked position. Failure to do this could lead to loosening of handle, loss of control, and serious injury. V.
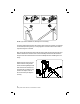
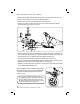
Re-Assembly with the Pivot Wheel • Slide the wheel pivot assembly over the end of the tongue so that the hole in the tongue lines up with the hole in the top as shown below. • Line the hitch connector hole #4 with those same two holes. • Run the 2-inch bolt provided through the d-ring, and then through the Wheel pivot assembly, tongue hitch connector.
Bolt must go through hole in flexible coupling. Otherwise, hitch could come loose causing an accident resulting in injury or death. VI. Using the Walk n’ Roller Wheel The wheel has two positions. One is for use as a trailer, “bike” position. The other is for use as a stroller, “stroll” position. Before changing engage the parking brake. To rotate the wheel, loosen the knob, #1. This will loosen the triangular pivot clamp, #2, enough to rotate.
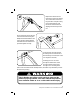
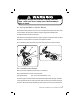
Clamp the brake assembly onto the frame tube as shown. The clamp should be oriented so that the bolt runs underneath the main frame tubing. Fasten with the bolt and nut through the clamp, but do not tighten. Adjust the brake by sliding backward or forward as needed before tightening. You will need to pull the brake handle backward to move the brake to engaged position (see next image). With the brake in engaged position, handle back, slide the brake forward until the post is just touching the tire.
Check brake before strolling, jogging, or bicycling; or after changing a tire, or any wheel removal. Failure to do so could result in serious injury. VIII. Safety Guidelines Using your Walk n’ Roller, bicycling with a trailer, and bicycling in general can be hazardous. Failure to obey the following Safety Guidelines could result in serious injury or death. • Walk n’ Roller must be operated by a responsible adult. • Wear street shoes.
IX. Maintenance Grease the wheel-pivot assembly twice a year (monthly under wet, dirty, salty conditions). Use a standard grease gun with multipurpose (thick brown, or green) grease and insert into the hole on pivot casing (1). Wipe clean all the old grease that flushes out. This can be done by your local bike shop or gas station while you wait. 1 Inspect handle, receivers, parking brake and wheel pivot monthly. Replace any loose or damaged parts.