User Guide
Manuals
Brands
Burnham Manuals
Boilers
ALP210B 168,000 BTU Output Condensing Boiler (Wall or Floor Mount)
1
2
3
4
5
6
7
8
4
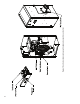
Figure 1: Control Locations (shown with optional concentric vent collar)
1
...
2
3
4
5
6
7
...
8