
Install Instructions


57
107750-01 - 9/17
VII. Venting F. Assembly of DuraVent PolyPro Vent Systems (continued)
8. Installations using PolyPro-ex (Vent Options 18,19,33,34):
WARNING
Asphyxiation Hazard. When using PolyPro ex, observe the following precautions:
• PolyPro ex may be damaged by handling at low temperatures. Do not bend, uncoil, or attempt to install
if it has been stored at a temperature below 42°F without allowing it to warm to a higher temperature
rst.
• Do not bend PolyPro ex more than 45°.
• Instructions below reference the DuraVent PolyPro Flex instruction manual. Not all vent
congurations shown in the DuraVent manual are listed for use with this boiler.
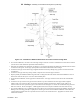
Refer to DuraVent PolyPro ex Instructions for assembly of all ex components including the chimney cap and the adaptor
to rigid PolyPro at the base of the masonry or B vent chimney. In addition, observe the following requirements:
a. Refer to the appropriate Vent option in Tables 7.13b or 7.21 for a list of the principle ex components required. Rigid
vent pipe by the same manufacturer will also be required for the run from the boiler to the base of chimney.
b. Masonry chimneys cannot be used for an air chase
c. B vent chimneys can only be used for an air chase (Vent options 18, 19) if the B vent has the minimum size shown in
Table 7.13b and is fully accessible for sealing of all joints and seams.
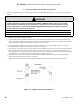
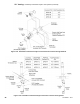
d. When Vent Option 18 or 19 is used, install a Tee on the base of the B-vent that is the same size as the B- Vent chimney.
Install the PolyPro Lower B–Vent adaptor in the base of this Tee as described in the DuraVent PolyPro Flex instructions.
Connection of the PVC air intake pipe to the side outlet of the tee is made using a cap and a PVC socket x male thread
adaptor (3" or 4", depending on the Vent Option). Cut a clearance hole in the cap for the male threads. Secure the
adaptor to the cap using a 3" or 4" electrical conduit lock nut. Seal all joints with RTV.
G. Assembly of Selkirk Polyue Vent Systems
1. This boiler has been listed for use with the Selkirk Polyue single wall PolyPropylene vent system to be provided by the
installer.
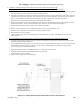
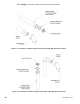
2. Assemble the vent system, starting at the boiler:
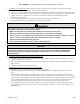
a. The vent adaptor has three different inside diameters. The middle inside diameter accepts 4" nominal Polyue
(Figure 7.26). Lubricate the upper gasket in the vent adaptor with mild soapy water and insert the rst piece of 4"
Polyue into the adaptor until it bottoms out. Tighten band clamp on vent adapter to secure vent pipe.
b. If 3" Polyue is to be used for the vent system, reduce the rst piece of 4" Polyue installed in Step (a) to 3" using
Selkirk #4PF-4R3. Otherwise assemble the next piece of 4" Polyue.
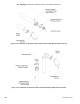
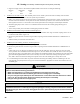
c. For each joint, verify that the gasket is evenly seated in the bell (female) end of the pipe. Lubricate this gasket with mild
soapy water. Slide a Pipe Locking Band over the male end of the pipe to be joined as shown in Figure 7.40. Push the
male end of the next section of pipe into the bell until it bottoms out, then back out 1/8—1/4" to provide room for
thermal expansion. Slide pipe locking band over the female end of the connections and tighten both hose clamps.
d. Assemble the rest of the vent system per the manufacturer’s installation instructions, being sure to pitch horizontal
sections back towards the boiler 5/8" per ft (53 mm/m).