
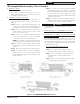
Product Overview


19
103859-12 - 8/19
MPO-IQ
Installation & Service Manual
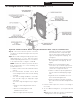
Figure 8: Baffle Orientation in Flueways
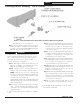
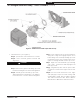
Figure 9: Oil Burner Installation (Beckett shown)
7. Install oil burner. (See Figure 9)
Step a. Open burner carton and remove contents.
Step b. Place oil burner gasket on burner and
align holes.
CAUTION
Do not install burner without gasket.
Step c. Remove three (3) 5/16-18 x 3/4 lg. cap screw
from burner swing door used for mounting burner.
Step d. Thread (1) 5/16-18 x 3/4 lg. cap screw,
approximately three (3) full turns, into tapping
located at 12:00 o'clock on burner swing door.
Step e. Insert oil burner into the opening of burner
swing door. Align and engage keyhole slot in
burner flange over head of protruding cap screw
installed in previous Step. Rotate burner to the
right to lock flange behind head of cap screw.
Step f. Align holes and install two (2) remaining
cap screws. Level burner and fully tighten all
three (3) screws.
Step g. Plug burner power cord into power outlet
receptacle located in lower right corner of front
panel.
Step h. Check oil nozzle in burner for size, angle
and spray type; inspect electrode settings and
head/air plate setting. Refer to Tables 15A thru
15C and 16 and Section VIII. Refer to Burner
Manufacturer's Manual for detail instructions.
2 Packaged Boiler Assembly - Trim & Controls (continued)
!