
Install Instructions


69
SECTION XIV: BOILER CLEANING
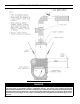
A. CLEAN THE FLUEWAYS (See Figure 34).
1. Prior to cleaning boiler, lay a protective cloth or
plastic over combustion chamber blanket to collect
debris falling from ueways. Several models DO
NOT utilize a combustion chamber blanket, see
Section XIV, Repair Parts, Item 1 Bare Boiler
Assembly for details.
2. For access to combustion chamber remove two (2)
5/16" - 18 cap screws, one on the right (1¼" long)
and one on the left (3¼" long). If boiler is equipped
with exible fuel line(s), swing door open.
3. For cleaning from the side:
a. Remove the jacket right side access panel to
expose the ue cover plates.
b. Loosen nuts securing the ue cover plates and
remove the plates. The rope gasket should
be removed with the plates with care to avoid
damage to the rope gasket.
4. For cleaning from the top:
a. Remove as much vent pipe as necessary to allow
removal of the jacket top panel and canopy.
b. Remove the jacket top panel.
c. Remove the canopy, being careful not to damage
the gasket.
5. Using a 1¼” diameter wire or bre bristle brush
(30” handle) clean the ueways. Brush from the top
and/or side using horizontal and diagonal strokes
for best results. DO NOT allow brush to strike the
target wall or liner in the chamber.
B. CLEAN TOP OF BOILER SECTIONS
(if cleaning from the top).
Brush and vacuum the tops of the boiler sections.
C. CLEAN THE COMBUSTION CHAMBER.
Using wire or bre bristle brush, clean crown of boiler
and inside of water legs.
WARNING
DO NOT allow brush to strike target wall or blanket
in the combustion chamber.
D. AFTER CLEANING, remove protective cloth or
plastic with debris and vacuum as necessary, but be
careful not to damage blanket. Inspect target wall,
combustion chamber blanket, burner swing door
insulation, and rope gasket for signs of damage. If
damaged, replace as needed.
E. REASSEMBLE BOILER.
CAUTION
DO NOT start the burner unless canopy, vent pipe,
burner swing door and all ue cover plates are
secured in place.
1. Install the canopy taking care to align the gasket
without blocking the ueways. If gasket is damaged,
replace as needed.
2. Reinstall ue cover plates, making sure rope gasket
on each plate is in place and forms a gas tight seal.
If damaged replace as needed.
3. Reinstall jacket top panel and/or jacket upper right
side access panel with #8 x ½" long sheet metal
screws.
4. Reinstall vent pipe on canopy and secure to collar
with sheet metal screws.
5. Close burner swing door. Secure door to front
section with 5/16" ange nut and washer (right side)
and 5/16" x 3½" lg. bolt (left side).
NOTICE
When securing burner swing door make sure door
is drawn-in equally on both sides.
Tighten swing door hardware to provide adequate
seal to rope gasket around perimeter of door.
Use an alternating tightening method from right side
ange nut to left side cap screw to pull door tight
equally.
WARNING
All boiler cleaning must be completed with burner service switch turned off. Boilers equipped with burner
swing door have a potential hazard which can cause severe property damage, personal injury or loss of
life if ignored. Before opening swing door, turn off service switch to boiler to prevent accidental ring of
burner outside the combustion chamber. Be sure to tighten swing door fastener completely when service is
completed.