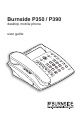
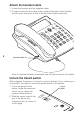
Burnside P350 / P390 desktop mobile phone user guide IDE NS nu Me ct le Se SM r ea Cl ll Ca Na me s S ox ilb Ma 1 M1 M2 M3 ter gis Re D R BU 2 4 EF 5 7 M4 M5 3 te Mu 6 8 + Re 9 0 dia l # e fre nds Ha s es rel les Wi odu mens M y Sie b
Contents 2 Introduction 2 Welcome 3 Setting up 3 4 4 5 5 5 Install your SIM card Attach the handset cable Unlock the transit switch Attach the antenna Prepare the power adapter Attach the power adapter 6 Using your phone 6 6 7 8 10 Switching on Switching off The standby screen Making and receiving calls Managing more than one call 12 Menu options 13 14 19 20 24 26 28 29 30 31 32 32 32 33 Menu options layout Phonebook Speed dial memory buttons Messages Call register Divert Tones Settings General
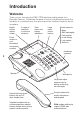
Introduction Welcome Thank you for choosing the P350 / P390 desktop mobile phone from Burnside Telecom. Combining the ease of use of a landline phone with the flexibility of a mobile phone, your phone provides landline simplicity almost anywhere.
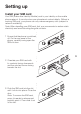
Setting up Install your SIM card Your SIM (Subscriber Identity Module) card is your identity on the mobile phone network. It can also store your phonebook contact details. Without a working SIM card, your phone can only make emergency calls (subject to network availability). Note: When handling your SIM card, limit your movements to reduce static electricity and avoid touching the gold contacts. 1 Ensure that the phone is switched off. On the rear panel of the phone, carefully swing open the SIM slot door.
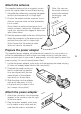
Attach the handset cable 1 Locate the handset and the supplied cable. 2 Connect one end of the cable to the socket at the base of the handset and the other end to the socket in the left side of the phone body. IDE NS R BU nu Me t c ele SM S S ox ilb D C ll Ca Na me s 1 M1 M2 M3 2 4 EF M5 3 5 7 M4 te Mu 6 8 Re 9 0 dia l # e fre nds Ha s es rel les Wi odu mens M y Sie b + Handset cable Note: An optional headset is available, see the Options section for details.
Attach the antenna The supplied antenna has a magnetic mount and a two metre cable for remote positioning. 1 Assemble the antenna by screwing the upper section into the base until it is finger tight. 2 Position the antenna where required, if possible on a secure metal surface (preferably iron or steel). Note: Keep the antenna base away from monitor screens, televisions, diskettes, credit cards, etc. because the magnetic base can affect these items.
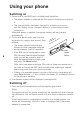
Using your phone Switching on 1 Ensure that a valid SIM card is installed and that either: • The power adapter is attached (as discussed in the previous section), or • The internal battery has been charged for at least two hours (or until the display shows ‘charged’) before it is used without mains connection. Whenever power is applied, the internal battery will be charged automatically. 2 On the rear panel, press and hold the red button for roughly one second, then release.
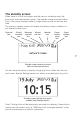
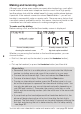
The standby screen When there is no call in progress and the menu is not being used, the phone will show the standby screen. The standby screen provides indications of the signal strength, battery charge status as well as the time and date. The ordinary standby screen will display the network name in addition to any relevant status icons.
Making and receiving calls Although your phone uses mobile communication technology, much effort has be made to make basic telephone functions work like a high quality landline phone, but with the added benefit of many mobile phone features. Important: If the network connection shows Searching... you will not be able to successfully make or receive calls.
To redial a previously called number 1 From the standby screen, press the Redial button to display a list of previously dialled numbers. 2 Use the or buttons to highlight the required number (or name) and then press the Select button. 3 Either pick up the handset or press the Handsfree button to place the call. To make a call using your phonebook 1 From the standby screen, press the Names button adjacent to the lower left corner of the screen.
To make a speed dial call Your phone allows you to assign your five most valued contacts to special buttons located to the left of the keypad. For details about how to store your contacts, see page 19. 1 From the standby screen, press the required speed dial memory button. 2 Either pick up the handset or press the Handsfree button to place the call. Options during a call and • To adjust earpiece or speaker volume during a call: Use the buttons. Note: Take care not to set the volume too high.
To respond to a new waiting call during an existing call During a call, if a new call is received, a call waiting tone will be heard and the display will show the name/number (if known) of the waiting call. 1 Press the Menu button to display the following: Hold the existing call and connect to the waiting call Reject the waiting call and return to the existing call End the existing call and replace it with the waiting call 2 Use the or buttons to highlight an option and press the Select button.
Menu options Your phone includes a menu of options that allow you to access features such as your phonebook and text messaging as well as the ability to customise phone operation to suit your requirements. Use the buttons located directly below the display to control the menu: Clear Press to exit from the current menu item. Up/Down Press to move between menu items. Select Press to choose the currently indicated menu item.
Menu options layout Phonebook Search Add name Status Memory in use Utilities page 15 page 16 page 17 page 17 page 18 Messages Write message Inbox Sent items Settings page 21 page 22 page 21 page 23 Call register Missed calls Received calls Dialled numbers Show durations Clear page 24 page 24 page 24 page 24 page 25 Divert Divert Divert Divert Divert Cancel all when busy no answer when off diverts page 26 page 26 page 26 page 26 page 27 To
Phonebook The phonebook allows you to store and use many contact numbers and corresponding names. You can choose to store contacts within the in-built memory of the phone (up to 250 contacts) or within the memory located on your SIM card (cards vary in capacity). The advantage of the latter is that your contacts can easily be moved between different phones. The phonebook allows you to quickly switch between the two storage areas and also to copy contacts between the two storage areas.
To view, edit or erase an entry 1 View the phonebook options: From standby, press the Menu button and then press the Select button. 2 Ensure that the Search option is highlighted and press the Select button. 3 Press the numeric button that contains the first character of your required contact (press the button repeatedly until the appropriate letter is shown on the screen). 4 Press the Select button to display the phonebook entries that begin with the chosen character.
To add a contact Phonebook entries can either be stored within the in-built phone memory or within the SIM card memory. It is possible to change between the two areas and also to copy entries between them. If necessary, check which memory area is currently in use and how many free locations remain before entering a new contact entry - please see “To check memory status” opposite. 1 View the phonebook options: From standby, press the Menu button and then press the Select button.
To check memory status 1 View the phonebook options: From standby, press the Menu button and then press the Select button. 2 Use the or buttons to highlight the Status option and press the Select button. A display similar to the following will be shown: Indicates the currently active phonebook memory: Phone or SIM card The number of contact entry spaces used and remaining within the currently active memory 3 Press the Select button to return to the previous menu screen.
To copy phonebook memory entries This option allows you to copy all entries between the phone and SIM card memory areas or alternatively, to erase all entries within a chosen memory area. 1 View the phonebook options: From standby, press the Menu button and then press the Select button. 2 Use the or buttons to highlight the Utilities option and press the Select button.
Speed dial memory buttons The phone features five buttons which allow instant access to your most regularly used contacts. Clear Names To program the speed dial memory buttons 1 From standby, press the button that you wish to program. M1 The items shown on screen will depend on whether a number is already associated with that button: • If the button is vacant, you will see two options: M2 Phonebook and Create.
Messages Your phone allows you to take full advantage of the text messaging services available through mobile phone technology. You can create and receive text messages up to a maximum of 160 characters per message. Note: Text messaging requires network support - ensure that your service provider contract allows SMS (Short Message Service). Using messaging You can use the messaging feature at any time when you are not engaged within a call.
3 Use the numeric buttons to enter your message. Please follow the guidelines ‘When writing or editing a message’ shown overleaf. 4 When your message is complete, press the Select button to display the following message options: Erases the whole message 5 To send the message, ensure that the Send option is highlighted and press the Select button to display your options for addressing the message: • Choose the Phonebook option to select an existing contact and use the Select button to confirm.
When creating or editing a message: • Use the main numeric keys to enter text. Press a numeric key repeatedly to produce the appropriate character (characters appear in the order printed on the key). • When the required character has been entered, wait for one second before entering another character that is situated on the same key. A new character on a different key can be entered immediately. • To change between upper and lower case characters, press the # button.
To delete, reply to or forward a message 1 View the received message as described previously. 2 Press the Select button to view the message options: Choose to erase the message Choose to send a reply to the sender Choose to send the received message to another recipient Phone number/name of sender and date/time of receipt or buttons to highlight the required option and press the 3 Use the Select button. • Choose the Delete option to erase the message and use the Select button to confirm.
Call register The call register holds records of all recent incoming and outgoing calls. Using the list you can quickly place a call to a recent number or add a new contact to your phonebook. Note: Incoming calls for which the number is unattainable (e.g. withheld or unavailable numbers, etc.) will not be listed within the register.
4 You can now, either: • Choose the Call option to dial the number immediately, or • Choose the Save to PB option to create a new contact within your phonebook: a) Highlight the Save to PB option and press the Select button. The display will prompt you to enter a name: Shows whether upper or lower case characters are being used - press the # button to change Enter the contact name here b) Use the numeric buttons to enter a name for the contact.
Divert The divert function allows you to determine the conditions upon which incoming calls will be diverted to other numbers (either another phone or a voice mail box) when you are unavailable. You can set the same or different numbers for each call divert option. Note: This function is dependent upon support from your service provider. To set or change divert options button to display 1 From standby, press the Menu button, then press the the Divert option and press the Select button.
3 When activating a divert: Highlight the Activate option and press the Select button. 4 You now need to determine where you would like to divert the calls. You will be presented with two options: • To voicemail - Choose this option to use your standard voicemail number. • To number - Choose this option to divert calls to another phone number. 5 When diverting to another phone number: Highlight the To number option and press the Select button.
Tones You can set different ring tones for your incoming message and incoming SMS text messages. Additionally you can set separate volume levels for both types of tones. To set tones or buttons to 1 From standby, press the Menu button, then use the display the Tones option and press the Select button. The various tone settings will be displayed: Controls for incoming call tones Controls for incoming SMS message tones or buttons to highlight the required setting and then press 2 Use the the Select button.
Settings The phone has numerous settings that allow you to customise its operation to suit your requirements. To view and change settings or buttons to 1 From standby, press the Menu button, then use the display the Settings option and press the Select button. The various settings are arranged as five main options: 2 Use the or buttons to highlight the required option and then press the Select button. • The various settings are discussed on the next three pages.
General settings The general settings are arranged within two groups: Basic and Advanced, which are selectable after you choose the General option. General basic settings 30 Language: Determines the language used for all phone menus and prompts. Contrast: Use this option to adjust the contrast between the display characters and the screen background. Adjustable between 0 and 15, the screen contrast will immediately respond as you change the value.
Call settings Call waiting: This option allows you to Activate or Cancel the call waiting function provided by your service provider. When enabled, call waiting will audibly notify you (while you are within a call) that another incoming call has been received. Note: This function is dependent upon support from your service provider. Own number sending: This option allows you to determine how your phone number is declared to people that you call.
Security settings Change PIN request: Use this option to determine whether the SIM card should request the PIN code whenever the phone is switched on - the current status of the setting is shown in the lower half of the screen. When selected, you will be requested to enter the existing PIN code before the setting can be changed. Change PIN: This option allows you to change the PIN code that is stored on the SIM card.
Status This screen provides additional status information that is normally hidden from view. To view the status information or buttons to 1 From standby, press the Menu button, then use the display the Status option and press the Select button. The status screen will be displayed: Signal level: Shows the current signal strength expressed both logarithmically in dBm and as a percentage of the dBm level/range.
Options Stub antenna The optional stub antenna can be mounted directly onto the rear of the phone for ease of installation. 34 To use the stub antenna 1 Ensure that the phone is switched off. 2 Unplug the supplied standard antenna, if it is installed. 3 Align the stub antenna with the circular connector on the far left of the rear panel. 4 Attach the antenna and twist the connector collar clockwise until it is finger-tight - do not overtighten. 5 In use, the antenna should always be vertical.
Headset The optional headset is ideal when the phone is being used on a continual basis. The headset replaces the standard handset and a special menu setting adjusts the behaviour of the phone to allow the Handsfree button as well as the handset hook switch to be used to control calls via the headset. To link the headset 1 Ensure that the phone is switched off. 2 Unplug the normal phone handset, if it is installed. 3 Link the cable leading from the headset to the adapter cable.
Linking to a computer The phone is equipped to operate in close cooperation with a computer system to allow several possibilities: • Initiate and terminate calls using applications that suppport Microsoft’s Telephony Application Programming Interface (TAPI) standard, • Wireless modem, fax, send and receive SMS, • Updating of the phone’s internal software to the latest version.
Important safety information Operating environment Vehicles Make sure that no special regulation is in force that imposes restrictions on the use of mobile telephones. Restrictions to mobile telephones would also apply to this phone. RF signals may affect improperly installed or inadequately shielded electronic systems in motor vehicles (e.g. electronic fuel injection systems, electronic anti-skid (anti-lock) braking systems, electronic speed control systems, airbag systems).
Part number 362060 / rev 1.0e (E&OE) Burnside Telecom Ltd Burnside House Isington ALTON GU34 4PP United Kingdom Tel: +44 (0)8700 762766 Fax: +44 (0)1420 520029 extn 4 Email: info@burnsidetelecom.com Web: www.burnsidetelecom.