CL 1010 Time Index Introductory information 1. General 2. Security guidelines Installation of the system 3. 4. 5. 6. Scope of supply Positioning and mounting Establishing the power supply Installation instructions for the fuses Operating guidelines 7. Functions of the CL 1010 Time Further Information 8.
Introductory information 1. General Dear customer, Congratulation on purchasing a BURY product. You have chosen a high quality product that is extremely easy to use. All aspects of BURY production through to sales and service are subject to strict quality management according to DIN EN ISO 9001. All BURY products meet CE and e1 security standards. Furthermore, we provide a two-year warranty on all components. Please read the operating manual carefully so that you can fully enjoy your BURY product.
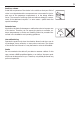
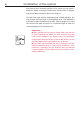
Position, volume Install the components of the device in the vehicle so that your field of vision is not impaired and the components are not mounted in the impact zone of the passenger compartment or in the airbag inflation zones. The removal of coverings (with and without airbags) or components of the dashboard requires – in some cases – special tools and special knowledge. Intended use We shall not be liable for damages or malfunctions due to improper use of the device.
Installation of the system 4 3.
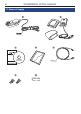
Description of the components: 1) Connector box with power supply cable 2) CL 1010 Time, case and holder 3) Installation and Operating manual, software on DVD 4) Cleaning cloth 5) USB data cable 6) Fuses 7) Label Please note: XXIf certain components are added or omitted you will receive the corresponding information on a separate enclosure. 4.
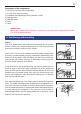
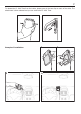
Installation of the system After having found a suitable position in the vehicle you can mount / attach the holder accordingly. Please use a cleaning cloth for degreasing the surfaces you want to attach the holder to. The end of the cable with the small Molex plug is ideally suited for placing through small openings in the dashboard area. This facilitates a practically invisible installation of the cable.
To release the CL 1010 Time from the holder, please press in the two clips on each of the sides. The attachment is then released and you can remove the CL 1010 Time.
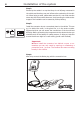
Installation of the system Step 2: Please lay the cables in a way that they do not lie/hang unsecured in the vehicle and that they may not influence the conducting of the vehicle. When laying a cable, please take care that it is not under traction stress but that it has some tolerance. Avoid crushing the cable as damages of the insulation can be caused by friction/rubbing. Step 3: Install the connector box at a convenient place in the vehicle. This can e.g.
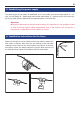
5. Establishing the power supply The power supply of the system is established via a 3-core cable. Connect the black (clamp 31 – minus), the red (clamp 30 – steady plus) and the blue cable (clamp 15 – ignition plus) to the power supply of your radio (where required via the cigarette lighter or the fuse box). Attention: XXThe blue cable must not be connected to clamp 30, otherwise it is not possible to start or finish a journey (ignition signal requirement).
Operating guidelines 7. Functions of the CL 1010 Time The CL 1010 Time is a system which serves the purpose of displaying the vehicle positions with the use of GPS coordinates. Using road map data, these coordinates can then display a specific route along which the vehicle has travelled. This serves the purpose of setting an electronic log book which you can then subsequently edit or supplement with a special PC software programme. You can find this software on the DVD.
You can change the mode by briefly pressing down on the button on the top of the main unit. If the red LED then lights up, the private journey mode is activated. If the business journey is set, however, the green LED lights up. During a commute to work, both of the LEDs light up. The LEDs remain permanently illuminated unless you have selected an alternative setting in this context using the PC software. If this is the case then the LEDs will fade out after approx. 10 seconds.
Operating guidelines Now connect the CL 1010 Time with your PC using the USB cable. You will find a USB jack on the side of the main unit of the CL 1010 Time. A detailed installation guide and a description of the BURY Time Suite are also provided on the DVD. Using the software, you are able to complete your tour data, change the system setting, enter a driver ID or activate the system’s integrated warning function prior to danger zones.
Further Information 13 8. Service In case of general or technical queries, suggestions and comments, please do not hesitate to contact our team at any time. Suggestions and feedback are always welcomed: BURY GmbH & Co. KG Robert-Koch-Straße 1-7 32584 Löhne Hotline: +49(0)180 5 - 842 468* Faxline: +49(0)180 5 - 842 329* * 0.14 €/min. Deutsche Telekom AG landline The costs of international telephone calls which are made from abroad can vary. E-Mail: hotline@bury.