BFI OP. MANUAL PDF Version WARNING: BEFORE USING THlS FIREARM, READ AND FOLLOW THESE INSTRUCTIONS. If there is anything you do not understand, get help from someone qualified in the safe handling of firearms. ® For all BUSHMASTER XM15 Models OPERATING AND SAFETYA1 & A2 Sight Systems All Rifles & Carbines INSTRUCTION MANUAL including V Match PLEASE PRACTICE SAFE FIREARMS HANDLING! This instructional manual should always accompany your Bushmaster firearm.
WARNING: BEWARE OF DANGEROUS PROCEDURES • Be sure cam pin is installed in the bolt group. If it isn't, your rifle can still fire and will explode. • If you are using a blank firing attachment, never fire anything except blank rounds (for safety, we recommend the visible military style blank firing attachment). • If your rifle stops firing with a live round in the chamber of a hot barrel (a misfire), remove the round fast.
TABLE OF CONTENTS Rifle Parts and Where To Find Them ……… Clearing Your Rifle ……… Disassembling Your Rifle ……… Cleaning / Inspection / Lubrication ……… Detailed Cleaning Techniques ……… Cleaning the Upper Receiver ……… Cleaning the Lower Receiver ……… Cleaning the Ejector ……… Inspection before Lubrication ……… Lubrication / Upper Receiver ……… Lubrication / Lower Receiver ……… Lubrication / Bolt Carrier Group ……… Lubrication / Adjustable Rear Sight ……… Reassembly ……… Magazine Disassembly / Reassembly ……… 4 6 8 13
RIFLE PARTS AND WHERE TO FIND THEM (Left Side)… A2 “SQUARE” FRONT SIGHT POST (A Round Post can be found on some A1 models. Bushmaster only uses the A2) CARRYING HANDLE (A3 Removeable type is illustrated at lower left.) BUTTPLATE ASSEMBLY WITH ”TRAPDOOR” STORAGE A2 TYPE UPPER RECEIVER BOLT CATCH SLIP RING (DELTA RING) TAKEDOWN PIN ® B.F.I. WINDHAM, ME. U.S.A. BUSHMASTER L099999 CAL.223-5.56MM MOD.
CLEARING YOUR RIFLE (continued)… 3.) To Lock Bolt Open, Pull Charging Handle rearward. Press bottom of Bolt Catch and allow Bolt to move forward until it engages Bolt Catch. Return Charging Handle to forward. If you haven't before, place Safety Selector Lever on SAFE. 4.) Check Receiver and Chamber to ensure there is no ammunition in the rifle. 5.) With Selector Lever pointing toward SAFE, allow Bolt to go forward by pressing upper portion of Bolt Catch. 7 DISASSEMBLING YOUR RIFLE… 1.
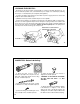
DISASSEMBLING YOUR RIFLE (continued)… 6.) Remove Bolt Carrier and Bolt 7.) Remove Charging Handle by pulling back and up DO NOT OPEN OR CLOSE SPLIT END OF PIN 8.) Remove Firing Pin Retaining Pin. 9 DISASSEMBLING YOUR RIFLE (continued)… 9.) Push Bolt in to locked position. PUSH BOLT IN 10.) Drop Firing Pin out rear of Bolt Carrier. 11.) Remove Bolt Cam Pin. GIVE CAM PIN A 1/4 TURN AND LIFT OUT 12.) Remove Bolt Assembly from Carrier.
DISASSEMBLING YOUR RIFLE (continued)… DISASSEMBLE USING STEPS 13 THRU 16 ONLY WHEN DIRTY OR DAMAGED PUSH EXTRACTOR PIN OUT NOTE: Press rear of extractor to check spring function. 13.) Remove Extractor Pin by pushing out with a punch or the tip of a bullet. 14.) Remove Extractor and Spring. CAUTION: Extractor Spring may pop out and get lost! DISASSEMBLING YOUR RIFLE (continued)… 11 BUFFER RETAINER 15.) Press in Buffer, depress Retainer, and release Buffer. 16.) Remove Buffer and Action Spring.
CLEANING • INSPECTION • LUBRICATION… After firing, clean your rifle as soon as possible to make the job easier and to avoid allowing the development of any corrosion. When your firearm has not been fired, you should clean it at least once or twice a year if you live in a temperate climate, or as often as once a week in a tropical climate. If you get your firearm wet, clean it as soon as possible.
DETAILED CLEANING TECHNIQUES (continued)… 5.) Attach the handle section of the cleaning rod to the end of the rod sticking out of the muzzle. 6.) Pull the brush through the bore and out the muzzle. You should be able to see the rod twisting as you pull it - this is the brush "tracking" in the rifling. Never reverse the direction of the bore brush while it is in the bore. 7.) After one pull, take off the handle section and repeat the process.
CLEANING THE EJECTOR… The design of the Ejector makes its disassembly for cleaning somewhat impractical (i.e. we don't recommend it). Make sure your Bushmaster ejects empty cases efficiently by following these steps on a monthly basis (more frequently if firing blanks). 1.) Remove the Bolt from the Carrier (as described on previous pages). Hold it as shown with the Ejector down and the Extractor up. 2.) Dribble a few drops of CLP around the Ejector to form a puddle. 3.
LUBRICATION - Upper Receiver… Lightly lubricate the inside of upper receiver, the bore and chamber (using the cleaning rod and a patch), the outer surfaces of barrel and front sight, and surfaces under the handguard. Be sure you lube in and around all the Locking Lugs (see illustration at right). Depress the Front Sight Detent and apply two or three drops of CLP to it. Depress the detent severaI times to work the lubricant into the spring.
LUBRICATION - Adjustable Rear Sight… Note: Record how far you move the rear sight so it can be returned to its original position upon the completion of this task. Rear Sight Moving Parts: Use 1 or 2 drops of CLP. Rotate these parts to ensure that the lubricant is spread evenly above, below and around the threads of the: DETENT 1.) Elevation knob SPRING 2.) Elevation screw shaft HOLE 3.) Windage knob WINDAGE KNOB 4.) Windage screw 5.
REASSEMBLY (continued)… STAGGER THE GAS RING GAPS TO REDUCE GAS LOSS. Position the three ring gaps 120 apart around the bolt. 3.) Push in Extractor Pin. 4.) Slide Bolt into Carrier. 23 REASSEMBLY (continued)… WARNING: Be sure the Cam Pin is installed in the Bolt Group. If it isn't, your rifle can still fire and will explode! NOTE: The Bolt is machined so as to allow insertion of the Cam Pin from one side only. This provision aligns the Extractor and Ejector properly within the Upper Receiver. 5.
REASSEMBLY (continued)… NOTE: Firing Pin should not fall out when Bolt Carrier Group is turned upside down. 9.) Engage, then push Charging Handle part way. 8.) Replace Firing Pin Retaining Pin. 10.) Position Carrier Key in slotted bottom of Charging Handle. Slide in Bolt Carrier Group. CAUTION: Bushmaster does not recommend the practice of swapping bolts between different rifles. Doing so could result in damage, personal injury or death. 25 REASSEMBLY (continued)… 11.
REASSEMBLY (continued)… 14.) Close the Upper and Lower Receiver groups and push in the Takedown Pin. When re-attaching the Handguards, use The “Buddy System”: 15.) Place the Rifle on the Buttstock and press down on the Slip Ring with both hands. Note: The “Half-Round” Handguards are identical and can be used on top or bottom. 16.) Have your buddy install one handguard on top and the other on the bottom. 17.) Re-attach the Sling. 27 MAGAZINE DISASSEMBLY / REASSEMBLY … 1.
PREVENTATIVE MAINTENANCE CHECKS & SERVICES… CHECK BEFORE YOU FIRE! … 1.) Check to see that there is no excessive oil in the Bore. If there is, swab it out with a patch and the cleaning rod. 2.) Retract the Bolt to ensure free movement between Bolt Carrier and Gas Tube. 3.) Perform Safety Function Check to ensure that Safety Selector Lever works properly. See Safety Check next page. Then back to Step 4. 4.) Check to ensure that the Magazine is secure.
LOADING A MAGAZINE… 1.) Use only quality ammunition suitable for your firearm. Examine each cartridge - particularly around the primer. Look for dents, scratches, and other signs of damage. Do not load damaged ammunition. 2.) With the magazine facing forward as shown in the illustration, place a round between the lips of the magazine with the bullet tip forward. Push the round down until it is held by the magazine lips. 3.
ZEROING YOUR SIGHTS… This is the procedure to follow in order to “Zero” your mechanical sights. 1.) In this procedure, the Front Sight Post and Rear Sight Windage Knob are adjusted so that you can hit your point of aim at 300 meters: 2.) Flip the unmarked (smaller) aperture to the up position (as shown). 3.).Set the Rear Sight so that the 300-meter mark is aligned with the mark on the left side of the receiver. ZEROING ADJUSTMENTS… 1.
25 METER ZEROING PROCEDURES (continued)… 4.) Now rotate the elevation knob "up" one click past the 300-meter mark. From this point on, the elevation knob should not be moved. Any changes in elevation required in the following zeroing steps are made to the front sight post only. 5.) Carefully aim and fire at the center of the target bull's-eye. 6.
A1 SIGHTS - DIFFERENCES & ADJUSTMENTS (continued)… NOTE: To zero the rifle, adjust the front sight (elevation) and the rear sight (windage) so that you can hit the aiming point at a given range. LONG RANGE APERTURE .S. L.R 25 M REGULAR APERTURE 25 M 250 M 375 M FRONT SIGHT - To adjust elevation, depress detent and rotate post as described previously for A2 Front Sight Post. The 5 notches of the A1 post allow for a finer adjustment than does the square A2 Post with 4 notches.
OPERATION OF YOUR RIFLE… INSERTING A MAGAZINE… 3.) Push Magazine up into Magazine Well until Magazine Catch engages and holds the Magazine. 4.) Tap upward on Magazine bottom to make sure it's seated correctly. 39 OPERATION OF YOUR RIFLE… CHAMBERING A ROUND with Bolt Assembly Open… NOTE: The Magazine may be inserted into the Rifle with Bolt Assembly open or closed. FORWARD ASSIST BOLT CATCH 40 1.) Depress upper portion of Bolt Catch. Bolt should spring forward. 2.
OPERATION OF YOUR RIFLE… CHAMBERING A ROUND with Bolt Assembly Closed… 1.) Pull Charging Handle fully to rear. 2.) Release the Charging Handle. FORWARD ASSIST NEVER “Ride” (or push) the Charging Handle. Let it move forward on its own. 3.)TAP the Forward Assist to ensure Bolt is fully forward and locked. NOTE: If the Rifle is not going to be fired immediately, make sure the Selector Lever is still on SAFE, and close the Ejection Port Cover to keep out dirt.
IMMEDIATE ACTION in case of trouble (continued)… 3.) If cartridge or case is ejected or chamber is clear, RELEASE Charging Handle to feed a new round. Don't “ride” the Charging Handle forward. 4.) TAP Forward Assist. 5.) Now FIRE. If the Rifle won't fire, look for trouble and apply remedial action. (See next page.) 43 REMEDIAL ACTION… WARNING: If your rifle stops flring with a live round in the chamber of a hot barrel, remove the round fast.
BULLET STUCK IN THE BORE… WARNING: If an audible “POP” or reduced RECOIL is experienced during firing, immediately CEASE FIRE: Then, (1) Remove the Magazine, (2) Lock the Bolt to the rear, (3) Place the Selector Lever on the SAFE position and (4) visually inspect and/or insert a cleaning rod into the bore to ensure there is not a bullet stuck in the bore. 1. Remove the Magazine 2. Lock the Bolt to the rear. 3. Place the Selector Lever on SAFE 4.
TROUBLESHOOTING (continued)… PROBLEM CHECK FOR: WHAT TO DO BOLT WON'T UNLOCK Dirty or burred Bolt. Clean or see a qualified gunsmith. WON'T EXTRACT Broken Extractor Spring. See a qualified gunsmith. Dirty or corroded Ammo. Remove stuck round - push out with cleaning rod. Carbon in Chamber. Clean Chamber. Fouling or carbon in Extractor recess or lip. Clean Extractor. 47 TROUBLESHOOTING (continued)… PROBLEM CHECK FOR: WHAT TO DO WON'T FEED Dirty or corroded Ammo. Clean. Dirty Magazine.
TROUBLESHOOTING (continued)… PROBLEM CHECK FOR WON'T FEED (continued) What To Do Turn Catch Clockwise to tighten and Counterclockwise to loosen TURN CATCH ON LEFT SIDE DOUBLE FEED Defective Magazine. Replace. WON'T CHAMBER Dirty or corroded Ammo. Clean. Damaged Ammo. Replace. Carbon in Chamber or on Gas Tube Clean. 49 TROUBLESHOOTING (continued)… PROBLEM CHECK FOR: WHAT TO DO WON'T LOCK Dirt, corrosion, or carbon buildup in barrel locking lugs Clean lugs.
TROUBLESHOOTING (continued)… PROBLEM CHECK FOR What To Do SHORT RECOIL Correct alignment of Gaps in Bolt Gas Rings “Gaps” in the 3 Gas Rings should be staggered 120 around the Bolt body for maximum effectivness. GAP GAP GAP Carbon or dirt in Carrier Key or on outside of Gas Tube. Clean Carrier Key or around area of the Gas Tube. 51 TROUBLESHOOTING (continued)… PROBLEM CHECK FOR: WHAT TO DO SHORT RECOIL (continued) Q-Tip or Pipe Cleaner pieces stuck inside Carrier Key.
TROUBLESHOOTING (continued)… PROBLEM CHECK FOR: WHAT TO DO BOLT CARRIER “HUNG UP” Round jammed between Bolt and Charging Handle and/or double feed 1.) Remove Magazine. 2.) Push in on the bottom of the Bolt Latch. 3.) While pulling down on Charging Handle, bang the Rifle Butt on the ground. Bolt should lock to the rear. WARNING: KEEP CLEAR OF MUZZLE. 4.) While Bolt is held to the rear, round should fall through the Magazine well. CAUTION: AFTER ROUND IS REMOVED, BOLT IS UNDER TENSION.
DISASSEMBLY VIEWS - Bushmaster XM15 E2S Rifle Lower Receiver / Magazine Groups FIR FOR 20" BARRELLED RIFLE • Caliber .223 Rem. (5.56 Mm) • Mode of Fire: Safe / Semi-Automatic • 30 Round Magazine • 39.25" Length Overall • 20" Barrel Length • Rifling - 1 in 9" / Right Hand Twist • Weight w/o Mag. - 8.27 Lbs. (3.
PLEASE PRACTICE SAFE FIREARMS HANDLING! LIMITED ONE-YEAR WARRANTY Bushmaster Firearms Inc. products are warranteed to be free from defects in material and workmanship. Warranty cards are included with all firearms and should be completely filled out and sent to Quality Parts Company to activate the terms of the warranty. Any such defect of which Bushmaster Firearms Inc.