X-8 TRAIL CAM ™ INSTRUCTION MANUAL Manuel d’instructions / Manual de instrucciones Bedienungsanleitung / Manuale di istruzioni Model 119327 Lit# 98-2334 / 05-12
TABLE OF CONTENTS PAGE ENGLISH 3-26 Français 27-51 Español 52-76 Deutsch 77-102 ITALIANO 103-126
English Page Index IMPORTANT NOTE 4 Introduction 5 Parts & Controls Guide 6-7 Battery and SD Card Installation 8 About the Setup Menu 9 Using the Setup Menu 9 SETUP MENU REFERENCE TABLE 10-12 Time Lapse Operation 13 Camera Operation 15 Mount the Camera 15 Power on the Camera 15 Set the PIR and Shutter Switches 16 Test the Coverage Area 16 Secure the Camera 16 (Optional) Using an External Power Source 17 Viewing the Photos and Videos 17 Glossary 18 Techn
IMPORTANT NOTE Congratulations on your purchase of one of the best trail cameras on the market! Bushnell is very proud of this camera and we are sure you will be pleased with yours as well. We appreciate your business and want to earn your trust. Please refer to the notes below and the instructions in this manual to ensure that you are completely satisfied with this product.
INTRODUCTION Congratulations on your purchase of a Bushnell X-8 Digital Trail Camera. This camera is designed to record animal activity in the outdoors with its still image and movie modes and weatherproof, rugged construction. Your X-8 Trail Cam features a compact, portable size and an extra long battery life. Main Features: • 2.0MP digital sensor • Compact Size (120mm*94mm*46mm) • Long Battery Life (Up to 9 months) • Trigger Time=1.
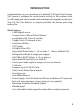
Parts and Controls Guide PIR Motion Sensor Camera Lens Padlock Hole PIR Indicator (Setup Mode Only) Infrared LED Array Tripod Socket Front of Camera (DC Power In Jack under rubber pad) DC Input Jack 6
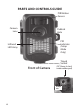
Parts and Controls Guide Ok Button SD Card Slot Control Panel (Front Opened) LCD Display Up Button PIR Sensitivity Switch USB Port TV Out Power Switch Setup Button Battery Compartment Down Button Shutter Speed Switch Left Side Panel (Front Opened) USB Port TV Out 7
BATTERY and SD CARD INSTALLATION The Bushnell X-8 Digital Trail Camera is designed to operate using 4 or 8 AA batteries. We recommend using a full set of 8 Lithium (for longest life) or Alkaline batteries. NOTE: Always set the power switch to the Off position when installing or removing batteries. Please make sure the batteries are inserted correctly, as indicated inside the battery compartment. Incorrect voltage or polarity (+/-) will damage the camera.
ABOUT THE SETUP MENU Slide the power switch to the On position. You’ll see “WAIT” on the display, then the Setup Menu screen (see below). Before you start using the camera, you’ll no doubt want to set the date/time so they are imprinted correctly on your photos, and maybe change the trigger delay time and image resolution to your preferences. This is done by editing the settings of an item listed in the Setup Menu.
SETUP MENU: Items/Settings/Description The following table lists all of the menu items, their available settings, and a description of their functions: Menu Item Settings Description/Operation T-Delay time, Duty (Start and Stop times) Press Ok-”T-Delay” will flash. Set the T-Delay time from 1-60 Minutes, using the Up/Down buttons. The T-Delay parameter sets how often photos or videos are captured during the “Duty” interval. Press Ok-the display will flash “Duty”.
SETUP MENU: Items/Settings/Description Menu Item Settings Description/Operation Date Year, month, and day Press Ok and use the Up/Down buttons (to change the setting), then press Ok again to go to the next date parameter and repeat, to set the current year, month, and day.
SETUP MENU: Items/Settings/Description Menu Item Settings Description/Operation Mode 2M, 4M, 6M (with Mode set to 1P or 3P for photos), 5-15 Sec (in Movie (video) mode) Select “Mode” and press Ok. Use Up/Down to select 1P (single photo), 3P (burst of 3 photos), or Movie (video mode). Press Ok. Use Up/Down to set 2M, 4M or 6M (megapixel) still photo resolution (High resolution provides better quality photos, low resolution allows you to store more photos on the SD card), or video length from 5-15 sec.
Time Lapse Operation (“T-Lapse”) “T-Lapse” is a special feature of the Bushnell X-8 Trail Cam, which allows you to monitor your food plots or field edges via time lapse photos or video. When activated, the X-8 Cam will take a photo (or record a video clip) automatically at your choice of intervals during a block of time you set up for each day, without requiring a trigger from an active animal.
start time determines when time lapse mode recording begins each day. The hour setting is based on a 24-hour clock, with “00” hours = midnight, “12” hours = noon, “23” hrs = 11PM, etc. Press Ok, then set the Duty start minute. After setting the minute, press Ok to save the start time. 5. Next, set the Duty stop hour (24-hr format), using the Up/Down buttons. The Duty stop time determines when time lapse mode recording ends each day. Press Ok, then set the Duty stop minute.
If an animal triggers the camera “in between” the 15 minute intervals, it will be recorded, same as it would if you had setup the camera with Time Lapse turned Off (T-Delay set to “OFF”). Note: Time Lapse settings of frequent intervals and/or long periods between start and stop time can reduce battery life. When you’ve finished using the Setup Menu, and are ready to return the camera to normal operating mode, so it will begin to capture photos or videos for you, simply press the Setup button.
is in “sleep” status. When the PIR sensor is triggered, it will start to take photos immediately after the delay time (as set in the menu) has passed. 3. Set the PIR and Shutter Switches The PIR slide switch allows you to increase or decrease the passive infrared sensor’s (PIR) sensitivity to heat. There are three settings, H (high), M (medium) and L (low).
• The PIR indicator light below the lens will blink when you have entered the coverage area. • Adjust the camera position as needed and repeat the test until the desired coverage area is achieved. • Press the Setup button again when you are finished using the test mode-the camera will be “sleeping” and waiting for the PIR sensor to trigger the first photo or video capture. • Maximum PIR sensor range is approx. 45 ft. 5.
Connecting the Camera to Your Computer via USB 1. Slide the Power switch to the “On” position, then press the Setup button. 2. Connect your camera’s USB port (left side near the display with camera unlatched and open) to a PC or Mac computer with the included USB cable. 3. The PC will recognize the camera as an external storage device, using the “USB Mass Storage” standard (no driver installation necessary-not compatible with Windows 98 or earlier).
GLOSSARY PIR (Passive Infrared Sensor): Senses motion like a typical security motion detector. Requires infrared energy (heat) in addition to motion to trigger the sensor to help limit detection to live subjects (rather than leaves, etc). Delay Time (Trigger Interval): Time elapsed between photos while events are sensed and recorded. You should set this based on wildlife activity in the area. Moon Phase: The X-8 trail cam has a feature which imprints a moon phase stamp on each photo for reference.
Technical Specifications Model Number 119327 Image Sensor Type 1/2 Inch CMOS Sensor Resolution 2.0 Megapixels Effective Focal Length 7.6 mm Lens Aperture IR Filter Display f/3.0 Automatic IR Filter LCD (menu screen) PIR Sensor Yes Trigger Speed Number of IR LED 1.
Troubleshooting / FAQ Battery life is shorter than expected 1. Battery life will vary with operating temperature and the number of images taken over time. Typically, the X-8 trail cam will be able to capture several thousand images before the batteries die. 2. Check to make sure you have used new alkaline or lithium batteries. Bushnell recommends using 8 Energizer® Lithium AA batteries in this Trail Cam to obtain maximum battery life. 3.
Troubleshooting / FAQ Camera won’t power up 1. Make sure that you have installed all 8 batteries in the battery compartment. Bushnell recommends using 8 Energizer® Lithium AA batteries in this X-8 trail cam. 2. Make sure that the batteries are installed correctly, observing proper polarity. Always place the negative (flat) end of each battery in contact with the spring tab side of its slot inside the camera. Do not mix old and new batteries. Do not mix battery types-use ALL lithium or ALL alkaline.
Troubleshooting / FAQ 5. Photos with streaked subject a. In some cases with low lighting conditions and fast moving subjects, the 6M (megapixel) resolution setting may not perform as well as the 2M or 4M settings. b. If you have multiple images where fast moving subjects produce streaks on the photo, try the 2M resolution setting instead. 6. Red , green or blue color cast a. Under certain lighting conditions, the sensor can become confused resulting in poor color images. b.
Troubleshooting / FAQ Camera won’t retain settings Make sure that you have been saving the changes to any parameter settings that you made while in Setup mode, by pressing “OK” after changing the setting. If you don’t save your new setting after changing it, the camera will continue to use the original default setting for that parameter. Do not mix old and new batteries. Do not mix battery types-use ALL lithium or ALL alkaline. Rechargeable batteries are not recommended.
TWO-YEAR LIMITED WARRANTY Your Bushnell® product is warranted to be free of defects in materials and workmanship for two years after the date of purchase. In the event of a defect under this warranty, we will, at our option, repair or replace the product, provided that you return the product postage prepaid. This warranty does not cover damages caused by misuse, improper handling, installation, or maintenance provided by someone other than a Bushnell Authorized Service Department.
FCC Compliance Statement: This equipment has been tested and found to comply with the limits for a Class B digital device, pursuant to part 15 of the FCC Rules. These limits are designed to provide reasonable protection against harmful interference in a residential installation. Operation is subject to the following two conditions: (1) This device may not cause harmful interference, and (2) this device must accept any interference received, including interference that may cause undesired operation.
Français Table des matières REMARQUE IMPORTANTE 28 Introduction 29 Guide des différents composants et commandes 30 Installation des piles et de la carte SD 32 Menu configuration 33 Utilisation du menu configuration 33 MENU CONFIGURATION (Options/Paramètres/ Description) 34 Mode Time-Lapse 38 Fonctionnement de la caméra 40 Installation de la caméra 40 Mise en marche de la caméra 41 Réglage de la sensibilité du capteur infrarouge (PIR) et de la vitesse d’obturation.
REMARQUE IMPORTANTE Félicitations ! Vous venez d’acquérir l’un des meilleurs appareils photo de surveillance sur le marché ! Bushnell est extrêmement fier de ce petit concentré de technologie et nous sommes certains qu’il vous satisfera également. Nous vous sommes très reconnaissants de votre choix et de votre confiance. Veuillez consulter les informations ci-dessous et les instructions de ce manuel pour garantir une utilisation optimale de ce produit.
INTRODUCTION Félicitations ! Vous venez d’acquérir le piège photographique numérique X-8 de Bushnell. Cet appareil photo est spécialement conçu pour enregistrer l’activité animale dans un environnement naturel, grâce à ses modes photo et vidéo, son design robuste et sa résistance aux intempéries. De taille compacte et facile à transporter, il possède également une très longue durée d’autonomie.
Guide des différents composants et commandes Capteur infrarouge passif (PIR) Emplacement pour cadenas Objectif Indicateur de mouvements (PIR) (mode configuration uniquement) Flash infrarouge à LED Pas de vis standard FACE AVANT Alimentation externe 30
Guide des différents composants et commandes Touche OK Emplacement pour carte SD Panneau de commande (volet ouvert) Écran LCD Touche Haut Bouton de réglage de la sensibilité du capteur infrarouge passif (PIR) Port USB Sortie TV Interrupteur d’alimentation Touche Setup (Configuration) Touche Bas Compartiment à piles Bouton de réglage de la vitesse de l’obturateur Vue latérale gauche (volet ouvert) Port USB Sortie TV 31
INSTALLATION DES PILES ET DE LA CARTE SD Vous pouvez utiliser 4 ou 8 piles de type AA pour faire fonctionner le piège photographique numérique X-8 de Bushnell. Nous vous recommandons d’utiliser un ensemble complet de 8 piles au lithium (pour une autonomie supérieure) ou alcalines. REMARQUE : L’interrupteur d’alimentation doit toujours être en position OFF lorsque vous insérez ou retirez les piles. Assurez-vous que les piles sont correctement insérées, tel qu’indiqué à l’intérieur du compartiment des piles.
MENU CONFIGURATION (SETUP) Mettez l’interrupteur d’alimentation en position « On ». L’écran affichera « WAIT » (Patientez), suivi du menu configuration (voir ci-dessous). Avant d’utiliser l’appareil photo, commencez par régler la date et l’heure pour que ces données s’impriment correctement sur vos photos. Profitez-en pour également adapter le délai de déclenchement et la résolution d’image selon vos préférences. Pour ce faire, veuillez modifier les paramètres des différentes options du menu configuration.
MENU CONFIGURATION : Options/Paramètres/Description Le tableau suivant liste toutes les options du menu, les paramètres qui y sont associés et une description de leurs fonctions: Option T- Lapse (Réglages du mode TimeLapse) 34 Paramètres Description/Fonctionnement T-Delay time (Fréquence), Duty (Intervalle de temps avec heures de début et de fin) Appuyez sur Ok - « T-Delay » clignotera sur l’écran. Programmez la fréquence T-Delay de 1 à 60 min en utilisant les touches Haut/Bas.
MENU CONFIGURATION : Options/Paramètres/Description Option Paramètres Description/Fonctionnement Date Year, month and day (Année, mois et jour) Appuyez sur Ok et utilisez les touches Haut/Bas pour faire défiler les paramètres. Puis, appuyez de nouveau sur Ok pour pouvoir passer au paramètre suivant ; répétez cette procédure pour régler l’année, le mois et le jour.
MENU CONFIGURATION : Options/Paramètres/Description Option Delay (Délai de déclenchement) 36 Paramètres Description/Fonctionnement Minutes (0 à 10) ou secondes (0 à 59) Délai de déclenchement par défaut = 10 sec Sélectionne la durée pendant laquelle l’appareil photo « attendra » avant de répondre à des déclenchements supplémentaires du capteur infrarouge passif après qu’un animal ait été initialement détecté et reste dans les limites de la portée du capteur.
MENU CONFIGURATION : Options/Paramètres/Description Option Paramètres Description/Fonctionnement Mode 2 MP, 4 MP, 6 MP (quand le mode est réglé sur 1P ou 3P pour les photos), 5 à 60 sec (quand le mode Movie (Film) est activé) Sélectionnez « Mode » et appuyez sur Ok. Utilisez les touches Haut/Bas pour sélectionner 1P (mode de capture simple), 3P (mode rafale trois photos) ou Movie (mode vidéo). Appuyez sur Ok.
Le mode Time-Lapse (« T-Lapse ») L’option « T-Lapse » est une nouvelle fonctionnalité du piège photographique numérique X-8 de Bushnell; elle vous permet de surveiller des zones plus vastes, comme un champ ou une grande clairière, au moyen de photographies ou de vidéos prises à intervalles de temps réguliers.
4. Ensuite, configurez l’heure de début de l’intervalle, à l’aide des touches Haut/Bas. L’heure de début détermine l’heure à laquelle le mode TimeLapse se met en route chaque jour. La configuration de l’heure est basée sur un format 24 heures ; « 00 » = minuit, « 12 » = midi et « 23 » = 23 h, etc. Appuyez sur Ok et configurez ensuite les minutes de début. Une fois l’heure de début configurée, appuyez sur Ok pour la garder en mémoire. 5.
par le capteur à infrarouge, une image sera prise, ou une vidéo enregistrée, toutes les 15 minutes pendant une tranche horaire de 2 heures et demie. Si le mouvement d’un animal déclenche l’appareil photo entre deux intervalles de 15 minutes, un enregistrement sera fait de la même façon que si l’appareil photo avait été programmé en mode Time-Lapse inactif (T-Delay réglé sur « OFF »).
2. Mise en marche de la caméra Mettez l’interrupteur d’alimentation en position « On ». Si vous ne souhaitez pas configurer de paramètre, appuyez sur la touche Setup (Configuration) pour quitter le menu configuration. L’écran devient vierge et l’appareil photo est en mode « veille ». Lorsque le capteur infrarouge passif (PIR) se déclenche, l’appareil photo commence à prendre des photos une fois la durée choisie du retardateur écoulée. 3.
• Le voyant du capteur infrarouge passif (PIR) situé sous l’objectif clignote lorsque vous êtes dans la zone de couverture. • Réglez la position de la caméra selon les besoins et faites des essais jusqu’à ce que la zone voulue soit couverte. • Une fois les essais terminés, appuyez de nouveau sur le bouton Setup. La caméra passe alors en mode veille et attend le déclenchement du capteur infrarouge passif (PIR) pour prendre la première photo ou vidéo.
Connecter l’appareil photo à votre ordinateur, grâce à un port USB 1. Mettez l’interrupteur d’alimentation en position « On », puis appuyez sur la touche Setup (Configuration). 2. Connectez le port USB de l’appareil photo (sur le côté gauche de l’écran, une fois le couvercle de l’appareil photo ouvert) à un ordinateur PC ou Mac à l’aide du câble USB (inclus). 3.
GLOSSAIRE Capteur infrarouge passif (PIR) : Détecte le mouvement à la manière d’un capteur de mouvements de sécurité traditionnel. Nécessite de l’énergie infrarouge (chaleur) en plus du mouvement pour limiter le déclenchement du capteur à la détection des animaux (plutôt qu’à celle des feuilles, etc.). Délai de déclenchement (intervalle de déclenchement) : Intervalle écoulé entre chaque photo pendant la détection et l’enregistrement des événements.
CARACTÉRISTIQUES TECHNIQUES Numéro de modèle 119327 Type de capteur photographique Type CMOS, ½ pouce Résolution effective 2,0 mégapixels Distance focale effective 7.6 mm Ouverture de diaphragme Filtre infrarouge Affichage f/3.
Diagnostic/Questions Fréquemment Posées La durée de vie des piles est plus courte que prévue. 1. La durée de vie des piles varie selon la température ambiante et le nombre de photos prises. De manière générale, le piège photographique pourra prendre plusieurs milliers de photos avant que les piles ne soient épuisées. 2. Vérifiez que vous utilisez des piles alcalines ou au lithium neuves.
Diagnostic/Questions Fréquemment Posées cas, il arrive que d’autres appareils modifient le formatage de la carte SD de telle manière qu’elle ne fonctionnera pas correctement avec le piège photographique. La caméra ne s’allume pas. 1. Vérifiez que vous avez bien inséré les quatre piles dans le compartiment des piles. Bushnell recommande l’utilisation de quatre piles AA au lithium Energizer® avec le piège photographique X-8. 2. Vérifiez que les piles sont bien installées et que la polarité est correcte.
Diagnostic/Questions Fréquemment Posées 4. Les photos ou les vidéos prises en plein jour sont trop claires Assurez-vous que la caméra n’est pas orientée vers le soleil ou une autre source lumineuse pendant la journée. 5. Les photos présentent des stries a. Dans certains cas, avec une faible luminosité et des sujets se déplaçant rapidement, il est possible que la résolution de 6 mégapixels ne produise pas d’aussi bons résultats que les résolutions de 2 ou 4 mégapixels. b.
Diagnostic/Questions Fréquemment Posées La LED du détecteur IRP s’allume/ne s’allume pas. 1. Lorsque la caméra se trouve en mode configuration, la LED du capteur infrarouge passif (PIR) sur le devant de la caméra s’allume lorsqu’elle détecte du mouvement. Cette fonction ne sert qu’au réglage et aide l’utilisateur à orienter la caméra. 2. Pendant l’utilisation, la LED ne s’allume pas lorsque la caméra prend une photo afin que les animaux ne remarquent pas sa présence.
GARANTIE LIMITÉE DE DEUX ANS ® Votre produit Bushnell est garanti contre les éventuels vices de matière ou de fabrication pendant deux ans à compter de la date d’achat. En cas de défaut durant la période de garantie, nous nous réservons la possibilité de réparer, ou d’échanger le produit, sous condition que vous retourniez le produit en port payé.
Traitement des déchets d’équipements électriques et électroniques (En vigueur dans l’Union européenne et autres pays européens ayant des systèmes de collecte des déchets séparés) Cet équipement contient des composants électriques et/ou électroniques et par conséquent ne doit pas être éliminé en fin de vie avec les autres déchets ménagers. Vous devez au contraire vous débarasser de ce produit afin qu’il soit recyclé aux points de collecte respectifs fournis par les communautés locales.
Español Índice de páginas NOTA IMPORTANTE 53 Introducción 54 Guía de Piezas y Controles 55-56 Instalación de las baterías y la tarjeta SD 57 Información Sobre El Menú De Configuración 58 Uso Del Menú De Configuración 58 MENÚ DE CONFIGURACIÓN 59-61 Funcionamiento Con Lapso De Tiempo 62 Funcionamiento De La Cámara 64 Montaje de la cámara 64 Encendido de la cámara 65 Configuración de los interruptores del obturador y del sensor de infrarrojos pasivo 65 Comprobación del área de c
NOTA IMPORTANTE Felicidades por comprar una de las mejores cámaras de rastreo del mercado. Bushnell está muy orgullosa de esta pequeña unidad y estamos seguros que usted también quedará complacido. Agradecemos su compra y queremos ganarnos su confianza. Consulte las notas siguientes y las instrucciones de este manual para asegurarse que queda plenamente satisfecho con este producto.
INTRODUCCIÓN Felicidades por comprar la cámara digital de rastreo Bushnell X-8. Esta cámara está diseñada para grabar la actividad de animales al aire libre, por medio de sus modos grabación de imágenes estáticas y películas, gracias a su diseño, robusto y resistente a la intemperie. La cámara de rastreo X-8 ofrece un tamaño compacto y portátil, además de una larga duración de las pilas.
Guía de Piezas y Controles Sensor de movimiento de tipo PIR Objetivo de la cámara Matriz de LED infrarrojos Orificio para candado Indicador de PIR (sólo en modo de configuración) Zócalo para montaje en trípode Vista frontal (conector de entrada de alimentación CC situado bajo la almohadilla de goma) 55
Guía de Piezas y Controles Botón Aceptar (Ok) Panel de control Ranura para (con el frontal retirado) tarjetas SD Pantalla LCD Botón Arriba (Up) Interruptor de sensibilidad de infrarrojos (PIR) Puerto USB Salida de TV Interruptor principal Botón Configuración (Setup) Compartimiento de las pilas Botón Abajo (Down) Interruptor de velocidad del obturador Panel lateral izquierdo (con el frontal abierto) Puerto USB 56 Salida de TV (TV Out)
INSTALACIÓN DE LAS PILAS Y LA TARJETA SD La cámara digital de rastreo Bushnell X-8 está diseñada para funcionar alimentada por 4 u 8 pilas de tipo AA. Recomendamos utilizar un juego completo de 8 pilas de litio (las más duraderas) o alcalinas. NOTA: Desconecte siempre el interruptor (posición Off) al colocar o quitar las baterías. Compruebe que las pilas se han colocado correctamente, tal como se indica en el interior del compartimiento de las mismas.
INFORMACIÓN SOBRE EL MENÚ DE CONFIGURACIÓN Ponga el interruptor principal en la posición de On (encendido). Verá que en la pantalla se muestra el mensaje de espera “WAIT” y a continuación, la pantalla del menú de configuración (véase a continuación). Antes de empezar a usar la cámara, debe fijar la fecha y hora, para que se impriman correctamente en las fotos. Tal vez quiera ajustar también a sus preferencias el tiempo de retardo del disparo y la resolución de la imagen.
MENÚ DE CONFIGURACIÓN Elementos, configuración y descripciones La siguiente tabla enumera todos los elementos del menú, detalla sus opciones de configuración y describe las funciones. Elemento del menú Configuración (negrita = predeterminada) Descripción y funcionamiento T- Lapse (Time Lapse mode settings) Tiempo de retardo del disparo (T-Delay), horario de activación de la cámara (Duty), horas de inicio y finalización Si pulsa Aceptar (Ok) parpadeará el Retardo del disparo (T-Delay).
MENÚ DE CONFIGURACIÓN Elementos, configuración y descripciones 60 Elemento del menú Configuración (negrita = predeterminada) Descripción y funcionamiento Fecha (Date) Año, mes y día Pulse el botón Aceptar (Ok) y use los botones Arriba y Abajo (Up/Down) para cambiar la configuración. A continuación, pulse Aceptar (Ok) de nuevo para pasar al siguiente parámetro de la fecha y repita la operación para fijar el año, mes y día actuales.
MENÚ DE CONFIGURACIÓN Elementos, configuración y descripciones Elemento del menú Configuración (negrita = predeterminada) Descripción y funcionamiento Modo (Mode) 2M, 4M, 6M (con el modo configurado en 1P o 3P para fotos), 5-60 segundos (en el modo de grabación de vídeo o película) Seleccione Modo (Mode) y pulse Aceptar (Ok). Use los botones Arriba y Abajo (Up/ Down) para seleccionar 1P (una sola foto), 3P (ráfaga de 3 fotos) o Película (Movie, el modo de captura de vídeo). Pulse Aceptar (Ok).
Funcionamiento con lapso de tiempo (T-Lapse) El lapso de tiempo (T-Lapse) es una función especial de la cámara de rastreo Bushnell X-8, que le permite vigilar áreas con cultivos dispuestas para atraer a la fauna o los bordes de campos capturando fotos o vídeos durante un lapso de tiempo.
cuenta que para los vídeos, esto es independiente de la duración de cada grabación de vídeo. Se trata de la frecuencia de grabación de los vídeos, no de la duración de cada uno de ellos. Nota: Cuando no esté usando la función de lapso de tiempo, asegúrese de que el retardo del disparo (T-Delay) esté apagado (Off), como es su configuración predeterminada, para que la cámara emplee el modo de funcionamiento normal. 4.
las 4 y las 6:30 de la tarde. Recuerde que esto es independiente de los disparos normales generados por actividad animal. Incluso si ningún animal entrase en la zona de cobertura del sensor de infrarrojos, se capturaría una imagen o vídeo cada 15 minutos durante el lapso de tiempo de 2,5 horas. Si un animal activa la cámara dentro de esos intervalos de 15 minutos, quedará grabado. Igual que si hubiese configurado la cámara con el lapso de tiempo desactivado (Retardo de disparo o T-Delay apagado, OFF).
Para montar la cámara en su sitio, inserte la correa a través de las ranuras para correa de la carcasa trasera. Enrolle la correa alrededor de la superficie de montaje. Apriete la correa y apriete la hebilla para sujetar la cámara. Compruebe que ambos cierres de la portezuela están bien cerrados para garantizar una adecuada resistencia a la intemperie. 2. Encendido de la cámara Ponga el interruptor principal en posición de encendido (On).
Zona de visualización de la cámara Zona de detección del sensor PIR 4. Comprobación del área de cobertura Una de las características más útiles de al cámara de rastreo X-8 es la posibilidad del comprobar el área de cobertura. • Después de montar la cámara, abra la carcasa delantera y ponga el interruptor “Power” en la posición “On”. Pulse el botón Configuración (Setup) si es necesario para acceder al menú de configuración.
OBSERVACIÓN DE LAS FOTOS Y LOS VÍDEOS Dispone de tres métodos para revisar las fotos y los vídeos que capture la cámara X-8: Utilización de un lector de tarjetas SD 1. Presione ligeramente la tarjeta SD para liberarla y después tire de ella con suavidad. 2.
de vídeo es el de revisión/reproducción, que muestra el archivo más reciente almacenado en la tarjeta SD. • Pulse el botón Arriba (Up) para ver la foto o el vídeo anterior, o la tecla Abajo (Down) para ver los siguientes. Los archivos de vídeo se reproducen automáticamente en toda su extensión (de 5 a 15 segundos). Al acabar el vídeo, pulse el botón Arriba (Up) o Abajo (Down) para seleccionar otra foto o vídeo.
GLOSARIO PIR (Sensor de infrarrojos pasivo): Detecta el movimiento, igual que un detector de movimiento de seguridad normal. Precisa energía infrarroja (calor) además de movimiento para disparar el sensor, así ayuda a ceñir la detección a los animales vivos (evitando hojas, etc.) Tiempo de retardo (intervalo de disparo): Tiempo transcurrido entre fotos mientras se detectan y registran sucesos. Debe ajustarse en función de la actividad de la fauna de la zona.
Especificaciones técnicas Número de modelo 119327 Tipo de sensor de imagen CMOS de 1/2" Resolución efectiva 2,0 megapíxeles Distancia focal efectiva 7,6 mm Diafragma del objetivo f/3.
Identificación de Problemas/Preguntas Frecuentes Las baterías duran menos de lo previsto 1. La duración de las baterías puede variar con la temperatura de funcionamiento y el número de imágenes tomadas con el tiempo. Habitualmente la Trail Cam podrá captar varios miles de imágenes antes que las baterías se agoten. 2. Compruebe que ha utilizado baterías alcalinas o de litio nuevas.
Identificación de Problemas/Preguntas Frecuentes el formateo borrará todos los archivos existentes). En algunos casos, otros dispositivos pueden cambiar el formateo de la tarjeta SD de forma que no funcionará correctamente con la Trail Cam. La cámara no se enciende 1. Compruebe que ha colocado las cuatro baterías en el compartimiento de las baterías. Bushnell recomienda utilizar ocho baterías AA de litio Energizer® en esta Trail Cam. 2.
Identificación de Problemas/Preguntas Frecuentes 4. Los vídeos o fotos diurnos son demasiado brillantes Compruebe que no se ha orientado la cámara hacia el sol ni otras fuentes de luz durante el día. 5. Fotos con el sujeto rayado a. En algunos casos, en condiciones de baja iluminación u objetos en movimiento rápido, es posible que la resolución de 6M (megapíxeles) no funcione igual de bien que una resolución de 2M o 4M. b.
Identificación de Problemas/Preguntas Frecuentes El LED del sensor PIR dispara/no dispara el flash 1. Si la cámara está en modo “Configuración”, el LED indicador de PIR de la parte delantera de la cámara destellará cuando detecte movimiento. Esto solo tiene objeto en la configuración y ayuda al usuario a orientar la cámara. 2. Durante el uso, el LED no destella cuando la cámara toma una imagen.
GARANTÍA LIMITADA DE DOS AÑOS Su producto Bushnell® tiene una garantía que le cubre los defectos de los materiales y de mano de obra durante dos años a partir de la fecha de la compra. En caso de un defecto bajo la garantía, nosotros, a nuestra elección, repararemos o reemplazaremos el producto, dando por sentado que usted devuelve el franqueo de producto a pagar por adelantado.
Eliminación de equipos eléctricos y electrónicos (Aplicable en la UE y otros países europeos con sistemas de recogida separada) Este equipo contiene elementos eléctricos o electrónicos y por tanto no debe eliminarse con los residuos domésticos normales. En cambio, debe eliminarse en los correspondientes puntos de recogida para reciclaje previstos por las comunidades. Para usted resultará gratuito.
Deutsch Seitenindex WICHTIGER HINWEIS 78 Einleitung 79 Anleitung für Teile und Bedienelemente 80-81 Einlegen der Batterie und SD-Karte 82 Info Über das Setup-Menü 83 Verwenden des Setup-Menüs 83 SETUP-MENÜ 84-87 Time Lapse Operation 88 KAMERABETRIEB 90 Montage der Kamera 90 Einschalten der Kamera 91 Einstellen der PIR- und Belichtungsschalter 91 Testen des Abdeckungsbereichs 92 Kamera sichern 92 (Optional) Verwenden einer externen Stromversorgung 92 ANZEIGEN DER F
WICHTIGER HINWEIS Wir gratulieren Ihnen zum Kauf einer der besten Wildkameras auf dem Markt! Bushnell ist auf die Entwicklung dieses Produktes sehr stolz, und wir sind sicher, dass auch Sie mit Ihrer Wahl zufrieden sein werden. Wir freuen uns über Ihren Kauf und danken Ihnen für das in uns gesetzte Vertrauen. Bitte befolgen Sie die nachfolgenden Hinweise und Anweisungen in dieser Bedienungsanleitung, damit Sie mit diesem Produkt voll und ganz zufrieden sind.
EINLEITUNG Herzlichen Glückwunsch zum Kauf einer digitalen Wildkamera X-8 von Bushnell. Diese Kamera ist mit Ihren Standbild- und Videomodi und dank wetterfester, stabiler Konstruktion für die Aufnahme von Tieraktivitäten im Freien konzipiert. Das Wildkamera-Modell X-8 bietet eine kompakte Größe für unterwegs und eine extra lange Batterie-Lebensdauer.
Anleitung für Teile und Bedienelemente PIR-Bewegungssensor Öffnung für Vorhangschloss Kameraobjektiv PIRAnzeige (Nur im SetupModus) InfrarotLEDGruppe Stativbuchse Vorderansicht (Stromanschlussbuchse „DC In“ unter Gummiabdeckung) DC Stromanschluss 80
Anleitung für Teile und Bedienelemente OkTaste SDKartenschlitz UpTaste (Nach oben) USBAnschluss TVAusgang SetupTaste (Einrichtung) DownTaste (Nach unten) Bedienfeld (Vorderseite geöffnet) LCDBildschirm PIR-Empfindlichkeitsschalter Einschaltknopf Batteriefach Belichtungszeitschalter Linke Seitenblende (Vorderseite offen) USB-Anschluss TV-Ausgang 81
EINLEGEN DER BATTERIE UND SD-KARTE Die digitale Wildkamera X-8 von Bushnell ist für den Betrieb mit 4 oder 8 AA-Batterien konzipiert. Es wird empfohlen, einen vollständigen Satz aus 8 Lithiumbatterien (für maximale Nutzungsdauer) oder Alkalibatterien zu verwenden. Hinweis: Stellen Sie den Ein-/Ausschalter stets auf die „Off“-Position (AUS), wenn Sie die Batterien einlegen oder herausnehmen. Achten Sie darauf, dass die Batterien korrekt eingelegt werden, wie im Batteriefach angezeigt.
INFO ÜBER DAS SETUP-MENÜ Schieben Sie den Einschaltknopf in die Position„On“ (Ein). Auf dem Display wird zunächst die Meldung „WAIT“ (Warten) und dann der Setup-Menübildschirm (siehe unten) angezeigt. Bevor Sie die Kamera in Betrieb nehmen, sollten Sie auf jeden Fall Datum/Uhrzeit einstellen, sodass die Angaben auf Ihren Fotos richtig sind. Sie können auch die Auslöseverzögerungszeit und die Bildauflösung nach Bedarf ändern.
SETUP-MENÜ: Elemente/Einstellungen/Beschreibung In der folgenden Tabelle werden alle Menüelemente, die jeweils verfügbaren Einstellungen und eine Beschreibung ihrer Funktionen aufgeführt. Menüelement Einstellungen (fett markiert=Standardeinstellung) Beschreibung/Operation T- Lapse (ZeitraffermodusEinstellungen) T-Delay time, (Verzögerungszeit), Duty (Betrieb, Startund Stoppzeit) Drücken Sie Ok – Auf dem Display blinkt „T-Delay“ (Verzögerung).
SETUP-MENÜ: Elemente/Einstellungen/Beschreibung Menüelement Einstellungen (fett markiert=Standardeinstellung) Beschreibung/Operation Datum Jahr, Monat und Tag Drücken Sie Ok und verwenden Sie zum Ändern der Einstellung die Up/ Down-Tasten (Nach oben/Nach unten). Drücken Sie dann erneut Ok, um zum nächsten Datumsparameter zu wechseln, und wiederholen Sie den Vorgang zum Festlegen des aktuellen Jahres, Monats und Tages.
SETUP-MENÜ: Elemente/Einstellungen/Beschreibung Menüelement Einstellungen (fett markiert=Standardeinstellung) Beschreibung/Operation Delay (Verzögerung) Minuten (0-10) oder Sekunden(0-59) Standardverzögerungszeit=10 Sekunden Bestimmt die Länge der Wartezeit der Kamera, bis sie auf weitere Auslöser des PIR-Sensors reagiert, nachdem das Tier erstmalig von der Kamera entdeckt wurde und in Reichweite des Sensors bleibt.
SETUP-MENÜ: Elemente/Einstellungen/Beschreibung Menüelement Einstellungen (fett markiert=Standardeinstellung) Beschreibung/Operation Modus 2M, 4M, 6M (für Fotos ist die Einstellung unter „Mode“ (Modus) auf 1P oder 3P festgelegt), 5-60 Sekunden (im Modus „Movie“ (Videomodus} Wählen Sie „Mode“ (Modus) aus und drücken Sie Ok. Wählen Sie mithilfe der Up/Down-Tasten (Nach oben/Nach unten) die Einstellung „1P“ (einzelnes Foto), „3P“ (Serie von 3 Fotos) oder „Movie“ (Videomodus) aus. Drücken Sie Ok.
Zeitrafferbetrieb („T-Lapse“) „T-Lapse“ (Zeitraffer) ist eine Sonderfunktion der Wildkamera X-8 von Bushnell, mit deren Hilfe Sie Ihre Futterstellen oder Feldränder anhand von Zeitrafferfotos oder -videos überwachen können. Wenn diese Funktion aktiviert ist, nimmt die X-8-Kamera während eines Zeitblocks, den Sie für jeden Tag einrichten, automatisch in den von Ihnen gewählten Intervallen ein Foto auf, ohne dass hierzu das Auslösen durch ein aktives Tier erforderlich ist.
verwenden, stellen Sie sicher, dass die Zeitverzögerung auf „OFF“ (Aus, Standardeinstellung) festgelegt ist, um den normalen Betrieb zu gewährleisten. 4. Legen Sie nun mit Hilfe der Up/Down-Tasten (Nach oben/Nach unten) die Startzeit unter „Duty“ (Betrieb) fest. Anhand dieser Startzeit wird bestimmt, wann die tägliche Aufnahme im Zeitraffermodus beginnt. Die Stundeneinstellung basiert auf einer 24-Stunden-Uhr, wobei 00 Uhr für Mitternacht, 12 Uhr für Mittag, 23 Uhr für 11 Uhr abends steht usw.
Diese Einstellungen würden dazu führen, dass die Kamera beginnend um 16 Uhr ein Foto (oder ein Video, je nach Art der Einstellung) aufnimmt. Das nächste wird um 16:15 Uhr, 16:30 Uhr usw. (das heißt, alle 15 Minuten) aufgenommen, bis die Zeitrafferaufnahme um 18:30 Uhr endet. Am darauffolgenden Tag würde die Kamera wiederum alle 15 Minuten zwischen 16:00 Uhr und 18:30 Uhr ein Bild oder ein Video aufnehmen.
Zum Befestigen der Kamera ziehen Sie die Riemen durch die dafür vorgesehenen Schlitze hinten am Gehäuse. Wickeln Sie den Riemen um die Befestigungsfläche herum. Sichern Sie den Riemen und schließen Sie die Schnalle, um die Kamera zu sichern. Stellen Sie sicher, dass beide Türverriegelungen sicher verschlossen sind, um eine entsprechende Wetterbeständigkeit zu gewährleisten. 2. Einschalten der Kamera Schieben Sie den Einschaltknopf in die Stellung „On“ (Ein).
Sichtbereich der Kamera Erkennungsbereich des PIR-Sensors 4. Testen des Abdeckungsbereichs Eine der nützlichsten Funktion der X-8 Kamera ist die Möglichkeit, den Abdeckungsbereich zu prüfen. • Öffnen Sie nach dem Montieren der Kamera das vordere Gehäuse und schieben den Einschaltknopf auf die „On“-Position. Drücken Sie bei Bedarf die Setup-Taste, um das Setup-Menü aufzurufen. • Die PIR-Anzeigenleuchte unter der Linse wird blinken, wenn Sie den im Erfassungsbereich der Kamera den Bewegungssensor auslösen.
ANZEIGEN DER FOTOS UND VIDEOS Für das Anzeigen der mit Ihrer X-8-Kamera aufgenommenen Fotos und/oder Videos gibt es drei Methoden: Verwendung eines SD-Kartenlesegeräts 1. Drücken Sie die SD-Karte leicht ein und ziehen diese vorsichtig heraus. 2. Stecken Sie die SD-Karte in ein SD-Kartenlesegerät (wahlweise ein spezielles SD-Kartenlesegerät oder ein „Multi-Kartenlesegerät, das über mehrere Schlitze für verschiedene Speicherkarten verfügt, darunter auch für SD-Karten). 3.
ANZEIGEN DER FOTOS UND VIDEOS Anzeigen von Bildern auf einem externen Videobildschirm Ein TV-Bildschirm kann ebenfalls zum Anzeigen von Fotos (oder Videos) verwendet werden, die mit der Kamera aufgenommen wurden. Schließen Sie einen TV-Bildschirm oder ein anderes Videogerät mit CompositeStandardvideoeingang (Cinch-Buchse) an den Mini-Anschluss „TV Out“ (TVAusgang) der X-8-Kamera an. Verwenden Sie dazu das mitgelieferte Kabel.
GLOSSAR PIR (Passiver Infrarot-Sensor): Erkennt Bewegung wie ein üblicher Sicherheitsbewegungsmelder. Benötigt neben der Bewegung Infrarot-Energie (Wärme) zum Auslösen des Sensors, damit die Erkennung auf lebende Tiere beschränkt bleibt (anstatt Blätter etc.). Verzögerungszeit (Auslösungsintervall): Verstrichene Zeit zwischen Fotos, während Ereignisse erkannt und aufgezeichnet werden. Sie sollten dies entsprechend der Wildaktivität in der Gegend einstellen.
Technische Spezifikationen Modellnummer 119327 Bildsensortyp 1/2 Zoll CMOS Effektive Auflösung 2,0 Megapixel Effektive Brennweite 7.6 mm Blende IR-Filter Anzeige f/3.0 Automatischer IR-Filter LCD (Menübildschirm) PIR-Sensor Ja Auslösergeschwindigkeit Anzahl der IR-LEDs 1,0 Sekunden oder weniger 36 LEDs Max.
Fehlerbehebung / häufig gestellte Fragen Die Batterielaufzeit ist kürzer als angenommen 1. Die Laufzeit der Batterie hängt mit der Betriebstemperatur und Anzahl der insgesamt gemachten Aufnahmen zusammen. In der Regel genügt die Batterieleistung der Wildkamera für mehrere tausend Aufnahmen. 2. Vergewissern Sie sich, ob Sie neue Alkali- oder Lithiumbatterien eingelegt haben.
Fehlerbehebung / häufig gestellte Fragen „Format“ im SETUP-Modus bevor Sie sie in Ihre Wildkamera einlegen (vergewissern Sie sich, dass Sie davor wichtige Dateien gespeichert haben, da eine Formatierung alle Dateien unwiederbringlich löscht). Es kann vorkommen, dass andere Geräte die Formatierung der SD-Karte verändert haben und sie daher in der Wildkamera nicht ordnungsgemäß funktioniert. Kamera lässt sich nicht einschalten 1.
Fehlerbehebung / häufig gestellte Fragen 2. Tagsüber aufgenommene Fotos oder Videos erscheinen zu dunkel Stellen Sie sicher, dass die Kamera tagsüber nicht direkt auf die Sonne oder andere Lichtquellen gerichtet ist, da die AutoBelichtung dadurch dunklere Ergebnisse liefert. 3. Nachts aufgenommene Fotos oder Videos erscheinen zu hell Das beste Ergebnis erzielen Sie, wenn sich das Objekt im idealen Abstand zum Blitz befindet, also nicht näher als 3m. Objekte erscheinen zu hell, je näher sie sind. 4.
Fehlerbehebung / häufig gestellte Fragen Auf den Fotos ist nicht das gewünschte Objekt zu sehen 1. Platzieren Sie die Kamera möglichst nicht in der Nähe einer Wärmequelle im Sichtfeld. 2. Wenn die Kamera in der Nähe zum Wasser aufgestellt wird, kann es hin und wieder vorkommen, dass auch Aufnahmen ohne Objekt gemacht werden. Die Kamera sollte daher immer auf festen Untergrund ausgerichtet sein. 3. Die Kamera sollte nach Möglichkeit nicht an kleinen Bäumen befestigt werden, die im Wind nachgeben. 4.
BESCHRÄNKTE ZWEI-JAHRES GARANTIE Wir garantieren für zwei Jahre ab Erwerbsdatum, dass Ihr Bushnell® -Produkt frei von Materialund Verarbeitungsfehlern ist. Bei allen Schäden unter dieser Garantie behalten wir uns nach eigenem Ermessen vor, das Produkt entweder zu reparieren oder zu ersetzen, vorausgesetzt, dass Sie das Produkt frei Haus an uns senden.
Entsorgung von elektrischen und elektronischen Geräten (Gültig in der EU und anderen europäischen Ländern mit getrennten Sammelsystemen) Dieses Gerät enthält elektrische und/oder elektronische Bauteile und darf deshalb nicht im normalen Haushaltmüll entsorgt werden. Stattdessen sollte es an den entsprechenden Sammelstellen für Recycling der jeweiligen Gemeinden abgegeben werden. Ihnen entstehen hierdurch keine Kosten.
Italiano Indice pagine NOTE IMPORTANTI 104 Introduzione 105 Guida alle componenti e ai tasti di controllo 106-107 Installazione Batteria e Scheda Sd 108 Informazioni Sul Menu Di Setup 109 Utilizzo Del Menu Di Setup 109 MENU DI SETUP 110-112 Funzionamento Time-Lapse 113 Funzionamento Fotocamera 115 Montaggio fotocamera 115 Accensione fotocamera 116 Impostazione degli interruttori PIR e Otturatore 116 Test dell’area di copertura 117 Protezione fotocamera 117 (Opzionale) Impiego
NOTE IMPORTANTI Congratulazioni per aver acquistato una delle migliori fotocamere da esplorazione sul mercato! Bushnell è particolarmente orgogliosa di questa unità dalle dimensioni compatte ed è certa che sarà apprezzata anche dagli utenti. Bushnell apprezza le attività svolte dagli utenti, di cui desidera guadagnare la fiducia. Si prega di fare riferimento alle note sottostanti e alle istruzioni contenute nel presente manuale per garantire l’uso soddisfacente del prodotto.
INTRODUZIONE Congratulazioni per aver acquistato la fotocamera digitale da esplorazione Bushnell X-8. La presente fotocamera è stata progettata per registrare tutte le attività della fauna in ambienti esterni in modalità immagini istantanee e video ed è caratterizzata da una struttura solida e impermeabile. La fotocamera da esplorazione X-8 presenta dimensioni compatte e portatili e garantisce tempi di durata della batteria particolarmente lunghi. Caratteristiche principali: • Sensore digitale 2.
Guida alle componenti e ai tasti di controllo Sensore di movimento PIR Obiettivo della fotocamera Foro per lucchetto Indicatore PIR (solo in modalità Setup) Fascia di LED infrarossi Presa treppiede Vista frontale (Jack di alimentazione CA sotto il pad in gomma) DC Input Jack 106
Guida alle componenti e ai tasti di controllo Tasto Ok SD Card Slot Pannello di controllo (parte frontale aperta) Display LCD Tasto Su Interruttore sensibilità PIR Porta USB Uscita TV Interruttore Tasto Setup Vano batterie Tasto Giù Interruttore velocità otturatore Pannello laterale sinistro (Parte anteriore aperta) Porta USB Uscita TV 107
INSTALLAZIONE BATTERIA e SCHEDA SD La fotocamera digitale da esplorazione X-8 Bushnell è progettata per funzionare con l’impiego di 4 o 8 batterie AA. Si raccomanda l’impiego di un set completo di 8 batterie alcaline o al litio (per garantire una maggiore durata). NOTA: Impostare sempre l’interruttore su OFF prima dell’installazione o rimozione delle batterie. Verificare che le batterie vengano inserite correttamente, secondo quanto indicato all’interno del vano batterie.
INFORMAZIONI SUL MENU DI SETUP Fare scivolare l’interruttore di accensione in posizione On. Sul display compare la dicitura “WAIT”, quindi la schermata Setup Menu (cfr. sotto). Prima di avviare l’utilizzo della fotocamera, è sicuramente auspicabile impostare la data e l’orario in modo che tali informazioni vengano impresse correttamente sulle fotografie; è altresì possibile modificare il tempo di ritardo di azionamento e la risoluzione delle immagini secondo quanto desiderato.
MENU DI SETUP: Voci/Impostazioni/Descrizione La tabella seguente contiene l’elenco delle voci di menu, le impostazioni disponibili, la descrizione delle rispettive funzioni. 110 Voce di menu Impostazioni (Grassetto = impostazione predefinita) Descrizione/Funzionamento T- Lapse (Impostazioni modalità Time Lapse) Tempo T-Delay, Duty (tempo di avvio e di arresto) Premere Ok- “T-Delay” inizia a lampeggiare. Impostare il tempo di T-Delay da 1 a 60 minuti, utilizzando i tasti Su/ Giù.
MENU DI SETUP: Voci/Impostazioni/Descrizione Voce di menu Impostazioni (Grassetto = impostazione predefinita) Descrizione/Funzionamento Data Anno, mese, giorno Premere Ok e utilizzare i tasti Su/Giù (per modificare le impostazioni), quindi premere nuovamente Ok per passare al parametro successivo della data, quindi ripetere per impostare l’anno in corso, il mese e il giorno. Premere Ok dopo aver impostato il giorno per procedere e impostare l’orario (voce successiva).
MENU DI SETUP: Voci/Impostazioni/Descrizione 112 Voce di menu Impostazioni (Grassetto = impostazione predefinita) Descrizione/Funzionamento Modalità 2M, 4M, 6M (con la modalità impostata su 1P o 3P per le foto), 5-60 Sec (in modalità Movie (video} Selezionare “Mode” e premere Ok. Utilizzare Su/Giù per selezionare 1P (foto singola), 3P (scatto di 3 foto), Movie (modalità video). Premere Ok.
Funzionamento Time-Lapse (“T-Lapse”) “T-Lapse” è una funzione speciale della fotocamera da esplorazione X-8 di Bushnell, che consente il monitoraggio delle coltivazioni per la fauna selvatica o dei confini di un campo mediante foto o video secondo un determinato Time lapse.
4. In seguito, impostare l’ora di inizio della funzione Duty, utilizzando i tasti Su/Giù. L’ora di inizio Duty determina il momento in cui la registrazione in modalità time lapse ha inizio ogni giorno. Le impostazioni dell’orario avvengono secondo il sistema suddiviso in 24 ore, pertanto “00” = mezzanotte, “12” = mezzogiorno, “23” = 11 di sera, ecc… Premere Ok, quindi impostare il minuto di avvio della funzione Duty. Una volta impostato il minuto, premere Ok per salvare l’orario di inizio. 5.
di copertura del sensore IR, l’immagine o il video verrebbero comunque realizzati ogni 15 minuti durante un intervallo di tempo pari a due ore e mezza. Laddove l’animale provochi l’azionamento della fotocamera tra gli intervalli di 15 minuti, la registrazione verrà effettuata come se la fotocamera fosse stata impostata con la funzione Time Lapse spenta (T-Delay impostata su “OFF”).
2. Accensione fotocamera Impostare l’interruttore di accensione su On. Premere Setup per uscire dal menu di Setup laddove non sia necessario regolare alcuna impostazione. Il display si oscura e la fotocamera passa in stato “sleep”. When the PIR sensor is triggered, it will start to take photos immediately after the delay time (as set in the menu) has passed. 3.
4. Test dell’area di copertura Una delle funzioni più utili della fotocamera da esplorazione X-8 è la capacità di effettuare la valutazione dell’area di copertura. • Una volta montata la fotocamera, aprire l’alloggiamento frontale e fare scivolare l’interruttore “Power” in posizione “On”. Premere il tasto Setup se necessario per accedere al menu di Setup. • La luce dell’indicatore PIR sotto l’obiettivo inizia a lampeggiare una volta effettuato l’accesso presso l’area di copertura.
3. tipi di memory card, tra cui le schede SD. Attenersi alle istruzioni del fornitore del lettore della scheda per visualizzare o scaricare i file foto e/o video sulla scheda SD. Collegamento fotocamera - computer mediante USB 1. Fare scivolare l’interruttore “Power” in posizione “On”, quindi premere il tasto Setup. 2. Collegare la porta USB della fotocamera (lato sinistro vicino al display con la fotocamera sbloccata e aperta) ad un PC o Mac con cavo USB incluso. 3.
GLOSSARIO PIR (Sensore infrarosso passivo): Rileva il movimento come un normale dispositivo di sicurezza preposto al rilevamento di movimenti. Richiede energia a infrarossi (calore) oltre al movimento per azionare il sensore e limitare il rilevamento di soggetti in movimento (piuttosto che foglie, ecc.). Tempo di ritardo (Intervallo di azionamento): Tempo trascorso tra una foto e l’altra mentre gli eventi vengono rilevati e registrati.
Specifiche tecniche Numero modello 119327 Tipo sensore immagine CMOS 1,20 cm Risoluzione reale 2.0 Megapixel Lunghezza focale reale 7.6 mm Apertura obiettivo Filtro IR Display f/3.0 Filtro IR automatico LCD (schermo menu) Sensore PIR Sì Velocità attivatore Numero di LED IR Distanza massima di illuminazione per visione notturna Conservazione 1.
Risoluzione problemi / FAQ La durata della batteria è inferiore a quanto previsto 1. La durata della batteria varia in funzione della temperatura di funzionamento e dal numero di fotografie scattate in un determinato intervallo temporale. Di norma, la fotocamera da esplorazione è in grado di scattare diverse migliaia di fotografie prima dell’esaurimento delle batterie. 2. Verificare se sono state usate batterie nuove alcaline o al litio.
Risoluzione problemi / FAQ 7. Qualora la scheda SD sia stata utilizzata in un altro dispositivo prima di essere inserita nella fotocamera da esplorazione, è possibile provare a formattare la scheda usando il parametro “Format” in modalità Setup (assicurarsi di aver prima eseguito il backup di eventuali file importanti, in quanto la formattazione cancella tutti i file presenti).
Risoluzione problemi / FAQ completamente prima di accendersi nuovamente. 2. Le foto o i video diurni risultano troppo scuri Verificare che la fotocamera non sia puntata verso il sole o altre sorgenti luminose durante il giorno, poiché ne può conseguire l’autoesposizione e la realizzazione di foto più scure. 3.
Risoluzione problemi / FAQ Le foto non catturano soggetti di particolare interesse 1. Provare a installare la fotocamera in un’area dove non siano presenti fonti di calore entro il raggio di azione della fotocamera. 2. In taluni casi, l’ubicazione della fotocamera nei pressi dell’acqua può causare la realizzazione di immagini prive di soggetto. Provare a puntare la fotocamera verso il suolo. 3.
GARANZIA LIMITATA DI DUE ANNI Questo prodotto Bushnell ® è garantito esente da difetti del materiale e di fabbricazione per due anni a decorrere dalla data di acquisto. In caso di difetto durante il periodo di garanzia, a nostra discrezione ripareremo o sostituiremo il prodotto purché sia restituito franco destinatario. Sono esclusi dalla garanzia eventuali danni causati da abuso, maneggiamento improprio, installazione o manutenzione eseguiti da persone non autorizzate dal servizio di assistenza Bushnell.
Smaltimento di apparecchiature elettriche ed elettroniche (Vigente presso i Paesi UE e altri Paesi europei con sistemi di raccolta differenziata dei rifiuti) Il presente apparecchio componenti elettriche e/o elettroniche e non può pertanto essere smaltito come rifiuto domestico ordinario. Al contrario, dovrebbe essere smaltito presso punti di raccolta destinati al riciclaggio, in base alle istruzioni delle amministrazioni locali. Tale operazione non prevede alcun costo per l’utente.
For further questions or additional information please contact: Bushnell Outdoor Products 9200 Cody, Overland Park, Kansas 66214 (800) 423-3537 • www.bushnell.com ©2012 B.O.P.