ENGLISH 10-19
Quick Start Guide (119936C/119938C/119975C/119977C) For full instruction manual go to: www.bushnell.com To get Started using your Bushnell Trail Camera: 1. Install 6 AA batteries (lithium* or alkaline) and SD card (up to 32GB max.) *lithium batteries are recommended 2. At the location you will place the camera, power it on. 3. Mount the camera using the tree strap. 4. Your camera is now ready to use at its default settings: photo mode, 10 sec interval between photos, 8MP resolutions, “Hi” LED Power. 5.
IMPORTANT NOTE Congratulations on your purchase of one of the best trail cameras on the market! Bushnell is very proud of this camera and we are sure you will be pleased with it as well. We appreciate your business and want to earn your trust. Please refer to the notes below and the instructions in this manual to ensure that you are completely satisfied with this product.
• GPS Geotag Capability - allows the user to input the longitude and latitude of the camera’s position, which will be embedded in each photo file. This enables Google Earth, Picassa and other geotag enabled software to automatically show a map pinpointing each camera’s location when a group of photos are reviewed on a computer. Especially useful for those who setup multiple Core Trail Camera s to monitor large or widely separated areas.
INSTALLING THE BATTERIES AND SD CARD 5
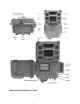
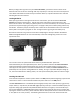
Before you begin learning how to use your Core Trail Camera, you will first need to install a set of batteries and insert an SD card. Although that may only take you a minute, there are some important notes about both batteries and SD cards you should be aware of, so please take the time to read the following directions and cautions: Loading Batteries After opening the latch on the right side of the Core Trail Camera, you will see that the Core Trail Camera has a battery release button.
• • Insert the SD card into the card slot with its label side upwards (see below). A “click” sound indicates that the card is installed successfully. If the wrong side of the card is facing up, you will not be able to insert it without force-there is only one correct way to insert cards.
OFF MODE The OFF mode is the “safe” mode when any actions must be taken, e.g., replacing the SD card or batteries, or transporting the device. You will also use OFF mode if you connect the camera to a computer’s USB port later to download your photos/ videos. And of course, when you are storing or not using the camera, you will switch it to OFF. Please note that even in the OFF mode the Core Trail Camera still consumes power at a very low level.
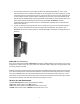
Fig. 3: SETUP Information Screen (119936C/119938C) USING THE SETUP MENU TO CHANGE SETTINGS The main purpose of the SETUP mode is to allow you to change the settings of the camera’s parameters (available parameters vary with use of Presets-see pg. 18 for more details) so your Core Trail Camera operates exactly the way you want it to. You will do this by entering the SETUP Menu and pressing the keys beside the LCD display, which will show you each parameter and its setting.
Fig. 4 Selecting Parameter Settings Press Menu (4A) Press Down (4B) Press OK EXAMPLES-Changing the Settings of Some Common Parameters Following this page, you will find tables listing all of the parameters found in the SETUP Menu, along with their possible settings (or range of settings), and a detailed description of what the parameter controls and what the settings do.
Now press the RIGHT key to move to another parameter in the Menu. Pressing it three times will take you to “Video Size”. Try using the UP and DOWN keys to scroll through the range of settings, then press ENTER to lock in your setting for the resolution of each video clip the camera shoots. Pressing the RIGHT key several more times will get you to the “Default Set” parameter.
Scan time block "A" for the dawn hours from 6 AM to 8 AM, and block "B" to capture images between 5:30 and 7 PM. No Field Scan recording would occur from 8AM to 5:30PM, or from 7PM to 6AM. 6. After setting Start/Stop times to define Field Scan block "A" and/or "B", press OK, then press the UP or DOWN key to select "Interval" and press OK (Step 6).
The SETUP Menu – Parameters and Settings List w/Descriptions Parameter Set Clock Settings (Bold=default) (Set) Mode Camera, Video, Hybrid NV Shutter Low, Fast Motion, Long Range Description Press OK and use the UP/DOWN keys (to change the setting) and LEFT/RIGHT keys (to move to the next field) to set the hour (24-hr format only, “00”=midnight, “12”=noon) and minute, and then (on the lower row), the year, month and date.
Image Size (only affects still photos in Camera) 3MP, 8MP, 24MP/30MP (119975C/119977C Only) Capture Number (only affects still photos in Camera mode) 1 Photo, 2 Photo, 3 Photo, 4 Photo, 5 Photo Video Size (only affects video clips in Video mode) 1920x1080 60FPS (119975C/119977C only) 1920x1080 1280x720 640x360 Video Length (only affects video clips in Video mode) 5S to 60S fixed time range (10S default), or Dynamic variable length Selects resolution for still photos.
of 2 minutes continuous video before a new video is initiated. With Interval set to 2 sec or longer, and LED Control=High, for night videos: same as daytime, but maximum length is 15 seconds before recording ends and a new video is started if a new trigger occurs. With Interval set to 2 sec or longer, and LED Control=Med/Low, for night videos: same as daytime, but maximum length is 60 seconds before recording ends and a new video is started if a new trigger occurs.
Camera Mode 24 Hrs, Day, Night Default Set Cancel, Execute Version None temperature. >70℉(High); 45℉~70℉(Normal); < 45℉(Low), High Sensor will adjust the cameras sensitivity to reach out 70’, Normal Sensor will adjust the cameras sensitivity to reach out 100’, Low Sensor will adjust the cameras sensitivity to reach out 40’ Allows user to limit operation to only day or night period if desired. An ambient light level sensor determines "Day" vs "Night" automatically.
be monitored, with the camera placed at a height of 5-6.5 ft. (1.5~2 m). Also, keep in mind that you will get the best results at night when the subject is within the ideal flash range, no farther than 100ft/30m (119936C/119975C) and no closer than 10ft (3m) from the camera. There are two ways to mount the Core Trail Camera: using the provided adjustable web belt, or the tripod socket. Using the adjustable web belt: Fig. 5 illustrates using the web belt on the Core Trail Camera.
REVIEWING/DELETING THE PHOTOS/VIDEOS After you have setup, mounted and activated your Core Trail Camera, you will of course be eager to return later and review the images it has captured for you. There are several different ways this can be done. Reviewing Images Directly From the SD Card This is the most popular method of viewing images. Since unmounting the camera and taking it to your computer isn’t very convenient, you may find it easier to just take the card out.
The Core Trail Camera supports 3 kinds of file system formats, FAT12, FAT16, and FAT32. The default value is FAT16 to save photos and videos. Here are some related notes: • You don’t need to be concerned about the file system format of the Core Trail Camera unless your equipment has problems reading the SD card. If this happens, please format the SD card with the Core Trail Camera or in your computer first and then insert the card into your Core Trail Camera and try again.
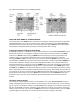
A camera has what is known as a “false trigger” if the PIR sensor thinks that there is motion and heat in front of the camera lens when there is no subject in the image. These “False Triggers” are the result of placing the camera in an environment where there is motion associated with tree branches creating motion in front of the camera or an area where there is high heat in the foreground and any motion from wind could set off the camera.
4. Do not move the switch directly from “On” to “Setup”-always move the switch all the way down to “Off” first, then back up to “Setup”. Still Photo and/or Video Quality Problems 1. Night photos or videos appear too dark a. Check the battery indicator icon to see if battery power is full. The flash will stop operating near the end of the battery life. b. You will get the best results when the subject is within the ideal flash range, no farther than 80ft/24m (119938C/119977C) or 100 ft/30m (119936C/119975C).
Date/Time Stamp not appearing on images Make sure that the “Time Stamp” parameter is set to “On”. Photos Do Not Capture Subject of Interest 1. Check the “Sensor Level” (PIR sensitivity) parameter setting. For warm temperature conditions, set the Sensor Level to “High” and for cold weather use, set the sensor for “Low”. For variable weather, use "Auto". 2. Try to set your camera up in an area where there is not a heat source in the camera’s line of sight. 3.
2. When using Field Scan in video mode, the smallest interval time available is 5 min, to avoid potential overheating of the batteries and electronic components, which could cause operational failure or damage to the camera. In still photo mode, a 1 min. Interval can be set. CAUTION: DO NOT USE the 0.6s Interval setting for Video at night at a feeder or similar environment.
pg. 21 for Dynamic Video length details (trigger based, variable per interval and LED settings). Power Supply 6x AA batteries recommended Stand-by Current < 0.
Specifications and designs are subject to change without any notice or obligation on the part of the manufacturer. FCC COMPLIANCE STATEMENT: FCC STATEMENT Changes not expressly approved by Primos® could void the user’s authority to operate the equipment. Note: This equipment has been tested and found to comply with the limits for a Class B digital device, pursuant to Part 15 of the FCC Rules.
This equipment contains electric and/or electronic parts and must therefore not be disposed of as normal household waste. Instead, it should be disposed at the respective collection points for recycling provided by the communities. For you, this is free of charge. If the equipment contains exchangeable (rechargeable) batteries, these too must be removed before and, if necessary, in turn be disposed of according to the relevant regulations (see also the respective comments in this unit’s instructions).