
Instructions


9
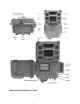
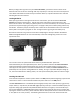
Fig. 3: SETUP Information Screen (119936C/119938C)
USING THE SETUP MENU TO CHANGE SETTINGS
The main purpose of the SETUP mode is to allow you to change the settings of the camera’s parameters
(available parameters vary with use of Presets-see pg. 18 for more details) so your Core Trail Camera
operates exactly the way you want it to. You will do this by entering the SETUP Menu and pressing the
keys beside the LCD display, which will show you each parameter and its setting.
Changing Parameter Settings in SETUP Mode
A wide range of options or “parameters” are provided to allow you to set the Core Trail Camera to your
operational preferences. To change the setting of any parameter you must first switch to the SETUP
mode. Once in SETUP mode, pressing the MENU button will allow you to select any parameter and
change its setting. The name of the parameter and its current setting will be shown on the LCD.
Pressing the RIGHT or LEFT key scrolls to the next or previous parameter (RIGHT key to move on to the
next parameter and LEFT key to go back to the previous parameter), and pressing the UP or DOWN key
lets you select a different setting for the currently displayed parameter. Once you have selected your
preferred new setting for a parameter, press the ENTER button to save the new setting (actually change
it). When you are finished changing the settings of one or more parameters, press MENU again to exit
the SETUP menu. MENU can also be pressed anytime you want to cancel changing a parameter’s setting
after a new setting has been selected (but OK has not been pressed yet). After setting the parameters to
your preferences, be sure to move the switch to ON to begin actually taking photos or videos. No images
will be captured if the switch is left in the SETUP position (unless you press the RIGHT/Shot key after
exiting the menu)-in fact, the camera will power off automatically after a few minutes with no key
pressed.
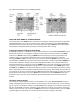
Parameter Settings Display
The settings for each parameter are shown on the display screen of your Core Trail Camera. Only one
setting is displayed at a time, starting with the current setting for the parameter when it is first selected
(pg. 13, Fig. 4a). To change the setting, use the UP/DOWN keys to display the new setting you want (Fig.
4b), then press ENTER to “Execute” (make the actual change to this setting). If you want to confirm this
setting is now the current one, just press the RIGHT key to scroll to the next parameter, then press LEFT
to go back again to the previous one. You should see the parameter setting you just made.