Telescope Instruction Manual 78-9500 60mm RefraCtor Lit.
Never Look Directly At The Sun With Your Telescope Permanent Damage To Your Eyes May Occur 2.
WHERE DO I START? Your Bushnell telescope can bring the wonders of the universe to your eyes. While this manual is intended to assist you in the set-up and basic use of this instrument, it does not cover everything you might like to know about astronomy. Although Northstar will give a respectable tour of the night sky, it is recommended you obtain a very simple star chart and a flashlight with a red bulb or red cellophane over the end.
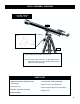
Parts Diagrams 78-9500 60mm Refractor 4. 3. 1. 2. 5. 13. 12. 9. 10. 11. 6. 7. 8. Telescope Parts Diagram 1. Red Dot Wide Field Finderscope 8. Accessory Tray 2. Eyepiece 9. Rack and Pinion Focusing Mechanism 3. Telescope Main Tube 10. Declination Lock Knob 4. 60mm Objective Lens 11. Counterweight Shaft 5. Latitude Lock Knob 12. Counterweight 6. Tripod Leg 13. Fine Adjustment Cables 7. Accessory Tray Braces 4.
QUICK ASSEMBLY DIAGRAM 78-9500 60mm RefRactor Step 2 Step 1 1. Spread tripod legs and attach accessory tray. 2. Attach telescope tube, finderscope, counterweight and fine adjustment cables to pre-assembled Equatorial Mount with pre-attached tripod legs. PARTS LIST • Adjustable Aluminum Tripod Assembly (Three Legs) • Accessory Tray • Refractor Telescope Assembly • Red Dot Wide Field Finderscope • 20mm, 12mm, 4mm Eyepieces • Erect Image Eyepiece (For Land Use) • Barlow Lens • Equatorial Mount 5.
DETAILED ASSEMBLY Remove all components from the carton and identify all components. READ THROUGH ASSEMBLY INSTRUCTION BEFORE YOU ASSEMBLE YOUR TELESCOPE. Attach Accessory Tray and Telescope 1. Fold down the accessory tray braces and place the Accessory Tray on top of braces. Attach Accessory Tray with included three small accessory tray bolts and nuts. 2. Locate the pre-assembled Tripod and Equatorial Mount. Remove attachment bolts at top of Equatorial Mount.
HOW TO USE YOUR NEW TELESCOPE Selecting an Eyepiece 1. You should always start viewing with the lowest power eyepiece, which in this case is the 20 mm lens. Note: the base power of each eyepiece is determined by the focal length of the telescope objective lens. A formula can be used to determine the power of each eyepiece: telescope OBJECTIVE lens focal length divided by EYEPIECE focal length = MAGNIFICATION (e.g.
HOW TO USE YOUR NEW TELESCOPE (CONTINUED) Understanding the Equatorial Mount The Equatorial Mount is designed to move in any direction. It can be set to allow manual controls to track the movements of celestial bodies across the sky. This is referred to as diurnal movement: movement of celestial bodies in the direction opposite to that of the earth’s rotation and around the earth’s axis.
M ENJOYING YOUR NEW TELESCOPE 1. First determine your targeted object. Any bright object in the night sky is a good starting point. One of the favorite starting points in astronomy is the moon. This is an object sure to please any budding astronomer or experienced veteran. When you have developed proficiency at this level, other objects become good targets. Saturn, Mars, Jupiter, and Venus are good second steps to take. 2.
M HELPFUL HINTS 1. Your telescope is a very sensitive instrument. For best results and fewer vibrations set your telescope up on a level location on the ground rather than your concrete driveway or your wooden deck. This will provide a more stable foundation for viewing, especially if you’ve drawn a crowd with your new telescope. 2. If possible view from a location that has relatively few lights. This will allow you to see much fainter objects.
M NOTES 11.