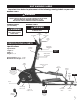
950 Elliptical Trainer OWNER’S MANUAL F OR M AXIMUM E FFECTIVENESS AND S AFETY, P LEASE R EAD T HIS O WNER ’ S M ANUAL B EFORE U SING Y OUR N EW B ALANCE 950 E LLIPTICAL T RAINER
TABLE OF CONTENTS Important Safety Instructions ...........................................................2 Unit Warning Labels ..........................................................................3 Specifications & Parts .......................................................................3 Introduction .......................................................................................4 Assembly Instructions.....................................................................
IMPORTANT SAFETY INSTRUCTIONS Read all instructions before using this machine. CAUTION: Exercise of a strenuous nature, as is customarily done on this equipment, should not be undertaken without first consulting a physician. No specific health claims are made or implied as they relate to the equipment. 1) Before starting this or any other exercise program, consult your physician, who can assist you in determining the target heart rate zone appropriate for your age and physical condition.
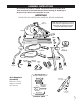
UNIT WARNING LABELS Important: See below for placement of the following warning labels on your unit. WARNING LABEL 1 WARNING FAILURE TO READ AND FOLLOW THE SAFETY INSTRUCTIONS STATED IN THE OWNER’S MANUAL MAY RESULT IN POSSIBLE SERIOUS INJURY OR DEATH. KEEP CHILDREN AWAY. MAXIMUM USER WEIGHT 300 LBS. REPLACE THIS LABEL IF DAMAGED, ILLEGIBLE OR REMOVED. WARNING LABEL 2 (six locations) WARNING LABEL 3 WARNING WARNING PINCH POINT. KEEP HANDS CLEAR OF MOVING PARTS. CRUSH HAZARD.
INTRODUCTION CONGRATULATIONS ON PURCHASING YOUR ELLIPTICAL TRAINER With this product in your home, you have everything you need to start your own workout program to tone and firm the major muscle groups of your lower body. This is vital for all of us, regardless of age, sex, or fitness level, and regardless of whether your primary goal is toning, health maintenance, or more energy for daily activities.
ASSEMBLY INSTRUCTIONS Occasionally our products contain components that are pre-lubricated at the factory. We recommend that you protect flooring, or anything else the parts may contact, with newspaper or cloth. IMPORTANT PLEASE READ ALL INSTRUCTIONS CAREFULLY BEFORE ASSEMBLING. NOTE: All location references, such as front, rear, left or right, made in these instructions are from the user being on the unit and facing forward.
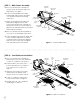
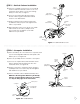
STEP 1 – Main Frame Assembly right front foot tube a) Remove (4) Allen Bolts, (4) Washers, (2) Nylon Nuts and (2) Nut Caps from Main Frame, see Figure 1. M8 x 15mm allen bolt M8 washer b) Position Left and Right Roller Tubes behind Main Frame with Roller Tracks on top and rear Allen Bolts facing each other.
STEP 3 – Vertical Column Installation vertical column a) Remove (1) Phillips Screw from front of Vertical Column. Slide the Vertical Column Cover onto Vertical Column with the screw hole facing away from the unit, see Figure 3. M4 x 16mm phillips screw b) Connect Computer Wire and Computer Extension Wire together and slide Vertical Column onto Main Frame. vertical column cover c) Attach Vertical Column with (3) Allen Bolts, (3) Washers and (3) Nylon Nuts. Tighten Bolts with tools provided.
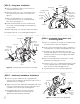
STEP 5 – Swing Arm Installation left swing arm a) Remove (2) Washers and (1) Nylon Nut from Left Vertical Column Arm. vertical column M10 large washer b) Slide Left Swing Arm onto Left Vertical Column Arm with Pulse Sensor Wire to the inside, see Figure 5. c) Slide (1) Large Washer onto Left Vertical Column Arm and screw on (1) Bushing Cap with open end facing out.
STEP 8 – Water Bottle and Holder Installation a) Remove (2) Phillips Screws from Vertical Column, see Figure 8. water bottle b) Align Water Bottle Holder on Vertical Column and re-install (2) Phillips Screws and tighten.
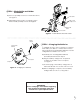
GETTING STARTED Once your elliptical trainer is assembled, make sure that your workout space has a solid, level surface with plenty of space around it. We recommend placing a mat under your unit to protect your flooring. Before you begin your first workout on the elliptical trainer, practice getting on and off your trainer a few times until you are comfortable with this movement. Getting On Move the left foot platform to its lowest position. 1) Face forward and put your hands on the stationary handlebar.
CHANGING FOOT POSITIONS The generously sized foot platforms provide workout stability and allows you to vary your foot position for maximum comfort. Position your feet on the platforms so that you do not have to lean forward while performing the exercise. USING THE HANDLEBARS Your elliptical trainer comes with both swing arms and stationary handlebars. Using the Swing Arms Grasp the swing arms. Use a firm grip but try to avoid “white knuckles”.
HEART RATE CHEST STRAP AND RECEIVER receiver Your trainer comes with a Wireless Heart Rate Chest Strap. Wearing the Chest Strap during exercise will allow you to have a Heart Rate reading regardless of hand placement. The receiver that plugs into the Computer (next to the book holder) is the Heart Rate Receiver. It must be plugged into your Computer so it can receive the wireless signal from the Chest Strap.
OPERATING THE COMPUTER WARNING The batteries must be installed as instructed on page 7. Do not carry batteries loosely, such as in a purse or pocket. The batteries may explode or leak and cause injury if installed improperly, misused, disposed of in a fire or recharged. WARNING Do not plug Battery Charger into wall until computer is completely assembled. Introduction This unit is equipped with a programmable Computer to help track your progress and motivate you to reach your fitness goals.
DISTANCE: Total miles or kilometers traveled during the workout are tracked and counted in increments of 0.1, from 0.1 to 99.9. Select miles or kilometers with the switch located on the back of the Computer. Programs 1 - 6 (P1, P2, P3, P4, P5, P6) PROGRAM 1 MANUAL SPEED: Current workout speed is displayed in either miles per hour or kilometers per hour, depending on how the switch on the back of the Computer is set. STRIDES/MIN: Displays the current strides per minute.
Programs 1 - 6 (Continued) 1) Start pedaling. Press and hold the RESET button for approximately (2) seconds to clear all data. 2) Use the ▲ UP and ▼ DOWN buttons to enter your weight. Press ENTER to confirm. 3) Scroll through Programs 1 - 6 (P1-P6) with the ▲ UP and ▼ DOWN buttons until the light reaches the desired workout program. Press ENTER to select program. 4) Set the desired workout Time and Resistance Level with the ▲ UP and ▼ DOWN buttons. Press ENTER to select after each.
Charging The Batteries FITNESS TEST SCORES WOMEN AGE LOW FAIR AVERAGE GOOD HIGH 20-29 30-39 40-49 50-59 60-69 <24 <20 <17 <15 <13 24-30 20-27 17-23 15-20 13-17 31-37 28-33 24-30 21-27 18-23 38-48 34-44 31-41 28-37 24-34 >49 >45 >42 >38 >35 MEN AGE LOW FAIR AVERAGE GOOD HIGH 20-29 30-39 40-49 50-59 60-69 <25 <23 <20 <18 <16 25-33 23-30 20-26 18-24 16-22 34-42 31-38 27-35 25-33 23-30 43-52 39-48 36-44 34-42 31-40 >53 >49 >45 >43 >41 Results Mode After an exercise program has been comp
FREQUENTLY ASKED QUESTIONS Q. Is there any danger to the unit if I charge the Computer for more than 4 hours, or if I leave the charger plugged in indefinitely? A. No, charging the unit beyond 4 hours or leaving the charger in the Computer indefinitely, will not harm the Computer or the batteries. Q. Can I use exercise power to charge empty batteries? A. Yes you can, but it is not recommended.
EXERCISE GUIDELINES IMPORTANT Please review this section before you begin exercising. IMPORTANT: If you are over 35 and have been inactive for several years, you should consult your physician, who may or may not recommend a graded exercise test. If you are just beginning your exercise program, your target heart rate range should be roughly at 60% of your maximum heart rate.
described previously. Each workout should begin with a warm up and end with a cool down. As a general rule, space your workouts throughout the week and avoid consecutive days of hard exercise. a certain degree on your age, and is determined by measuring your heart rate in beats per minute. Refer to the “Measuring Your Heart Rate” section below and on page 20 for more information on how to determine and measure your heart rate.
individual would need to keep their heart rate at or above 126 beats per minute to get a cardiovascular effect. Note: Although 70% was used in this example, the heart rate range needed to achieve results falls between 60% and 85% of your maximum heart rate. If you are just beginning your exercise program, your target heart rate range should be roughly at 60% of your maximum heart rate.
HEART RATE TARGET ZONE FOR CARDIOVASCULAR FITNESS TABLE 1 200 195 190 190 185 180 180 175 170 170 165 Heart 160 Rate (Beats/ 150 Min) 140 165 161 160 157 155 153 148 150 144 145 140 Maximum Attainable Heart Rate 140 136 136 133 131 129 130 127 129 123 129 119 120 115 119 112 108 110 100 20 105 25 30 35 40 45 50 55 60 85% Target Zone 65 70 101 98 75 70% Target 80 Zone AGE (YRS) TABLE 2 Exercise Week &1 & 2 &3 & 4 &5 & 6 &7 & 8 & 9 & 10 &11 & 12 Warm Up Period 5
WARM UP & COOL DOWN STRETCHES Stretches can help improve flexibility and relieve the tightness in muscles that results from repetitive sport movements that require a limited range of motion, like elliptical striding. 10 to 12 minutes of daily stretching is recommended. This can be done when warming up or cooling down. When performing these stretches, your movements should be slow and smooth, with no bouncing or jerking.
4. Back Stretch Stand with your legs shoulder length apart and your knees slightly bent. Bend forward from your waist with your arms extending loosely in front of your body. Gently bend from the waist flexing your body as far forward as it will go. Hold for 20 to 30 seconds. Straighten up and repeat. 5. Standing Hamstrings Stretch Stand with your legs hip-width apart. Extend one leg out in front of you and keep that foot flat against the ground.
CARE & STORAGE OF ELLIPTICAL TRAINER Care For Your Unit Instructions For Moving Your Unit Your elliptical trainer has been carefully designed to require minimum maintenance. However, we recommend the following to keep your unit operating smoothly. Your elliptical trainer is portable. If you need to change the location of your unit, please follow the steps below. • Unplug your unit when it is done charging. • Use your unit indoors only.
WORKOUT PROGRESS CHARTS Use the charts below and on the following pages to keep track of your progress over time. Before writing on them, make as many copies as you think you’ll need. We suggest you keep these in a notebook. You will find it both informative and motivational to look back at what you’ve done, and this data will help you to chart future fitness goals as you progress. Every two weeks, measure yourself to rechart your progress.
EXERCISE DATA CHARTS Update once a week Week (Date) # Of Workouts Total Workout Time Week (Date) # Of Workouts Total Workout Time ___________ ___________ ___________ ___________ ___________ ___________ ___________ ___________ ___________ ___________ ___________ ___________ ___________ ___________ ___________ ___________ ___________ ___________ ___________ ___________ ___________ ___________ ___________ ___________ ___________ ___________ ___________ ___________ ___________
REPLACEMENT KITS LEFT SWING ARM KIT – NB950-K1L RIGHT SWING ARM KIT – NB950-K1R KIT INCLUDES: KIT INCLUDES: PART # DESCRIPTION 3 6 10 19 23 38 52 61 67 80 101 QTY Left Swing Arm Pulse Sensor w/Wire M25 x 30mm Washer Spacer Metal Spacer Bushing M10 Nylon Nut M10 Large Washer M10 x 57mm Allen Bushing Bolt M10 Washer M3 x 16mm Phillips Screw 1 1 1 1 1 2 2 1 1 2 2 PART # DESCRIPTION 4 6 10 19 23 38 52 61 67 80 101 QTY Right Swing Arm Pulse Sensor w/Wire M25 x 30mm Washer Spacer Metal Spacer Bushing M1
REPLACEMENT PARTS 59 15 15 11 37 12 60 97 2 16 60 97 15 37 15 Stationary Handlebar (2) Stationary Handlebar Plug (37) Stationary Handlebar Grip (97) Foot Platform (16) Non Skid (59) M6 x 15mm Phillips Screw (60) Outside Front Foot Tube Cover (11) Inside Front Foot Tube Cover (12) M4 x 12mm Phillips Screw (15) 98 98 45L 45R 5 60 End Cap (17) Right Roller Tube (45R) M6 x 15mm Phillips Screw (60) 17 17 End Cap (17) Left Roller Tube (45L) M6 x 15mm Phillips Screw (60) 28 60 96 Vertical C
New Balance Fitness Equipment Dedication to Quality New Balance Fitness Equipment warrants this product to be free from all defects in material and workmanship when used according to the manufacturer’s instructions. See Limited Warranty Card for details. If you have any comments or questions contact our Customer Service Department, toll free at 1-800-292-5009, Monday through Friday, 9:00am to 5:00pm, EST. Please record the following information and keep for reference.