ONIX 110 GPS NAVIGATOR Quick Start Guide Model 36-1100 Lit# 98-1324/11-08
Warnings and Notices GPS System & Map Data Accuracy Notice: The Global Positioning System (GPS) is operated by the government of the United States, which is solely responsible for its accuracy and maintenance. The system is subject to changes which could affect the accuracy and performance of all GPS equipment. All map data sources contain some level of inaccuracies or incomplete data. Bushnell strives to provide the most recent map information at a reasonable cost.
Package Contents Before you start using your ONIX 110 Handheld GPS Navigator, make sure that your package contains the following items. If anything appears to be missing or damaged, contact your local Bushnell dealer or distributor for a replacement. ONIX 110 Handheld GPS Navigator Documentation (Quick Start Guide) Software CD-Rom inc.
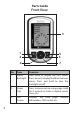
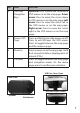
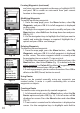
Parts Guide Front View 3 4 1 2 5 6 4 7 No. Item Function 1. Menu/ Backlight Press once to display the OSD menu. Press twice to display the Main Features menu. Press and hold to turn the backlight on/off. 2. Zoom Out Press to zoom out on a map page. Hold for 3 seconds to hide or display roads, rivers, etc. 3. LCD Screen Displays the map page, information, OSD menus etc.
No. Item Function 4. Four-way Navigation Keys Up arrow: Press to move the cursor up in OSD menus or on the map page. Down arrow: Press to move the cursor down in OSD menus or on the map page. Left arrow: Press to move the cursor left in the OSD menus or on the map page. Right arrow: Press to move the cursor right in the OSD menus or on the map page. 5. Power/ ESC/ Page Press and hold to turn the power on/off. Press to exit (ESCape) the OSD menu.
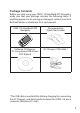
Charging the ONIX 110 Battery Before using your ONIX 110 for the first time, the internal rechargeable battery must be fully charged, via the USB port on the unit. Connect the supplied USB cable to the ONIX 110, then connect the other end of the cable to the AC Charger. Plug the charger into an AC wall outlet, and allow the unit to charge until the battery charge icon on the unit’s display indicates a full charge (this typically takes 4-5 hours).
When navigation is initiated, a route between the Home location and your current location is displayed on the screen. You can refer to the route to help you go back to your Home location. Press the ESC button to return to the map page. Zooming In/Out Press the +/- buttons to zoom in/out and increase/decrease the map scale. Or, select Map Zoom Scale in the Menu, adjust it with left/right navigation keys, then press OK. The ONIX 110 features eight zoom levels.
Fig. 5 Fig. 6 Setting the Home Location To set your Home Location: 1. In Simple mode, press the Menu button to display the menu options. 2. Use the navigation keys to select Set Home and press OK (Fig. 5). 3. You can set your home location in one of the following ways (Fig. 6): • Press the navigation keys to highlight Edit Home and press OK. Use the navigation keys to set the home position manually. • Select Save as Home by pressing the navigation keys.
Searching for an Object (Points Of Interest) You can search for objects including roads, hotels, banks, restaurants, etc. using this feature. Read the following sections to learn how to use the search functions. 1. From the map page, press the Menu button and use the navigation keys to select the Find/Go To option and press OK (Fig. 8), then Select A Region using the navigation keys, and press OK (Fig. 9). 2. Select A Type of object using the navigation keys and press OK (Fig.
Creating Waypoints (continued) and view your new waypoint on the map, or highlight GOTO and press OK to create an auto-route from your current location to the waypoint. Fig. 12 Fig. 13 Fig. 14 10 Fig. 15 Modifying Waypoints To modify an existing waypoint: 1. From the map page, press the Menu button, select My Waypoints, and press OK. A list of all waypoints is displayed on the screen. 2.
input information such as name, comment, etc. 3. Highlight the waypoints field (Fig. 16). Press the Menu button and select from the following options to create a route: • Select Add WP to add existing waypoints to the route (Fig. 17). • Select Insert WP to insert a waypoint starting at the selected location on the route. 4. You can set the priority of the waypoints on the route by selecting the waypoint and pressing OK.
Creating a Trail Log (continued) Fig. 20 Fig. 21 Fig. 22 12 Fig. 23 • Select Off to disable logging of the trail. • Select Fill to save trails with no more than 2500 trail points. • Select Wrap to create trails in a cyclical manner. After a trail log with 2500 track points is saved, new trail points are saved by overwriting the old trail points starting from 0. •Select Continue (Fig. 21) to create a single continuous trail log of all trail points. You can save up to 8 continuous trail logs. 3.
• When saving trail logs, select the Continue option and the trail log setting will automatically be set to Show ON. If you select Wrap or Fill, the trail log setting will automatically be set to Show Off. Viewing Trail Log Information To view trail log information: 1. In Advanced mode, press the Menu button, highlight Trail Logs and press OK to confirm. 2. Under the Info tab (Fig. 37) use the navigation keys to view the distance and the area traveled for the selected trail log. Fig.
Fig. 27 Fig. 28 Fig. 29 14 Fig. 30 Using the Measure Distance Feature The Measure Distance feature enables you to measure the distance from your current position to a specified destination. To enable the measure distance function: 1. On the map page, press the Menu button, select Measure Dist On and press OK. A ruler appears at the cursor point on the map screen (Fig. 27). Use the navigation keys to move to your destination and press OK. 2.
want to change and press OK to view the available options (Fig. 32): • Speed: shows the speed at which you are traveling • Heading: shows the tracking direction • Trip Odom: shows the distance traveled so far • Trip Time: shows the time elapsed • AltGPS: shows the altitude of your current location • Signal: shows the current signal strength of the device • Speed Avg.: shows the average speed • Speed Max: shows the maximum speed •To Dest.: shows the distance to your destination 2.
Transferring Data You can transfer maps, waypoints, routes, trails, and fonts to and from a PC using the Connect to PC feature. System Requirements (for the PC Companion Software) Make sure that the host PC (a Mac version is not available) meets the following system requirements: • CPU: 500 megahertz (MHz), Pentium III processor or higher • Memory: 64 megabyte (MB) RAM or higher • Operating system: Windows ME, 2000, XP, or Vista • Hard disk: Min.
2. Scroll to the Connect to PC option and press OK. 3. Press the Menu key as prompted. 4. Choose the appropriate option from those displayed on the screen as follows: • PC->GPS Map: to transfer map from a PC to the ONIX 110C. See Downloading Map on page 65. • PC->GPS My Trails: to transfer trail logs from a PC to the ONIX 110. See “Downloading Trail Logs” . • PC->GPS Wp&Rt: to transfer waypoints and routes from a PC to the ONIX 110. See “Downloading Waypoints and Routes”.
Features You can use the menu bar to perform various tasks from the main program window. The following sections describe how to use the GPS PC Companion menu items. You can also use the toolbar icons to carry out various functions. Move your mouse over the toolbar icons to view a tool-tip about the icon and learn what each icon represents. File Menu Click File | Open to open map card files (*.ard) or map list files (*.arl, which contains a list of several map card files). Select a map list file (*.
• Show/Hide | SportLog – enables or disables the display of sports logs (*.spt). • Show/Hide | Geocaching – enables or disables the display of geocaching (*.geo). Tools Menu The Tools menu enables you to view the map, move across the map, search for locations, and so on. • Arrow – Cursor becomes an arrow. Move the cursor to a road or point of interest to view information about it. • Move – Cursor becomes a hand and allows you to pan across the map. Press the left mouse button to drag and move the map.
available. Create a route as follows: i. Click New under Route to create a new route. Modify the route name if desired in the Name filed. ii. Select a waypoint from the waypoint list and click Add to add it to the route. Repeat as required. iii. Click Set Navi to create the route and display it on the map. • Geocaching – Click to create or open a geocaching file. You are prompted to specify the file in which you want to save the geocaching file.
to ONIX 110. •PC->GPS | Geocaching – downloads geocache files (*.geo) to the ONIX 110. •GPS->PC | My Trails – uploads trail logs (*.trl) from the ONIX 110 to a host PC. •GPS->PC | Waypoints and Routes – uploads waypoint and route files (*.wpr) from the ONIX 110 to a host PC. •GPS->PC | Sport Log – transfers sports logs from the ONIX 110 to a PC.
amount of exercise within a week. 4. Double-click a log to view the types of exercise done. 5. Click the exercise type to display the lap information. The track diagram is displayed on the upper right screen and the lap detail diagram is displayed on the screen at the lower right corner. Downloading Trail Logs To download trail logs to the ONIX 110, do the following: 1. Click Transfer | PC->GPS | My Trail in the GPS PC Companion program. 2. The Open dialog window opens. Locate the desired trail log file (*.
NOTES
Troubleshooting Problems Possible Solution I pressed the power button but Make sure that you hold the power button the device doesn’t switch off. for two seconds to turn it off. If the unit still doesn’t turn off, remove the battery or the power source for five seconds and install it again. The unit does not respond when I try to move the cursor. The map position may be latched. Check if the symbol is shown in the bottom right corner of the map page.
Specifications Item Description Navigation •Waypoints: Max. 1000 waypoints with name (symbol) coordinate and remarks •Route: 50 reversible and editable routes up to 150 waypoints each •Trail log: 8 tracking logs with 2500 points each Performance Acquisition Time: •Cold Start: within 42 seconds •Warm Start: within 38 seconds •Hot Start: within 1 second in open sky and 15 seconds indoors •Update Rate: every second Accuracy •Position: within 5 to 25m CEP •Velocity: 0.1m/sec.
FCC Compliance Statement The ONIX complies with Part 15 of the FCC interference limits for Class B digital devices FOR HOME OR OFFICE USE. These limits are designed to provide reasonable protection against harmful interference in a residential installation, and are more stringent than “outdoor” requirements.
ONE Year LIMITED WARRANTY Your Bushnell® GPS receiver is warranted to be free of defects in materials and workmanship for one year after the date of purchase. In the event of a defect under this warranty, we will, at our option, repair or replace the product, provided that you return the product with return postage prepaid. This warranty does not cover damages caused by misuse, improper handling, installation, or maintenance provided by someone other than a Bushnell Authorized Service Department.
Customer Service: (800) 423-3537 www.bushnell.