
Installation Manual

TOOLS FOR EASY INSTALLATION
7mm Socket
Phillips Screwdriver
Grease Pencil
Awl (optional)
INCLUDED IN KIT:
1 Pair Front Fender Flares
1 Pair Rear Fender Flares
16 x Black Plastic Tab (Item #1)
12 x “S” Clip (Item #2)
12 x Serrated Flange Screw (Item #3)
4 x Plastic Clip (Item #4)
4 x #14 Truss Head Screw (Item #5)
364” x Edge Trim (Item #6)
Step 1:
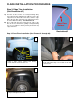
Prior to Installation:
A) Bushwacker only approves installing the flares according to these
written instructions with the hardware provided. WARNING: Failure
to install according to these instructions will invalidate the warranty.
This includes, but is not limited to using alternative installation
methods, hardware, or materials. DO NOT USE: Loctite,
SuperGlue, or similar products on the hardware or the flares.
B)
Fit: Verify the fit of the flares to vehicle. (Some filing, sanding, or
cutting may be necessary to ensure proper fit).
C)
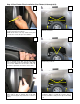
Painting: (Optional) if paint is desired it must be done prior to
installing flares on the vehicle clean outer surface with a good
grade degreaser. DO NOT USE LACQUER THINNER OR
ENAMEL REDUCER AS A DEGREASER. Wipe outer surface
thoroughly with a tack rag prior to paint.
Paint flares using a high quality enamel, or polyurethane automotive
paint. (Application of a primer coat is optional)
If painting edge trim (not recommended), use a flex additive.
D)
Performance: Using larger Tires may increase the area required
to turn the vehicle. Some Tire/Rim combinations may require
lowering bump stops and or installing steering stops to prevent tire
from contacting flare.
E)
Exhaust System: Modifications may be necessary to maintain a
minimum 4” clearance between flares and exhaust pipes.
(Exhaust gases should not vent directly onto flares)
F)
Metal Protection: All exposed fasteners and bare metal should
be treated with red oxide primer BEFORE installing flares. Spray
inner fender wells with undercoating AFTER flare attachments
have been completed.
G)
DECALS: Flares may interfere with existing decals on vehicle. If
you wish, remove decals prior to installation of flares.
GMC Sierra
Std/Long Bed
Set Part # 40926
Rev-2 03-18-10
6710 N. CATLIN AVE. PORTLAND, OR 97203 503-283-4335
1-800-234-8920 (USA AND CANADA) FAX 503-283-3007
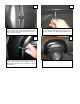
“S” Clip
2.
Serrated
Flan
g
e Scre
w
3.
Edge Trim
6.
Black Plastic
Tab
1.
Plastic Clip
4.
#14 Truss
Head Scre
w
5.